

Step 1: Symbols
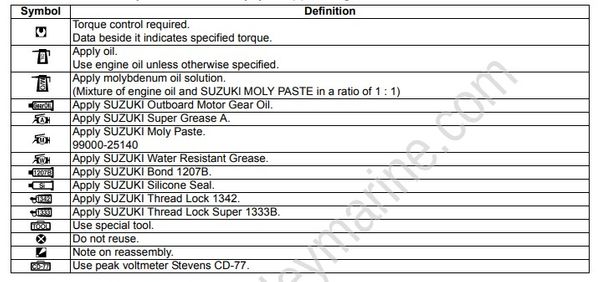
Listed in the table below are the symbols indicating instructions and other important information necessary for proper servicing.
Please note the definition for each symbol. You will find these symbols used throughout this manual.
Refer back to this table if you are not sure of any symbol (s) meanings.
Step 2: Abbreviations
Abbreviations used in this service manual are as follows:
A:
ATDC: After Top Dead Center
AC: Alternating Current
B:
BTDC: Before Top Dead Center
D:
DC: Direct Current
E:
EX (Ex.): Exhaust
F:
FP: Fuel Pump
G:
GND: Ground
I:
IG: Ignition
Ign.: Ignition
IN (In.): Intake
O:
OHV: Over Head Valve
P:
PORT: Port
S:
STBD: Starboard
SIGP: Start-In-Gear Protection
Step 3: Wire Color Symbols
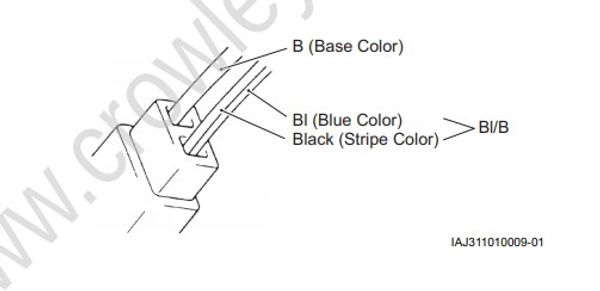
There are two kinds of colored wire used in this product.
One is single colored wire and the other is dual colored (striped) wire.
The single colored wire uses only one color symbol. example: B (Black).
The dual colored wire uses two color symbols. example: Bl/B.
The first symbol represents the base color of the wire and the second symbol represents the color of the stripe.
Example: Bl/B (Blue with Black stripe).
| Symbol | Wire color | Symbol | Wire Color |
|---|---|---|---|
| B | Black | Lg | Light green |
| BI | Blue | O | Orange |
| Br | Brown | P | Pink |
| Dg | Dark green | R | Red |
| G | Green | V | Violet |
| Gr | Gray | W | White |
| LbI | Light blue | Y | Yellow |
Step 4: Warning, Caution and Information Label Locations
The figure shows main labels among others that are attached to outboard motor.
When servicing outboard motor, refer to WARNING / CAUTION instructions printed on labels.
If any WARNING / CAUTION label is found stained or damage, clean or replace it as necessary.
Do not reuse a label after it has been removed. Always use new label.
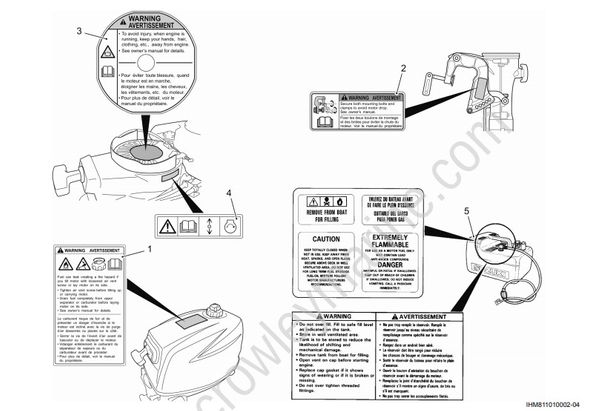
- Label, engine cover
- Mark, clamp bracket
- Label, recoil starter
- Label, S.I.G.P.
- Fuel tank
Step 5: Outboard Motor Identification Number Location
Model, Pre-fix, Serial number
The Model, Pre-fix and Serial number of motor are stamped on a plate attached to the clamp bracket.
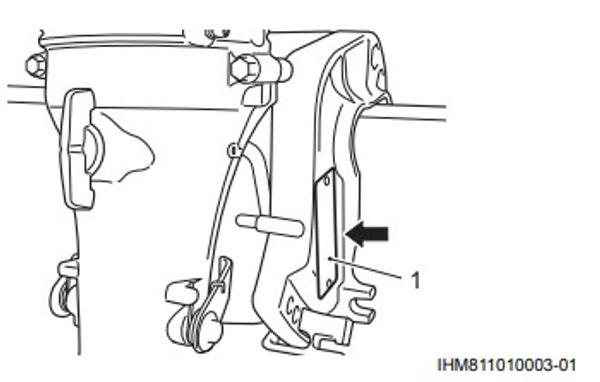
- Identification number plate
Example
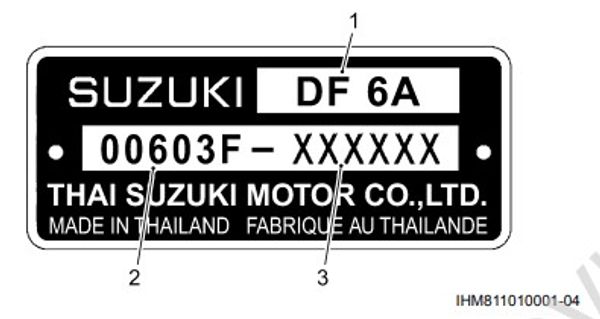
- Model
- Pre-fix
- Serial number
Engine Serial Number Location
A second engine serial number plate is pressed into a boss on the cylinder block.
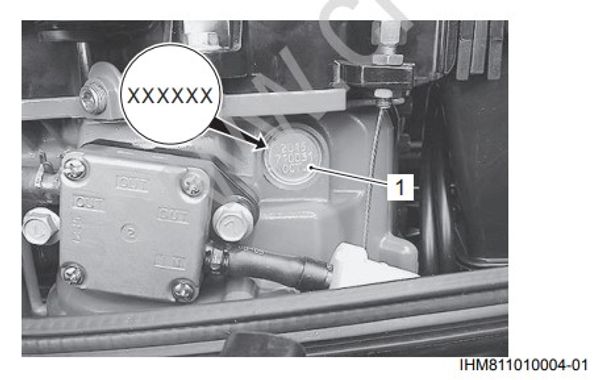
- Serial number plate
Step 6: Fuel and Oil Recommendations
Gasoline
Use of leaded gasoline can cause engine damage.
Use of improper or poor quality fuel can affect performance and may damage the motor and fuel system.
Use only unleaded gasoline. Do not use fuel having lower than the recommended octane, or fuel that may be stale or contaminated by dirt/water etc.
Suzuki highly recommends that you use alcohol-free unleaded gasoline with a minimum pump octane rating of 87 (R/2+M/2 method) or 91 (Research method).
However, blends of unleaded gasoline and alcohol with equivalent octane content may be used.
Allowable maximum blend of a single additive (Not combination)
5% Methanol, 10% Ethanol, 15% MTBE
Engine oil
Use of a poor quality engine oil can adversely affect engine performance and life.
Suzuki recommends that you use Suzuki Marine 4-Cycle Engine Oil or its equivalent.
Oil quality is a major contributor to your engine’s performance and life. Always select good quality engine oil.
Suzuki recommends the use of SAE 10W-40 or 10W-30 SUZUKI MARINE 4-CYCLE ENGINE OIL.
If SUZUKI MARINE 4-CYCLE ENGINE OIL is not available, select a NMMA certified FC-W oil or good quality 4-cycle motor oil from the following chart according to the average temperatures in your area.

Gear Oil
Suzuki recommends the use of SUZUKI Outboard Motor Gear Oil. If it is not available, use SAE 90 hypoid gear oil which is rated GL-5 under the API classification system.
Step 7: Break-In Procedures
Failure to follow the break-in procedures described below can result in severe engine damage.
Be sure to follow the engine break-in procedures described below.
The first 10 hours are critically important to ensure correct running of either a brand new motor or a motor that has been reconditioned or rebuilt. How the motor is operated during this time will have direct bearing on its life span and long-term durability.
Break-in period
10 hours
Warm-up recommendation
Running at high speed without sufficient warm-up may cause severe engine damage such as piston seizure.
Always allow sufficient idling time (5 minutes) for the engine to warm-up before running at high speed.
Allow sufficient idling time (more than 5 minutes) for the engine to warm up after cold engine starting.
Throttle recommendation
Avoid maintaining a constant engine speed for an extended period at any time during the engine break-in period by varying the throttle position occasionally.
First 2 hours
For the first 15 minutes, operate the engine in-gear at idling speed. During the remaining 1 hour and 45 minutes, operate the engine in-gear at less than 1/2 (half) throttle (3000 r/min).
The throttle may be briefly opened beyond the recommended setting to plane the boat, but must be reduced to the recommended setting immediately after planning.
Next 1 hour
Operate the engine in-gear at less than 3/4 (three - quarter) throttle (4000 r/min).
Last 7 hours
Operate the engine in-gear at a desired engine speed. However, do not operate continuously at full throttle for more than 5 minutes.
Running continuously at full throttle for more than 5 minutes at a time during the last 7 hours of break-in operation may cause severe engine damage such as seizure.
During the last 7 hours of break-in operation, do not operate at wide open throttle for more than 5 minutes at a time.
Step 8: Propeller Selection Guide
An outboard motor is designed to develop its rated power within a specified engine speed range. The maximum rated power delivered by the DF4A/5A/6A models are shown below.
Recommended full throttle speed range
| DF4A | 4 000 – 5 000 r/min |
| DF5A | 4 500 – 5 500 r/min |
| DF6A | 4 750 – 5 750 r/min |
Installing a propeller with either too much or too little pitch will cause incorrect maximum engine speed, which may result in severe damage to the motor.
Select a propeller that will allow the engine to reach the recommended operating range at full throttle with the maximum boat load.
If the standard propeller fails to meet the above requirement, use another pitch propeller to hold the engine speed within the range specified above.
Propeller size chart
| Blade x Dia. (in.) x Pitch (in.) |
|---|
| 3 x 7 1/2 x 6 |
| 3 x 7 1/2 x 6 1/2 |
| 3 x 7 1/2 x 7 |
Step 9: Carburetor Jetting Modification for High Altitude Operation
Operation of the outboard motor at high altitudes will affect the carburetor air fuel ratio as a result of reduced air pressure and density. Depending on the altitude level, the change in air pressure could affect the standard carburetor air-fuel ratio and may cause the engine run too rich. This could decrease engine performance and increase fuel consumption, and may cause an increase in exhaust gas emissions. It can also cause spark plug fouling, and could cause the engine to be difficult to start when warm.
If the outboard motor will be operated continuously above 5000 feet (1500 meters) elevation, the jetting should be changed to the appropriate high altitude specification listed below. This will adjust the amount of fuel used by the engine to the correct level for operation at high altitude conditions, above 5 000 foot elevation levels. The jetting must be restored to the standard specification if the outboard motor is to be operated at elevations below 5000 feet.
If the engine is operated at elevations of less than 5000 feet (1500 meters), the standard jetting specification should not be changed.
If you operate an outboard motor at low altitude (below 5000 feet (1500 meters)) when the engine has been modified for high-altitude operation, the engine could be damaged from overheating, or there could be excessive exhaust gas emissions.
Be sure to reinstall standard-specification jetting in any outboard that has been modified for high-altitude operation prior to operating the outboard at low altitude (below 5000 feet (1500 meters)).
DF 4A Carburetor Jet Chart
| Altitude Feet / (Meters) | Main Jet size | Pilot Jet size | Comment |
|---|---|---|---|
| Over 5000 (1500) | # 52 | # 34 | High altitude specification |
| 0 – 5000 (0 – 1500) | # 54 | # 34 | Standard specification |
DF 5A Carburetor Jet Chart
| Altitude Feet / (Meters) | Main Jet size | Pilot Jet size | Comment |
|---|---|---|---|
| Over 5000 (1500) | # 64 | # 35 | High altitude specification |
| 0 – 5000 (0 – 1500) | # 66 | # 37 | Standard specification |
DF 6A Carburetor Jet Chart
| Altitude Feet / (Meters) | Main Jet size | Pilot Jet size | Comment |
|---|---|---|---|
| Over 5000 (1500) | # 70 | # 39 | High altitude specification |
| 0 – 5000 (0 – 1500) | # 72 | # 41 | Standard specification |
