

Lower unit (F50B, F60B)
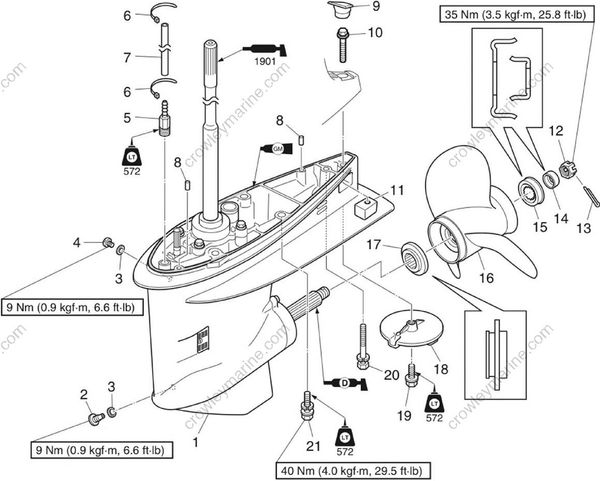
| No. | Part name | Q’ty | Remarks |
|---|---|---|---|
| 1 | Lower unit | 1 | |
| 2 | Drain screw | 1 | M8 |
| 3 | Gasket | 2 | Not reusable |
| 4 | Oil level plug | 1 | M8 |
| 5 | Hose nipple | 1 | PT 1/8 |
| 6 | Plastic tie | 2 | |
| 7 | Hose | 1 | Hose nipple to hose nipple |
| 8 | Dowel | 2 | |
| 9 | Grommet | 1 | |
| 10 | Bolt | 1 | M8 x 35 mm |
| 11 | Anode | 1 | |
| 12 | Propeller nut | 1 | M16 |
| 13 | Cotter pin | 1 | Not reusable |
| 14 | Washer | 1 | |
| 15 | Washer | 1 | |
| 16 | Propeller | 1 | |
| 17 | Spacer | 1 |

| No. | Part name | Q’ty | Remarks |
|---|---|---|---|
| 18 | Trim tab | 1 | |
| 19 | Bolt | 1 | M8 x 25 mm |
| 20 | Bolt | 1 | M8 x 84 mm |
| 21 | Bolt | 4 | M10 x 40 mm |
Removing the lower unit
WARNING
- Make sure to disconnect the battery cables from the battery, and remove the clip from the engine shut-off switch.
- When removing the lower unit with the power unit installed, make sure to suspend the outboard motor. Otherwise, the outboard motor could fall suddenly and result in severe injuries.
- When loosening or tightening the propeller nut, do not hold the propeller using your hands
Drain the gear oil. See steps 1-4 in “Changing the gear oil” (10-14).
Remove the cotter pin.
Set the gear shift to the N position.
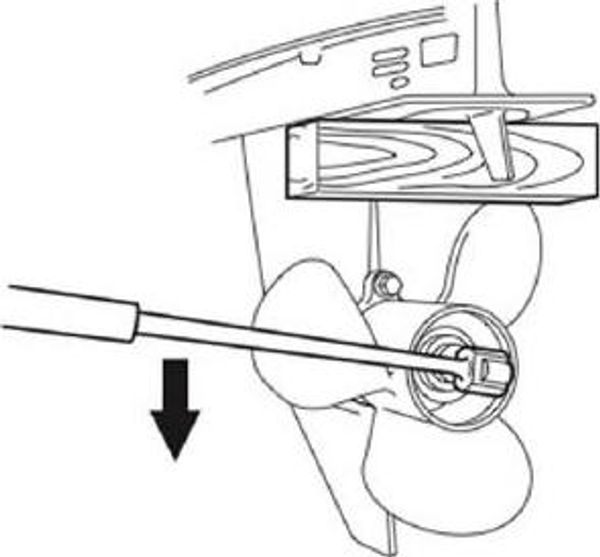
Place a block of wood between the anti cavitation plate and the propeller to prevent the propeller from turning, and then remove the propeller nut and propeller.
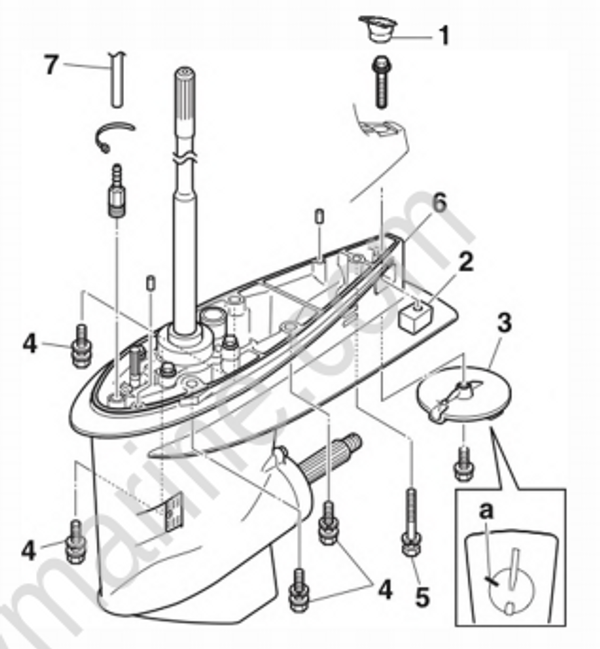
Remove the grommet “1” and anode “2”.
Mark the trim tab “3” and the lower case with an identification mark “a”, and then remove the trim tab “3”.
Remove the lower case mounting bolts “4” and “5”, and then remove the lower unit “6”.
Remove the speedometer hose “7”.
TIP:
When disassembling the lower unit, measure the backlash before disassembly. See “Measuring the forward gear backlash and reverse gear backlash before disassembly” (8-27).
Checking the propeller
Checking the lower unit anode
- Check the anode and trim tab. Clean the anode or the trim tab if there is grease, oil, or scales.
NOTICE
Do not apply grease, oil, or paint to the trim tab.
