SERVICE MANUAL
NOTICE
This manual has been prepared by the Yamaha Motor Company primarily for use by Yamaha dealers and their trained mechanics when performing maintenance procedures and repairs to Yamaha equipment.
It has been written to suit the needs of persons who have a basic understanding of the mechanical and electrical concepts and procedures inherent in the work, for without such knowledge attempted repairs or service to the equipment could render it unsafe or unfit for use.
Because the Yamaha Motor Company Ltd. has a policy of continuously improving its products, models may differ in detail from the descriptions and illustrations given in this publication.
Use only the latest edition of this manual. Authorized Yamaha dealers are notified periodically of modifications and significant changes in specifications and procedures, and these are incorporated in successive editions of this manual.
HOW TO USE THIS MANUAL
MANUAL FORMAT
All of the procedures in this manual are organized in a sequential, step-by-step format.
The information has been complied to provide the mechanic with an easy to read, handy reference that contains comprehensive explanations of all disassembly, repair, assembly, and inspection operations.
In this revised format, the condition of a faulty component will precede an arrow symbol and the course of action required will follow the symbol, e.g.,
- Bearings
Pitting/Damage -> Replace.
To assist you to find your way about this manual, the Section Title and Major Heading is given at the head of every page.
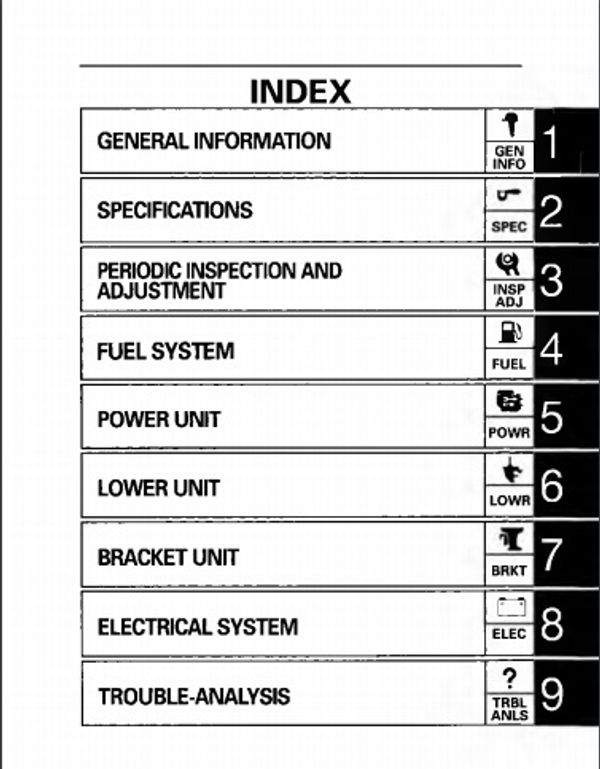
On the first page of each Section is an Index of that section's contents.
MODEL INDICATION
Multiple models are shown in this manual. These indications are noted as follows.
| Model name | 9.9F | 15F |
|---|---|---|
| USA and CANADA name |
9.9MH, 9.9EH, 9.9ER |
15MH, 15EH |
| Indication | 9.9 | 15 |
THE ILLUSTRATIONS
Some illustrations in this manual may differ from the model you have. This is because a procedure described may relate to several models, though only one may be illustrated. (The name of model described will be mentioned in the description).
REFERENCES
These have been kept to a minimum; however, when you are referred to another section of the manual, you are told the page number to go to.
HOW TO READ DESCRIPTIONS
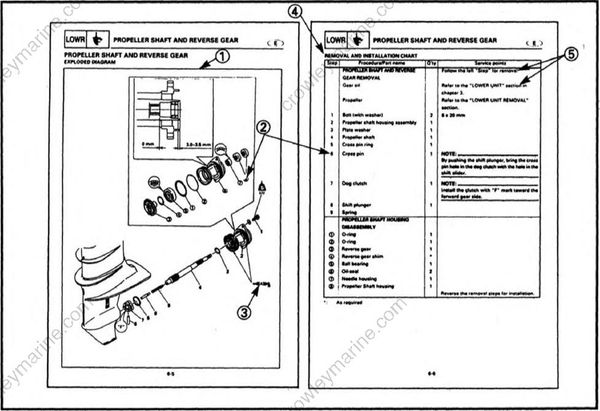
A disassembly installation job mainly consists of the exploded diagram (1).
The numerical figures represented by the number (2) indicates the order of the job steps.
The symbols represented by the number (3) indicates the contents and notes of the job.For the meanings of the symbols, refer to the next page(s).
The REMOVAL AND INSTALLATION CHART ® is attached to the exploded diagram and explains the job steps, part names, notes for the jobs, etc.
The SERVICE POINTS, other than the exploded diagram, explains in detail the items difficult to explain in the exploded diagram or REMOVAL AND INSTALLATION CHART, the Service points requiring the detailed description (5) ,etc.
WARNINGS, CAUTIONS AND NOTES
Attention is drawn to the various Warnings, Cautions and Notes which distinguish important information in this manual in the following ways.
The Safety Alert Symbol means ATTENTION I BECOME ALERT! YOUR SAFETY IS INVOLVED!
WARNING
Failure to follow WARNING instructions could result in severe injury or death to the machine operator, a bystander, or a person inspecting or repairing the outboard motor.
CAUTION:
CAUTION indicates special precautions that must be taken to avoid damage to the outboard motor.
NOTE:
A NOTE provides key information to make procedures easier or clearer.
SYMBOLS
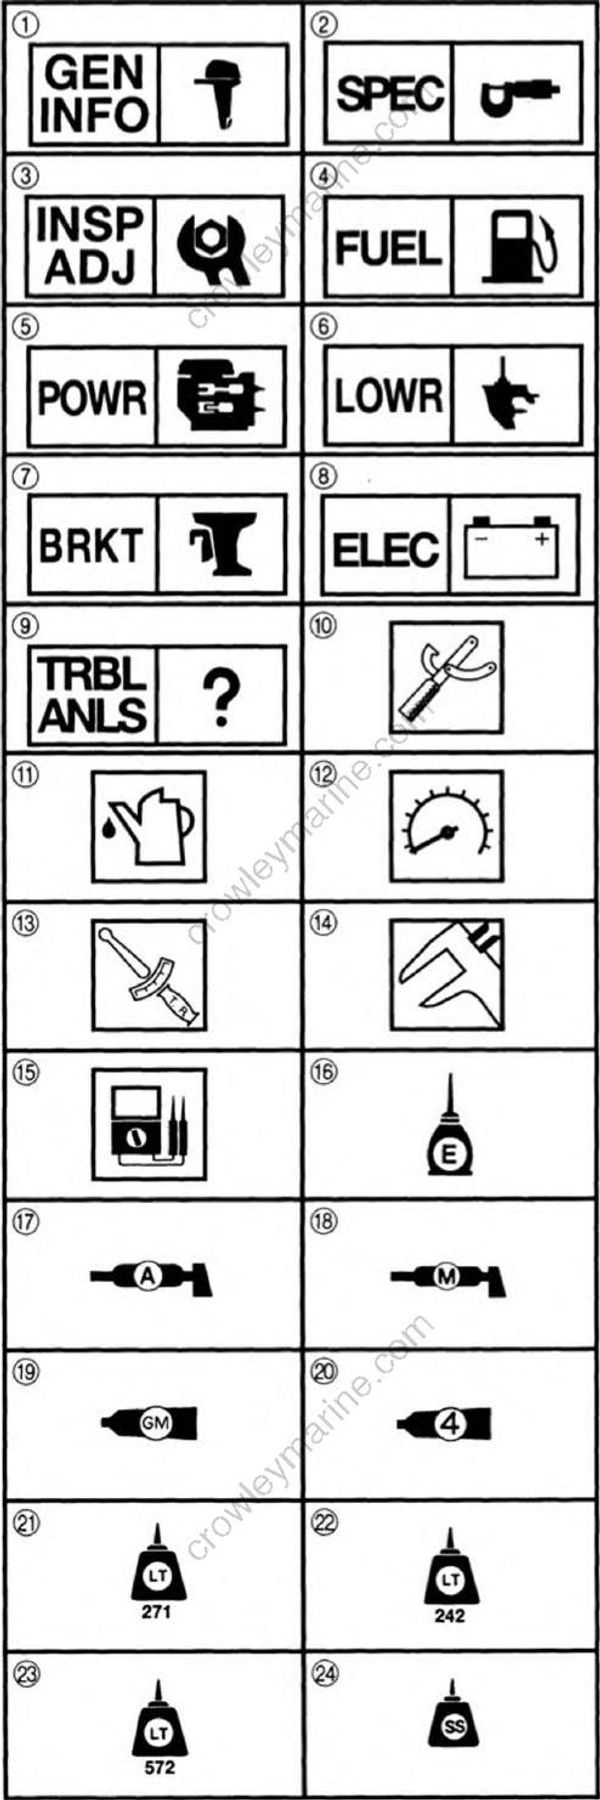
Symbols (1) to (9) are designed as thumb-tabs to indicate the content of a chapter:
(1) General information
(2) Specifications
(3) Periodic Inspection and Adjustment
(4) Fuel system
(5) Power unit
(6) Lower unit
(7) Bracket unit
(8) Electrical system
(9) Trouble-analysis
Symbols (10) to (15) indicate specific data:
(10) Special tool
(11) Specified liquid
(13) Specified torque
(12) Specified engine speed
(14) Specified measurement
(15) Specified electrical valve
[Resistance (Ω), Voltage (V), Electric current (A)]
Symbol (16) to (18) in an exploded diagram indicate grade of lubricant and location of lubrication
point:
(16) Apply Yamaha 2-stroke outboard motor oil
(17) Apply water resistant grease (Yamaha grease A, Yamaha marine grease)
(18) Apply molybdenum disulfide grease
Symbols (19) to (24) in an exploded diagram indicate grade of sealing or locking agent, and location of application point:
(19) Apply Gasket Maker®
(20) Apply Yamabond #4 (Yamaha bond No. 4)
(21) Apply LOCTITE® No. 271 (Red LOCTITE)
(22) Apply LOCTITE® No. 242 (Blue LOCTITE)
(23) Apply LOCTITE® No. 572
(24) Apply Silicon sealant
NOTE:
In this manual, the above symbols may not be used in every case.