

Upper case
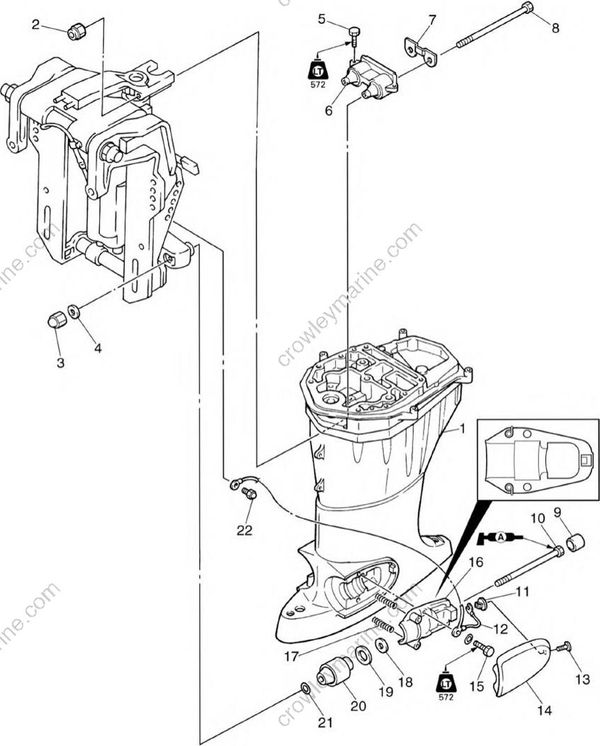
S62Y7170
| No. | Part name | Q’ty | Remarks | Tightening torques | Tightening torques | Tightening torques | Tightening torques |
|---|---|---|---|---|---|---|---|
| Stage | N•m | kgf•m | ft•lb | ||||
| 1 | Upper case assembly | 1 | |||||
| 2 | Nut | 2 | 24 | 2.4 | 17 | ||
| 3 | Nut | 2 | 42 | 4.2 | 30 | ||
| 4 | Washer | 2 | |||||
| 5 | Bolt | 3 | M8 x 30 mm | ||||
| 6 | Upper mount | 1 | |||||
| 7 | Plate | 1 | |||||
| 8 | Bolt | 2 | M8 x 175 mm | ||||
| 9 | Cap | 2 | |||||
| 10 | Bolt | 2 | M12 x 160 mm | ||||
| 11 | Grommet | 2 | |||||
| 12 | Ground lead | 1 | |||||
| 13 | Screw | 2 | |||||
| 14 | Mount cover | 2 | |||||
| 15 | Bolt | 4 | M8 x 25 mm | ||||
| 16 | Mount housing | 2 | |||||
| 17 | Spring | 4 | |||||
| 18 | Washer | 2 | |||||
| 19 | Rubber washer | 2 | |||||
| 20 | Lower mount | 2 | |||||
| 21 | Washer | 2 | |||||
| 22 | Grease nipple | 1 |
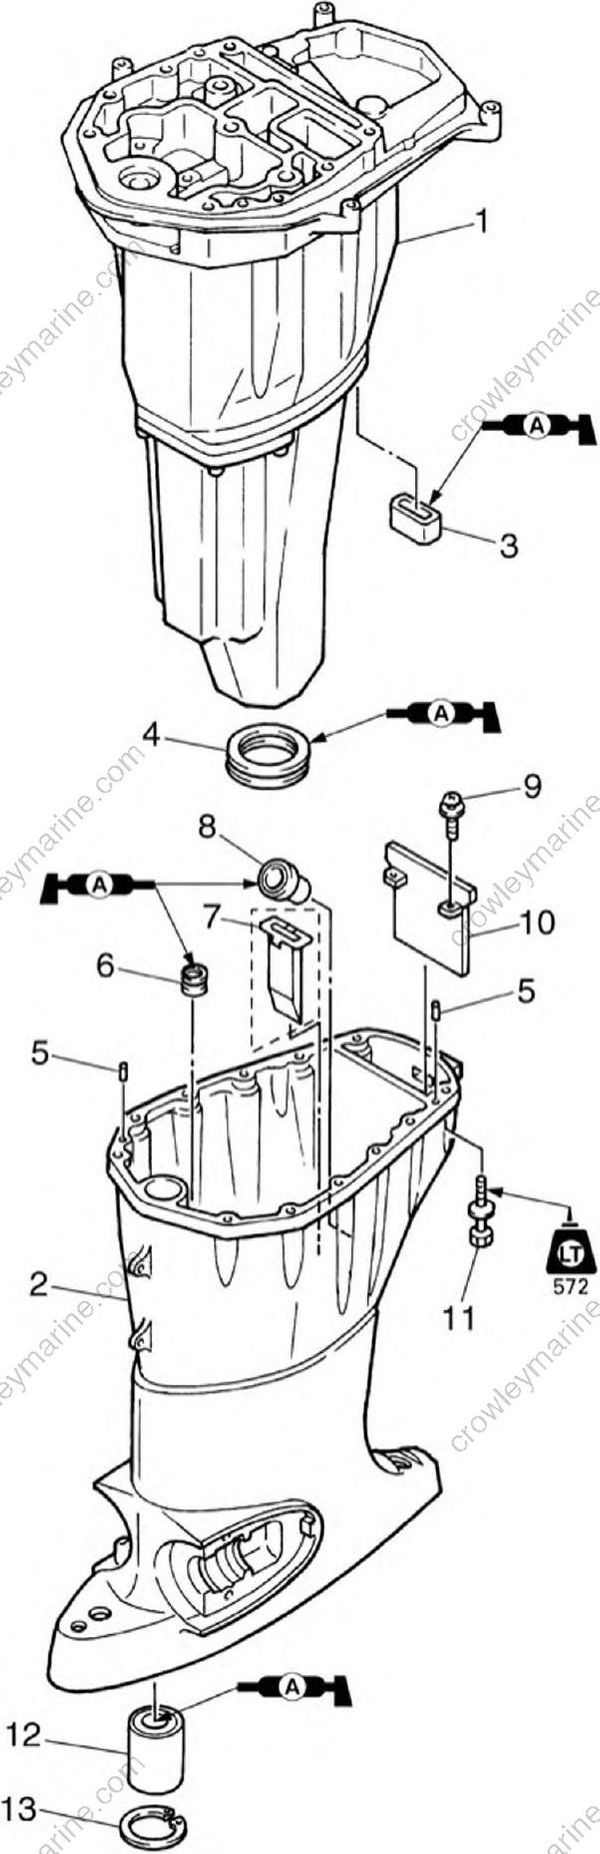
S62Y7180
| No. | Part name | Q’ty | Remarks | Tightening torques | Tightening torques | Tightening torques | Tightening torques |
|---|---|---|---|---|---|---|---|
| Stage | N•m | kgf•m | ft•lb | ||||
| 1 | Muffler assembly | 1 | |||||
| 2 | Upper case | 1 | |||||
| 3 | Muffler seal | 1 | |||||
| 4 | Rubber seal | 1 | |||||
| 5 | Dowel pin | 2 | |||||
| 6 | Grommet | 1 | |||||
| 7 | Guide | 1 | FT50C | ||||
| 8 | Damper | 1 | |||||
| 9 | Screw | 2 | M5 x 16 mm | ||||
| 10 | Baffle plate | 1 | |||||
| 11 | Bolt | 4 | M8 x 30 mm | ||||
| 12 | Drive shaft bushing | 1 | |||||
| 13 | Circlip | 1 |
(F50/F50A, T50/FT50B)
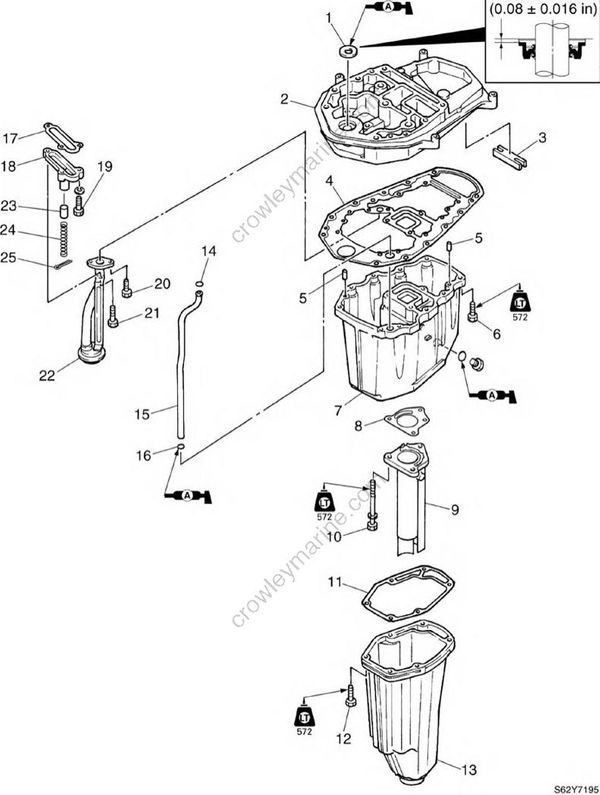
S62Y7195
| No. | Part name | Q’ty | Remarks | Tightening torques | Tightening torques | Tightening torques | Tightening torques |
|---|---|---|---|---|---|---|---|
| Stage | N•m | kgf•m | ft•lb | ||||
| 1 | Oil seal | 1 | Not reusable | ||||
| 2 | Exhaust guide | 1 | |||||
| 3 | Grommet | 1 | |||||
| 4 | Gasket | 1 | Not reusable | ||||
| 5 | Dowel pin | 2 | |||||
| 6 | Bolt | 10 | M6 x 25 mm | ||||
| 7 | Oil pan | 1 | |||||
| 8 | Gasket | 1 | |||||
| 9 | Exhaust manifold | 1 | |||||
| 10 | Bolt | 3 | M6 x 50 mm | ||||
| 11 | Gasket | 1 | Not reusable | ||||
| 12 | Bolt | 6 | M6 x 25 mm | ||||
| 13 | Muffler | 1 | |||||
| 14 | Gasket | 1 | Not reusable | ||||
| 15 | Pipe | 1 | |||||
| 16 | Rubber seal | 1 | Not reusable | ||||
| 17 | Gasket | 1 | Not reusable | ||||
| 18 | Relief valve housing | 1 | |||||
| 19 | Bolt | 2 | M6 x 25 mm | ||||
| 20 | Bolt | 2 | M6 x 16 mm | ||||
| 21 | Bolt | 1 | M6 x 25 mm | ||||
| 22 | Oil strainer | 1 | |||||
| 23 | Relief valve | 1 | |||||
| 24 | Spring | 1 | |||||
| 25 | Cotter pin | 1 | Not reusable |
(FT50C)
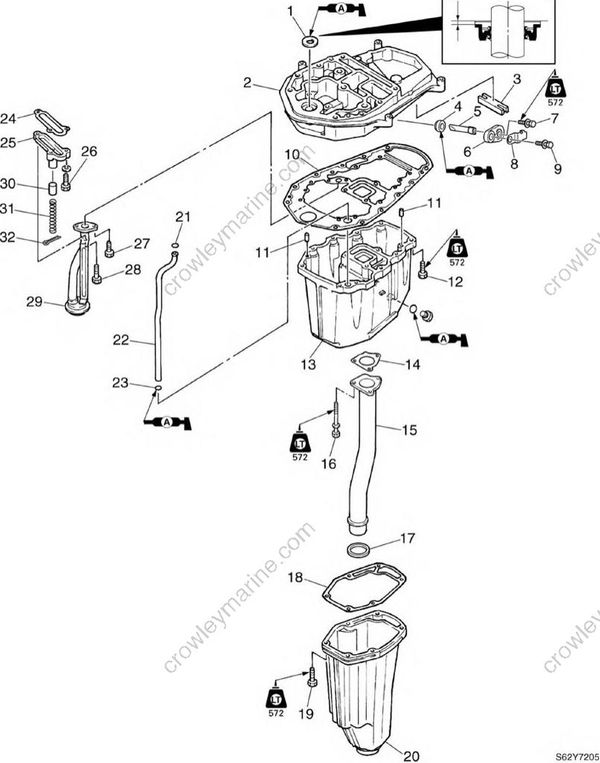
S62Y7205
| No. | Part name | Q’ty | Remark | Tightening torques | Tightening torques | Tightening torques | Tightening torques |
|---|---|---|---|---|---|---|---|
| Stage | N•m | kgf•m | ft•lb | ||||
| 1 | Oil seal | 1 | Not reusable | ||||
| 2 | Exhaust guide | 1 | |||||
| 3 | Grommet | 1 | |||||
| 4 | Grommet | 1 | |||||
| 5 | Anode | 1 | |||||
| 6 | Cover | 1 | |||||
| 7 | Bolt | 1 | |||||
| 8 | Cover | 1 | |||||
| 9 | Bolt | 2 | |||||
| 10 | Gasket | 1 | Not reusable | ||||
| 11 | Dowel pin | 2 | |||||
| 12 | Bolt | 10 | M6 x 25 mm | ||||
| 13 | Oil pan | 1 | |||||
| 14 | Gasket | 1 | Not reusable | ||||
| 15 | Exhaust manifold | 1 | |||||
| 16 | Bolt | 1 | M6 x 45 mm | ||||
| 17 | Gasket | 1 | Not reusable | ||||
| 18 | Gasket | 1 | Not reusable | ||||
| 19 | Bolt | 6 | M6 x 45 mm | ||||
| 20 | Muffler | 1 | |||||
| 21 | Gasket | 1 | Not reusable | ||||
| 22 | Pipe | 1 | |||||
| 23 | Rubber seal | 1 | Not reusable | ||||
| 24 | Gasket | 1 | Not reusable | ||||
| 25 | Relief valve housing | 1 | |||||
| 26 | Bolt | 2 | M6 x 25 mm | ||||
| 27 | Bolt | 2 | M6 x 16 mm | ||||
| 28 | Bolt | 1 | M6 x 25 mm | ||||
| 29 | Oil strainer | 1 | |||||
| 30 | Relief valve | 1 | |||||
| 31 | Spring | 1 | |||||
| 32 | Cotter pin | 1 | Not reusable |
Disassembling the oil pan
Remove the muffler (1) from the oil pan (2).
Remove the exhaust manifold (3) from the oil pan (2).
Remove the oil pan (2) from the exhaust guide (4).
Remove the oil strainer (5) and the relief valve housing (6).
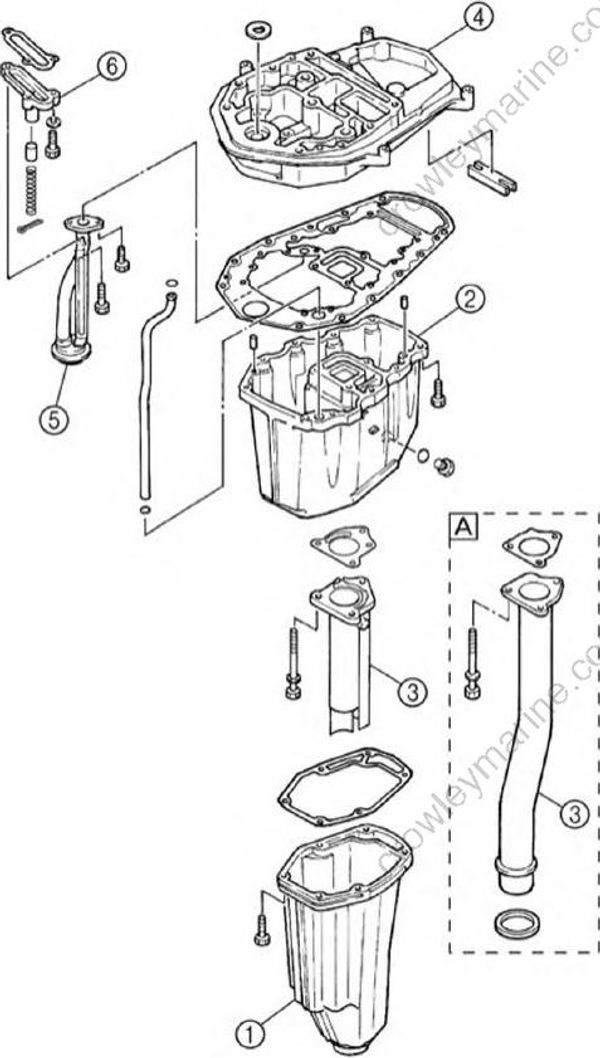
S62Y7210
(A) FT50C
Checking the oil strainer and the relief valve
- Check the oil strainer and relief valve for dirt and residue. Clean if necessary.
Assembling the oil pan
Install the gaskets onto the exhaust guide (1).
Install the relief valve assembly (2) by installing the bolts, then tightening them finger tight.
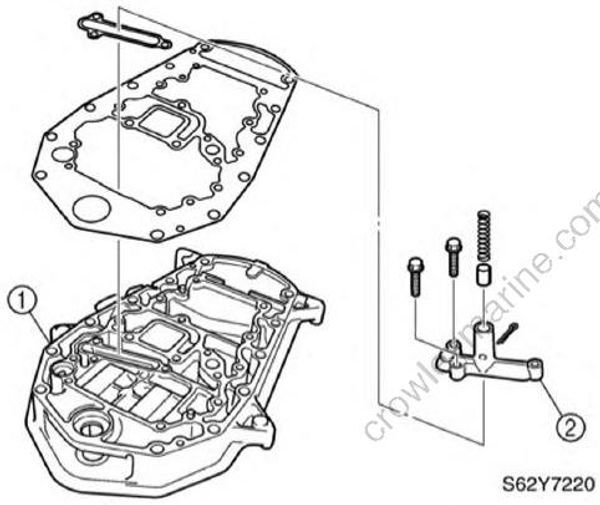
S62Y7220
- Install the oil strainer (3) by installing the bolts.
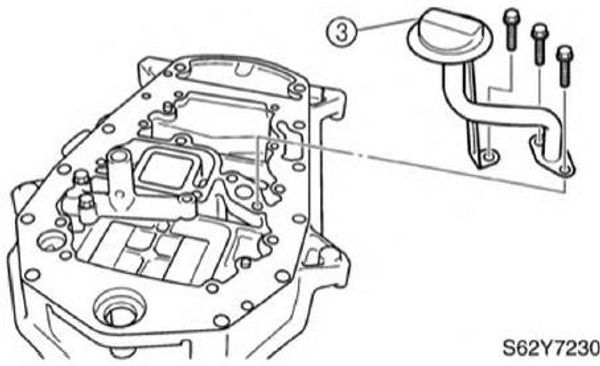
S62Y7230
Install the water pipe (4).
Install the oil pan (5) and bolts, and then tighten the bolts finger tight.
Install the exhaust manifold (6) and bolts, and then tighten the bolts finger tight.
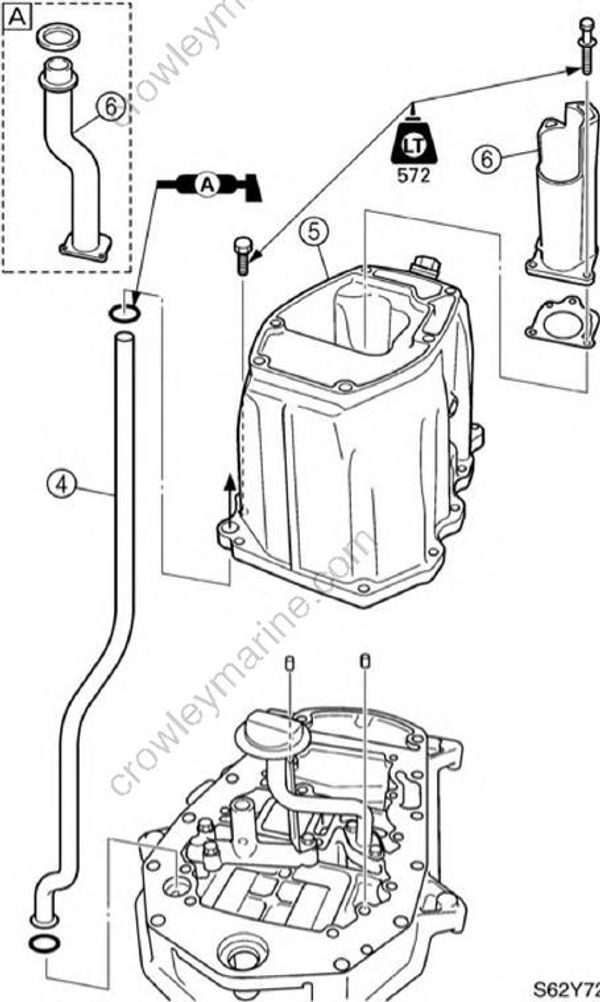
S62Y7240
(A) FT50C
- Tighten the exhaust manifold bolts (7), then the oil pan bolts (8).
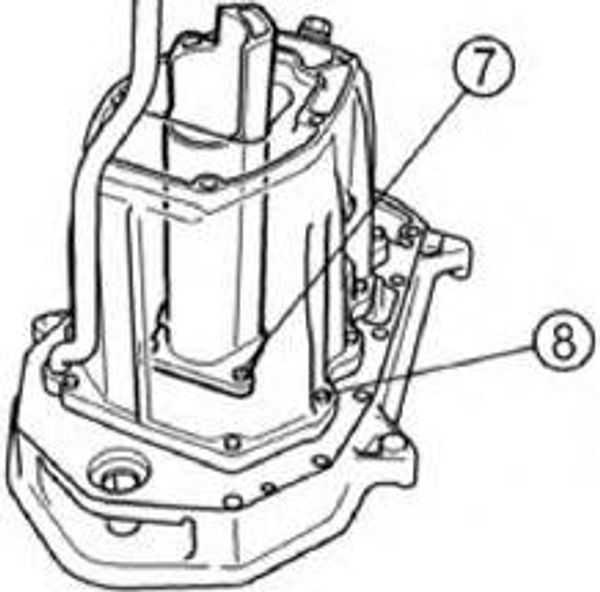
S62Y7245
- Install the muffler © into the oil pan.
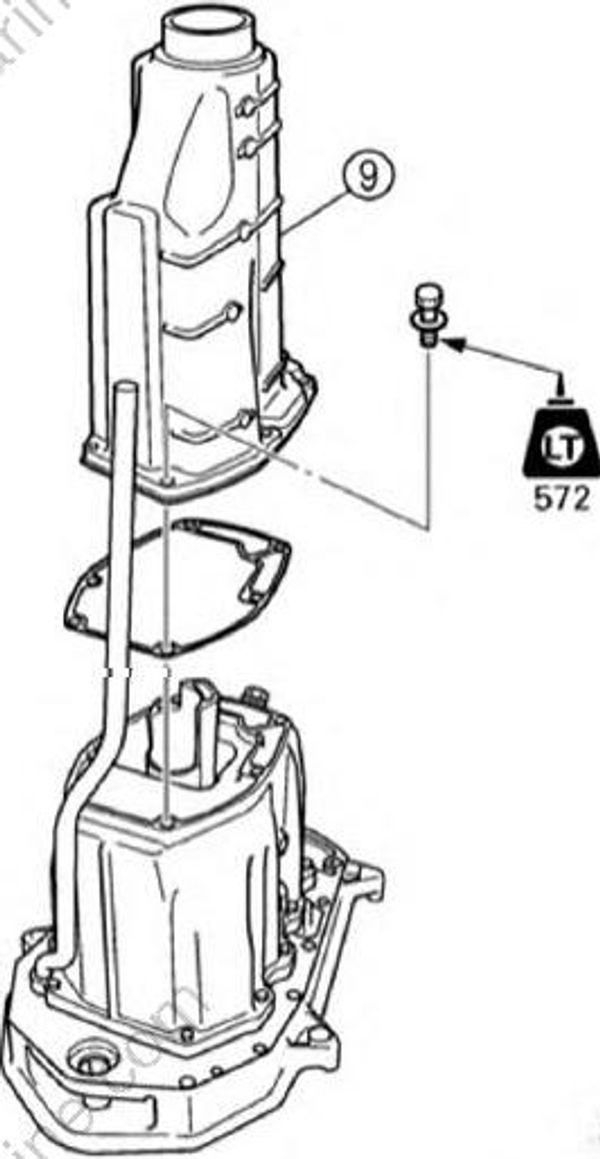
S62Y7250
- Install the muffler assembly (10) by inserting the tip of the water pipe (4) into the joint hole (a) of the upper case.
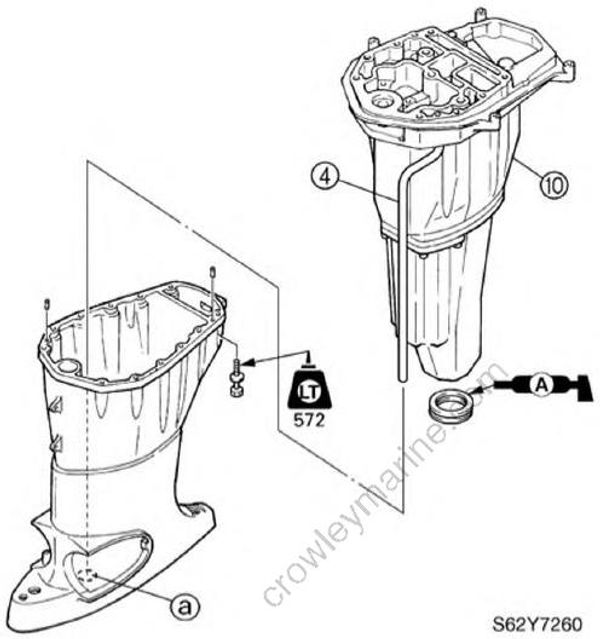
S62Y7260
Installing the upper case
- Install the upper mount (1) and bolts (2) into the upper case, and then tighten the bolts (3).
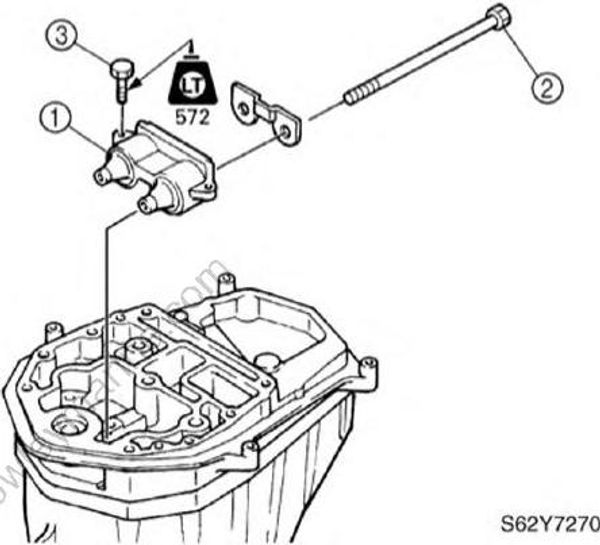
S62Y7270
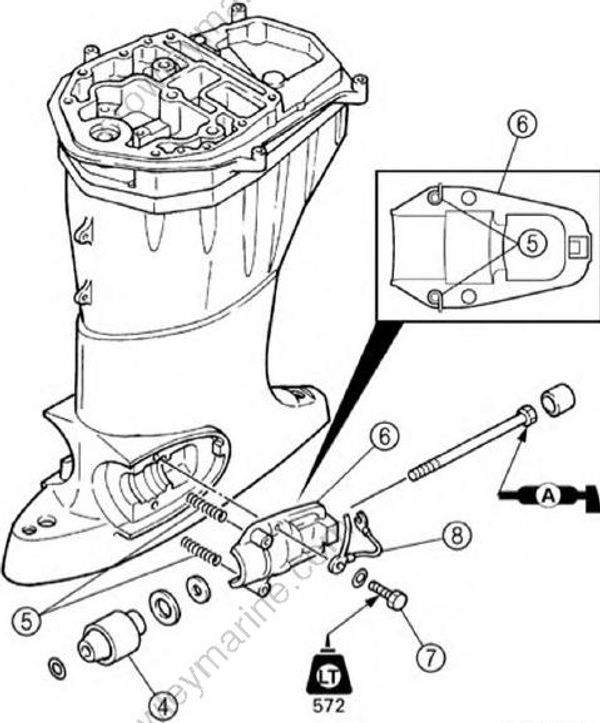
Set the lower mounts (4) and bolts to the upper case.
Install the end of the spring (5) into the groove of the mount housing (6), and then tighten the bolts (7).
S62Y7280
NOTE:
Be sure to install the ground lead (8) into the mount housing (6).
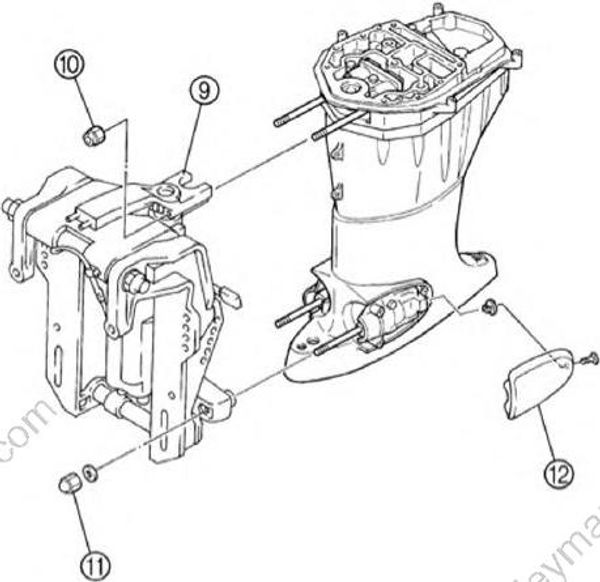
Install the upper and lower mounting bolts into the swivel bracket (9) simultaneously.
Install the upper mounting nut (10) and lower mounting nut (11), and then tighten them to the specified torques.
Install the cover (12) by installing the screw.
S62Y7290
Upper mounting nut (10): 24 N•m (2.4 kgf•m, 17 ft•lb)
Lower mounting nut (11): 42 N•m (4.2 kgf•m, 30 ft•lb)
