

Tiller handle (F50/F50A, T50/FT50B)
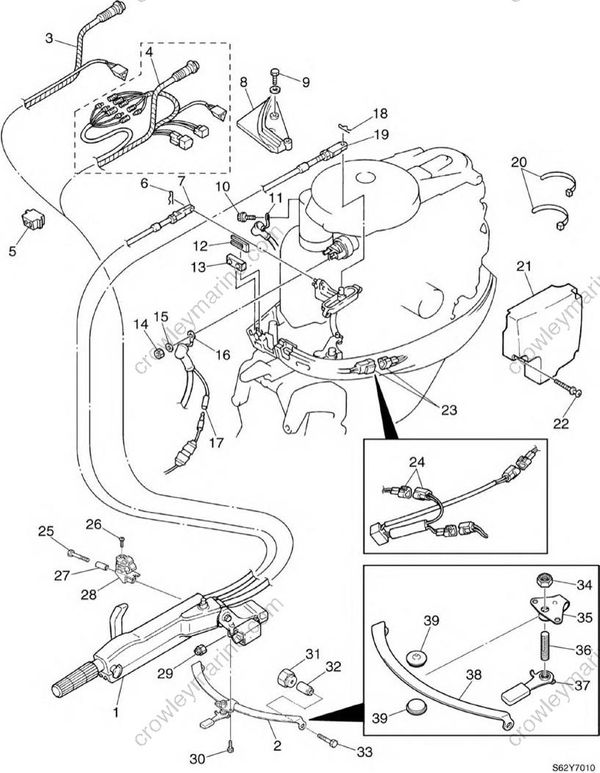
| No. | Part name | Q’ty | Remarks | Tightening torques Stage |
Tightening torques N•m |
Tightening torques kgf•m |
Tightening torques ft•lb |
|---|---|---|---|---|---|---|---|
| 1 | Tiller handle assembly | 1 | |||||
| 2 | Friction plate | 1 | |||||
| 3 | Tiller handle wiring harness | 1 | |||||
| 4 | Tiller handle wiring | 1 | Models applicable for harness tachometer, trim meter or warning buzzer | ||||
| 5 | Grommet | 1 | |||||
| 6 | Clip | 1 | |||||
| 7 | Throttle cable | 1 | |||||
| 8 | Plate | 1 | |||||
| 9 | Bolt | 3 | M6 x 20 mm | ||||
| 10 | Bolt | 1 | M8 x 16 mm | 9 | 0.9 | 6.5 | |
| 11 | Negative battery lead | 1 | |||||
| 12 | Cable guide | 1 | |||||
| 13 | Grommet | 1 | |||||
| 14 | Nut | 1 | 7 | 0.7 | 5.1 | ||
| 15 | Washer | 1 | |||||
| 16 | Positive battery lead | 1 | |||||
| 17 | Connector | 1 | |||||
| 18 | Clip | 1 | |||||
| 19 | Shift cable | 1 | |||||
| 20 | Plastic tie | 2 | |||||
| 21 | Cover | 1 | |||||
| 22 | Screw | 3 | M6 x 35 mm | ||||
| 23 | Trailer switch coupler | 1 | |||||
| 24 | PTT switch coupler | 1 | Models with trailer switch | ||||
| 25 | Bolt | 1 | M6 x 35 mm | ||||
| 26 | Screw | 1 | M6 x 25 mm | ||||
| 27 | Collar | 1 | |||||
| 28 | Clamp | 1 | |||||
| 29 | Nut | 2 | 37 | 3.7 | 27 | ||
| 30 | Bolt | 2 | M6 x 16 mm |
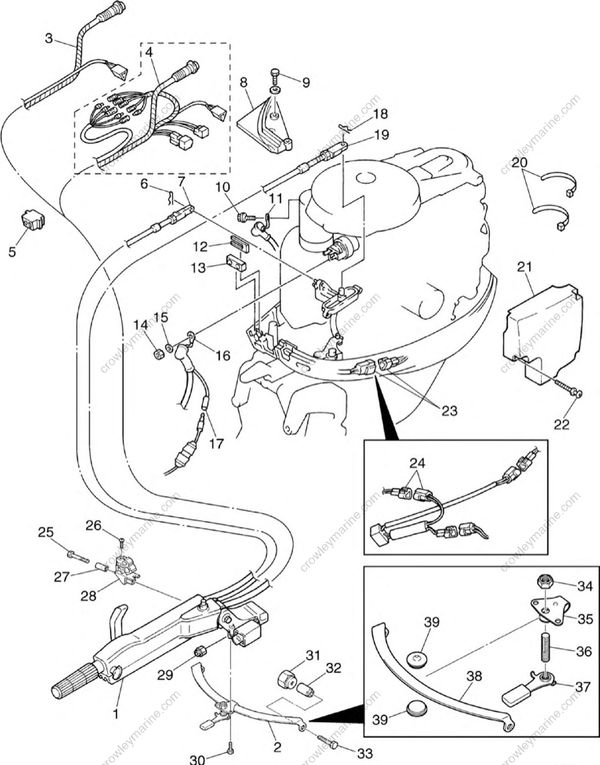
| No. | Part name | Q’ty | Remarks | Tightening torques Stage |
Tightening torques N•m |
Tightening torques kgf•m |
Tightening torques ft•lb |
|---|---|---|---|---|---|---|---|
| 31 | Nut | 2 | |||||
| 32 | Collar | 2 | |||||
| 33 | Bolt | 2 | M8 x 50 mm | ||||
| 34 | Self-locking nut | 1 | |||||
| 35 | Bracket | 1 | |||||
| 36 | Steering lock shaft | 1 | |||||
| 37 | Steering lock knob | 1 | |||||
| 38 | Friction plate | 1 | |||||
| 39 | Friction piece | 2 |
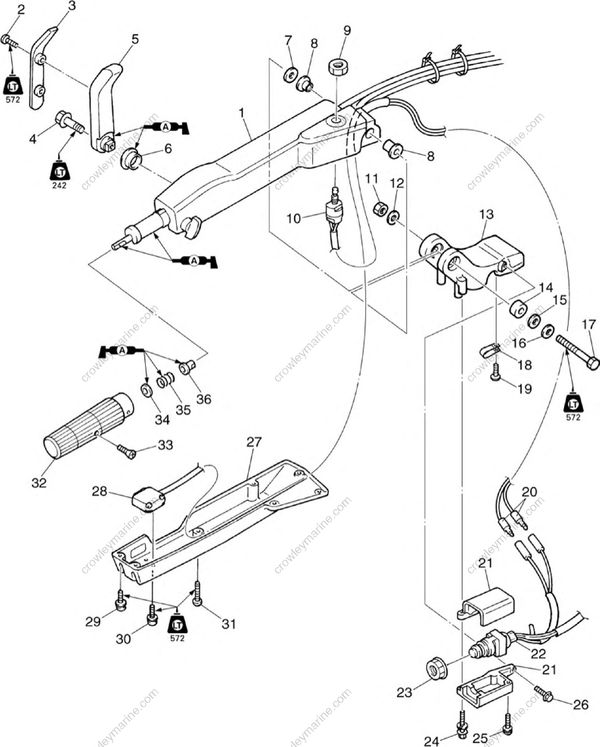
| No. | Part name | Q’ty | Remarks | Tightening torques Stage |
Tightening torques N•m |
Tightening torques kgf•m |
Tightening torques ft•lb |
|---|---|---|---|---|---|---|---|
| 1 | Tiller handle sub assembly | 1 | |||||
| 2 | Screw | 2 | M6 x 10 mm | ||||
| 3 | Shift lever cover | 1 | |||||
| 4 | Bolt | 1 | M8 x 40 mm | ||||
| 5 | Shift lever | 1 | |||||
| 6 | Bushing | 1 | |||||
| 7 | Washer | 1 | |||||
| 8 | Bushing | 2 | |||||
| 9 | Nut | 1 | 4 | 0.4 | 2.9 | ||
| 10 | Engine stop lanyard switch | 1 | |||||
| 11 | Nut | 1 | 38 | 3.8 | 27 | ||
| 12 | Washer | 1 | |||||
| 13 | Bracket | 1 | |||||
| 14 | Collar | 1 | |||||
| 15 | Wave washer | 1 | |||||
| 16 | Washer | 1 | |||||
| 17 | Bolt | 1 | |||||
| 18 | Clamp | 1 | |||||
| 19 | Screw | 1 | |||||
| 20 | Connector | 2 | |||||
| 21 | Engine start switch housing | 1 | |||||
| 22 | Engine start switch | 1 | |||||
| 23 | Nut | 1 | 5 | 0.5 | 3.7 | ||
| 24 | Bolt | 1 | M6 x 25 mm | ||||
| 25 | Screw | 1 | |||||
| 26 | Bolt | 1 | M6 x 20 mm | ||||
| 27 | Cover | 1 | |||||
| 28 | Power trim and tilt switch | 1 | |||||
| 29 | Screw | 5 | M6 x 16 mm | ||||
| 30 | Screw | 2 | M6 x 16 mm |
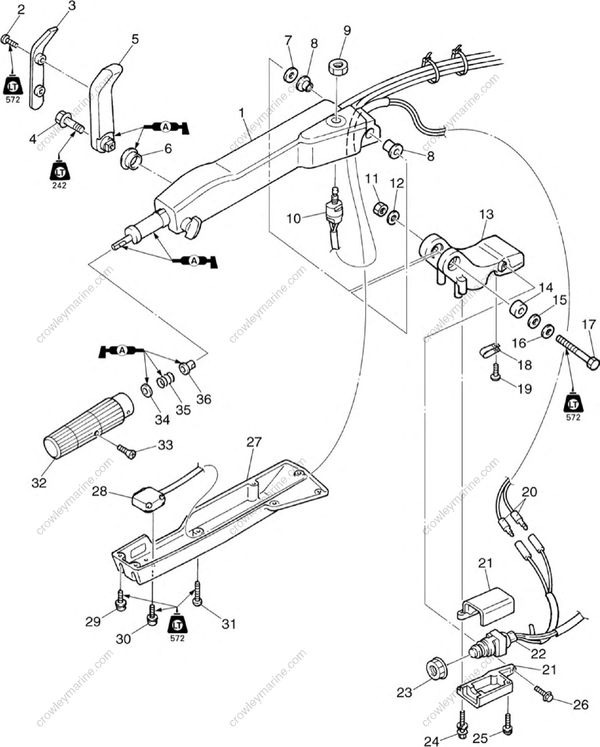
| No. | Part name | Q’ty | Remarks | Tightening torques Stage |
Tightening torques N•m |
Tightening torques kgf•m |
Tightening torques ft•lb |
|---|---|---|---|---|---|---|---|
| 31 | Screw | 2 | M6 x 40 mm | ||||
| 32 | Throttle grip | 1 | |||||
| 33 | Screw | 1 | M5 x 25 mm | ||||
| 34 | Washer | 1 | |||||
| 35 | Spring | 1 | |||||
| 36 | Bushing | 1 |
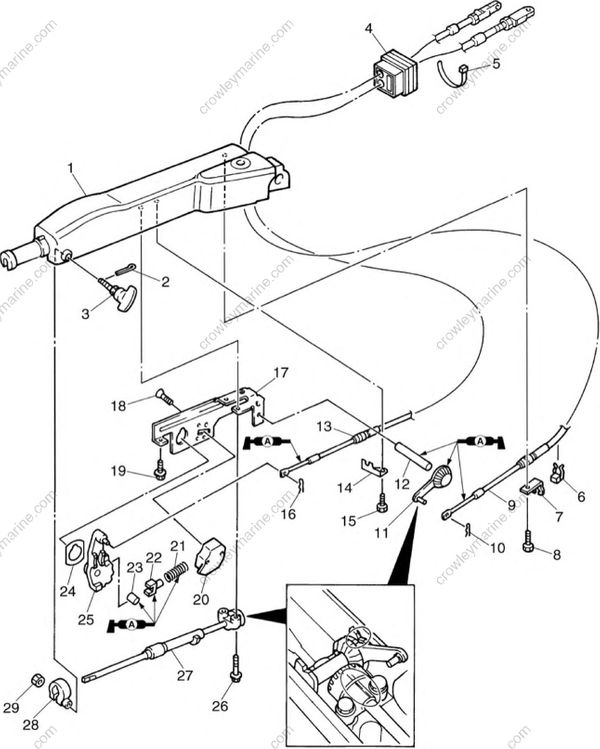
| No. | Part name | Q’ty | Remarks | Tightening torques Stage |
Tightening torques N•m |
Tightening torques kgf•m |
Tightening torques ft•lb |
|---|---|---|---|---|---|---|---|
| 1 | Tiller handle | 1 | |||||
| 2 | Cotter pin | 1 | Not reusable | ||||
| 3 | Friction adjusting knob | 1 | |||||
| 4 | Grommet | 1 | |||||
| 5 | Plastic tie | 1 | |||||
| 6 | Cable clamp | 1 | |||||
| 7 | Stay | 1 | |||||
| 8 | Bolt | 1 | M6 x 14 mm | ||||
| 9 | Throttle cable | 1 | Short | ||||
| 10 | Clip | 1 | |||||
| 11 | Throttle arm | 1 | |||||
| 12 | Throttle arm shaft | 1 | |||||
| 13 | Shift cable | 1 | Long | ||||
| 14 | Shift cable bracket | 1 | |||||
| 15 | Bolt | 1 | M6 x 14 mm | ||||
| 16 | Clip | 1 | |||||
| 17 | Frame | 1 | |||||
| 18 | Screw | 2 | M5 x 14 mm | ||||
| 19 | Bolt | 1 | M6 x 14 mm | ||||
| 20 | Spring housing | 1 | |||||
| 21 | Spring | 1 | |||||
| 22 | Actuator | 1 | |||||
| 23 | Roller | 1 | |||||
| 24 | Bushing | 1 | |||||
| 25 | Shift arm | 1 | |||||
| 26 | Bolt | 2 | M6 x 30 mm | ||||
| 27 | Throttle shaft | 1 | |||||
| 28 | Friction piece | 1 | |||||
| 29 | Nut | 1 |
Checking the throttle cable and shift cable
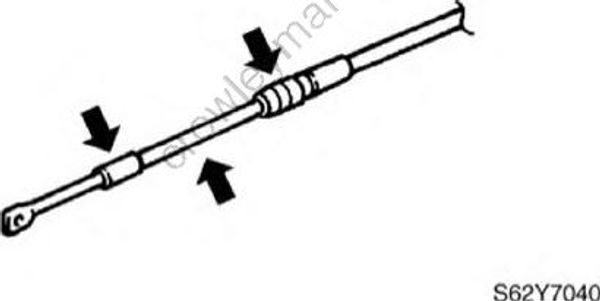
Check the operation of the throttle cable and shift cable.
Check the inner wire and outer wire of both cables for bends or damage, and the rubber seals for damage. Replace if necessary.
Assembling the tiller handle
- Install the throttle shaft (1) and throttle arm (2) into the frame (3). Align the mark (a) of the fully closed position of the throttle shaft to the shaft holder. Align the mark (b) of the fully closed position of the throttle arm to the indent of the frame.
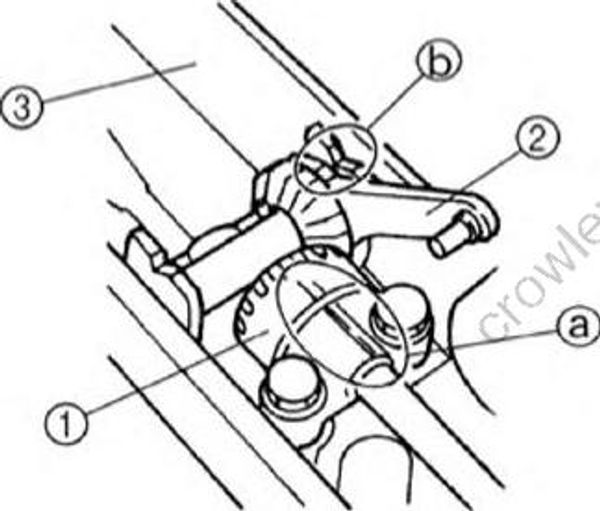
Make sure that the throttle grip is fully closed when installing the throttle cable.
