

Step 1: Engine Management Module (EMM)
The Engine Management Module (EMM) is a water-cooled controller. It controls engine management and engine–related remote control functions.
This section discusses the functions of the EMM and its various internal and external sensors. It also describes using Evinrude Diagnostics software to retrieve and adjust service information saved in the EMM.
Step 2: EMM Functions
The EMM controls the following processes and functions:
- Alternator output; 55 V and 12 V
- Start Assist Circuit (SAC) voltage boost
- Fuel and ignition timing and duration
- Fuel injector activation
- Oil pump activation
- Electric fuel lift pump control
- Electric high pressure fuel pump control
- Idle speed control
- RPM limiter
- Electrical circuit monitoring
- Fault code creation and storage
- Warning system activation
- ROM verification, self-test
- Cold starting
- Output of diagnostic data
- Tachometer signal
- RPM profile and engine hours
- Oil pump activation
- Anti-knock compensation
- Electronic throttle control
- Electronic shift control
- Dynamic Power Steering
Step 3: EMM Connections
IMPORTANT: EMM connections and wiring must be clean and tight. Improper electrical connections can damage the EMM. DO NOT run the outboard with loose or disconnected wiring.
Make sure EMM connections are clean and tight.
• Engine wire harness to EMM connectors; J1-A, J1-B, J2, J3, J4.
• Stator to EMM connections; one 6-pin AMP and J2 connector.
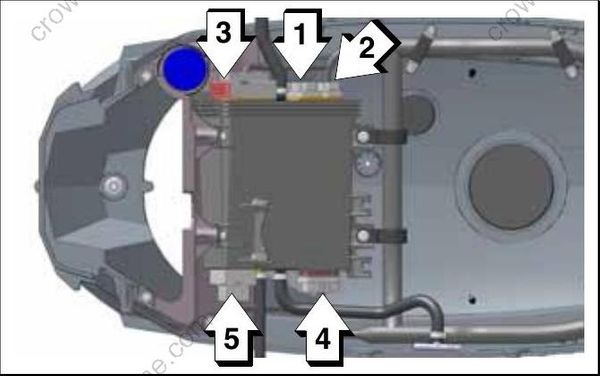
- J1-A connector
- J1-B connector
- J2 connector
- J3 connector
- J4 connector
Step 4: EMM Inputs and Outputs Diagram
- EMM
- 12 VDC Battery
- Fuel Vapor Separator
- Electronic Throttle Body
- Shift Actuator
- Knock Sensor (2)
- Engine Temperature Sensor (2)
- Exhaust Temperature Sender
- Engine Oil Level Sender
- Trim Sender
- (reserved for future use)
- DPS Pressure Sensors
- Digital Remote Control
- Intake Air Temperature Sensor
- Crankshaft Position Sensor
- Water in Fuel Sensor
- Stator
- Low Oil Switch
- Trim Switch
- (reserved for future use)
- Fuel Injector (6)
- Ignition Coil (6)
- Water Valve
- Digital Displays & Gauges
- Dynamic Power Steering Module
- Oil Pumps
- Starter Solenoid & Motor
- Trim & Tilt Relay
- Vapor Vent Solenoid
