

CHARGING SYSTEM TESTS
Charging System Circuit Diagram

- Marine battery
- RED wire (POS)
- BLACK wire (NEG)
- Starter solenoid
- Main harness ground
- Key switch connector
- Fuse (10 amp)
- Stator
- EMM
- Battery charge module
12 V Charging Circuit
To test the operation of the regulator in the battery charge module, you must be able to run the out board continuously at approximately 5000 RPM, such as in a test tank or on a marine dynamometer.
The test consists of monitoring the system’s response to a partially discharged battery. Use a variable load tester to discharge the battery. Disconnect the battery cables at the battery.
Use an inductive amp meter or connect a 0 to 50 A ammeter in series between the red wire of engine wire harness (alternator output from Battery Charge Module) and the positive (B+) battery cable terminal of starter solenoid.
- model 334 or 336, Snap-On
- model MT110 Fluke
or EETA501, and various other amp meters should be available through local tool suppliers. Reconnect the battery cables.
Following the manufacturer’s directions, connect the variable load tester (carbon pile) across the battery terminals. Stevens model LB-85 and Snap-On model MT540D are examples of testers available.
Excessive battery discharge rates might overheat battery causing electrolyte gassing. This might create an explosive atmosphere. Always work in a well ventilated area.
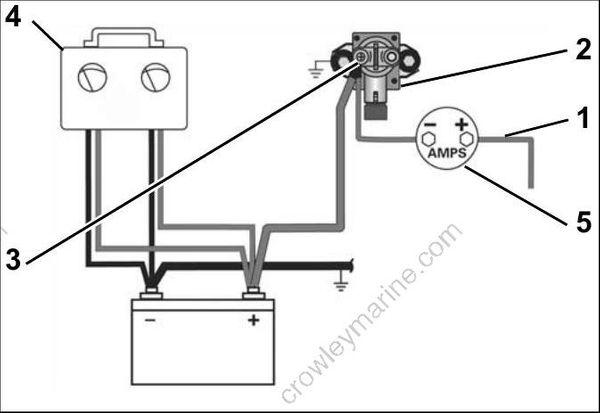
Variable Load Test Diagram
- Red wire (alternator output from EMM)
- Starter solenoid
- Battery cable terminal (B+)
- Variable load tester
- Ammeter
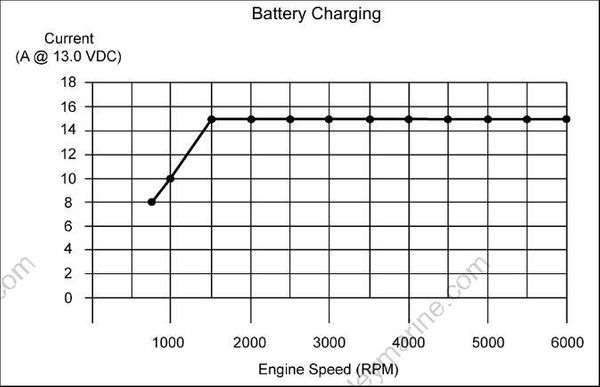
Battery Charging Graph
Start and run the outboard at approximately 5000 RPM. Use the variable load tester to draw the battery down at a rate equivalent to the stator’s full output.
- The ammeter should indicate nearly full output, approximately 15 A @ 5000 RPM.
When the battery charge module is at full load, it is normal for the 55 V circuit to experience a voltage drop of up to 2 VDC.
Decrease the battery load toward 0 A.
- Ammeter should show a reduced output. As the current draw decreases, the battery voltage should stabilize at approximately 14.5 V.
. If results vary, check stator and alternator circuit BEFORE replacing the battery charge module. Refer to STATOR TESTS on p. 89 and 55 V Alternator Circuit on p. 93.
55 V Alternator Circuit
Check battery ground cable for continuity.
With the key switch ON, check battery voltage at battery (12 V).
Then, use Electrical Test Probe Kit, P/N 342677, and a digital multi meter set to read 55 VDC to check voltage on white/red wires at the EMM connector. Voltage at EMM connector should be 0.5 to 1 V less than battery.
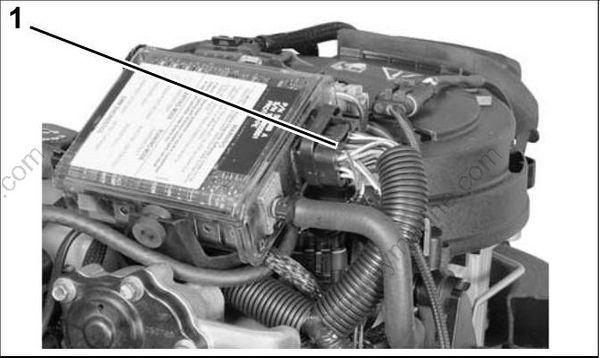
- EMM connector
With outboard running at 1000 RPM, voltage on white/red wires should be 55 V. Voltage readings at a specific speed (RPM) should be steady.
If there is any other reading, refer to STATOR TESTS on p. 89. Inspect the stator wiring and connections. Repair the wiring or replace a faulty stator, or EMM.
