PRÉPAREZ-VOUS POUR L'HIVER : de 10 % à 50 % de réduction sur toutes les pièces d'origine !

Sauf interdiction par le fabricant. N'inclut pas les produits de rechange ou de marque Crowley Marine. Prix indiqué.

Recherche Plus d'un 1 million de pièces d'équipementier
Facile à utiliser  schémas des pièces Meilleur prix  garanti Assistance en directexperte   Plus de 50 ans  au service des plaisanciers Grand choix de pièces OEM  -  de 1950 à 2026 La plupart des pièces en stock  -  Exécution le jour même
Pièces en stock- Exécution le même jour

Seat and Thermostat Assembly P/N 433379

Temps de réparation: Less than 30 mins
Difficulté de réparation: Easy
Seat and Thermostat Assembly P/N 433379
BRP Marine Outboard

Sections:

  1. Product Referemce & Illustration
  2. Disassembly
  3. Reassembly

Safety Considerations

These instructions will alter you to certain things you should do very carefully. If you don't, you could...

  • hurt yourself or bystanders
  • hurt boat operator, passengers
  • damage the machinery

appears next to information important to prevent you and others from being hurt.

appears next to information important to keep machinery from being damaged.

The important safeguards and instructions appearing in these directions cannot cover all possible conditions or situations that occur. The person following these directions must use common sense, caution and care.

Product Referemce & Illustration

When reference is made to brand name, product or specific tool, an equivalent product may be used in place of the referred to product. Substitute products used must have equivalent characteristics, including type, strength, and material. Incorrect substitution may result in product malfunction and possible injury to the operator and/or passengers.

All photographs and illustrations used may not necessarily depict actual models or equipment, but are intended only for reference. Specifications used are based on the latest product information available at the time of publication.
Disassembly

1. Remove the thermostat cover screws and the thermostat cover.

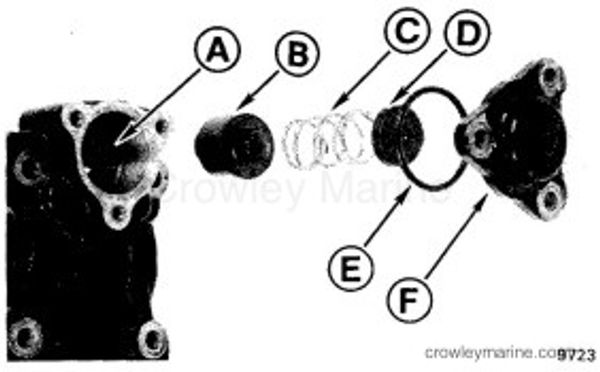
2. Remove thermostat cover screws, O-ring, isolator and spring. Discard old thermostat.

3. Without marring the valve seat sealing surface, remove old valve seat.

It is necessary to replace the valve seat when installing the new thermostat. The new thermostat will not function properly without the new valve seat.

Reassembly

1. Install new valve seat (A) into cylinder head with chamfer facing out.

2. Install the thermostat (B), spring (C), and isolater (D) in the cylinder head.

3. Install O-ring (E) on thermostat cover (F) and install thermostat cover onto cylinder head.

4. Torque thermostat cover screws to 60-84 in. lbs. (7-9 Nm).

0433379 - Thermostat & Seat Assembly

Share on social: