

EXPLODED DIAGRAM
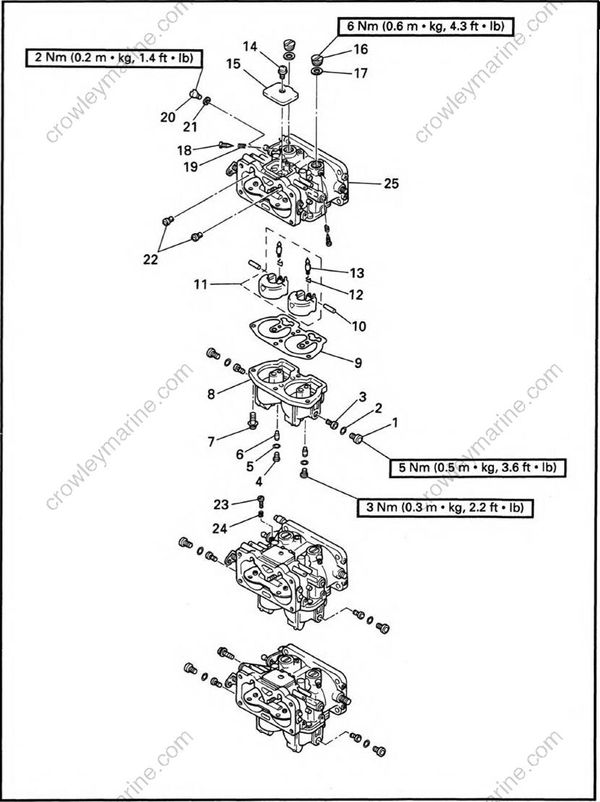
REMOVAL AND INSTALLATION CHART
| Step | Procedure/Part name | Q’ty | Service points |
|---|---|---|---|
| CARBURETOR DISASSEMBLY | Follow the left "Step" for removal | ||
| Carburetor assembly | Refer to "CARBURETOR REMOVAL" section. | ||
| 1 | Drain screw | 2 | |
| 2 | Gasket | 2 | |
| 3 | Main jet | 2 | |
| 4 | Pilot jet plug | 2 | |
| 5 | Gasket | 2 | |
| 6 | Pilot jet | 2 | |
| 7 | Screw | 4 | |
| 8 | Float chamber | 1 | |
| 9 | Float chamber gasket | 1 | |
| 10 | Arm pin | 2 | |
| 11 | Float assembly | 2 | |
| 12 | Clip | 2 | |
| 13 | Needle valve | 2 | |
| 14 | Screw | 1 | |
| 15 | Air vent cover | 1 | |
| 16 | Plug screw | 2 | |
| 17 | Gasket | 2 | |
| 18 | Pilot screw | 2 | |
| 19 | Spring | 2 | |
| 20 | Plug screw | 1 | |
| 21 | Gasket | 1 | |
| 22 | Pilot air jet | 2 | |
| 23 | Throttle adjust screw | 1 | middle carburetor |
| 24 | Spring | 1 | |
| 25 | Carburetor body | 1 | |
| Reverse the removal steps for installation. |
SERVICE POINTS
Do not use steel wire for cleaning the jets as this may enlarge the jet diameters and seriously affect performance
Carburetor inspection
- Inspect:
- Carburetor body
Crack/Damage -> Replace.
Contamination -> Clean.
- Inspect:
- Pilot screw
Bend/Wear -> Replace.
- Inspect:
- Main jet
- Pilot jet
- Main air jet
- Pilot air jet
- Main nozzle
Contamination ->Replace.
- Inspect:
- Needle valve
Grooved wear -> Replace.
- Inspect:
- Float
Crack/Damage -> Replace.
Carburetor assembly
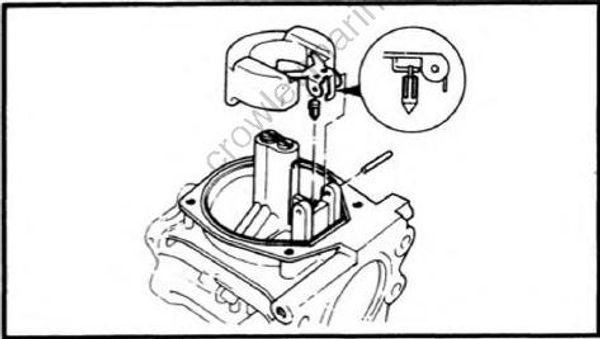
- Install:
- Needle valve
- Float
- Float pin
- Screw
NOTE:
After installing, check the smooth movement of the float.
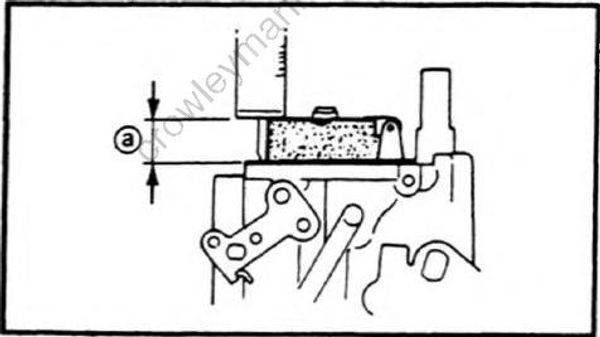
- Measure:
- Float height @
Out of specification -> Replace.
Float height: 16.0 ± 0.5 mm (0.63 ± 0.02 in)
NOTE:
- The float should be resting on the needle valve, without compressing it.
- Measure at the end of the float, opposite to its pivoting end.
- Adjust:
- Pilot screw
Adjustment steps:
- Screw in the pilot screw until it is lightly seated.
- Back out by the specified number of turns.
Pilot screw (turns out):
150: 1 ± 1/4
S150: 1-1/4± 1/4
P150:
S: 1-9/16 ± 1/4,
P: 1-1/16 ± 1/4
175: 1-1/16 ± 1/4
S175: 1-1/8± 1/4
P175:
S: 1-5/8 ±1/4,
P: 1-1/8 ± 1/4
200: 1-1/8 ±1/4
S200:
S: 1-1/8 ±1/4,
P: 5/8 ± 1/4
P200, 225:
S: 1-1/4 ± 1/4,
P: 3/4±1/4
