

Preface
This kit is designed for use on CE Model V4 and V6 Johnson® and Evinrude® outboards used with a mechanical push-pull steering system that meets ABYC standard P-17-83. This kit can be used on either single or dual engine installations.

How to Read Illustration Symbols
Step 1. Prepare For Installation
1. Read complete installation instructions prior to starting work.
2. Become familiar with the contents of the parts kit.
Special tools required:
- Grease Gun
- Lifting Tool P/N 396748
- Torque Wrench Extension P/N 912031
- 1 in. Crowfoot
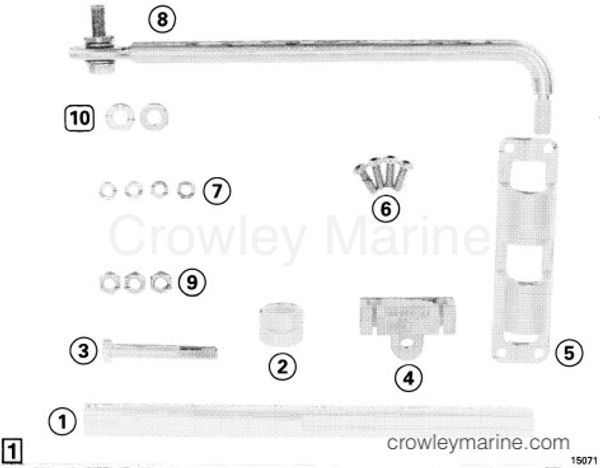
[1]
Contents of kit:
Step 2. Installation of Steering Connector Rod
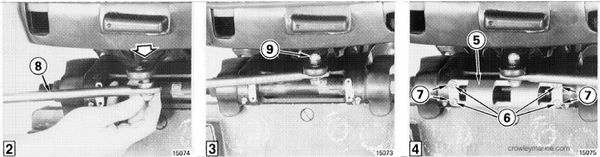
[2] [3]
Locate the rear hole on the steering arm and install connector rod (8) as shown. Attach locknut (9) to screw as soon as enough thread is exposed above the steering arm.
Tighten the steering connector rod screw until the pivot nut is in solid contact with the underside of the steering arm. Tighten the steering arm screw an additional 1/8 turn.
Using Torque Wrench Extension P/N 912031 attached to a torque wrench at a 90° angle, tighten locknut to a torque of 18-21 ft. lbs. (25-28 Nm).
Step 3. Installation of Steering Tube and Mounting Bracket
[4]
Place washers (7) onto mounting screws (6) and install mounting bracket (5) onto transom bracket bosses. Tighten the mounting screws to a torque of 5-7 ft. lbs. (7-9 Nm).

[5]
While holding steering tube nut (2) in cavity of mounting bracket, screw steering tube (1) into aluminum nut.
[6]
Continue turning tube until port steering tube nut (2) can be installed.
[7]
Adjust tube so that the starboard end of the steering tube is 4 3/8 in. (110 mm) from the starboard end of the mounting bracket.
Step 4. Installation of Steering Cables
[8]
Rotate steering wheel so that the maximum amount of steering cable rams is exposed. Lightly coat exposed steering cable ram with Triple-Guard® grease.

[9]
Press steering cable jacket fitting against tilt tube and thread steering cable anchor nut onto tilt tube. Tighten anchor nut to cable manufacturer's recommended torque.
Do not force or bend steering cable when assembling. If necessary to ease installation, pull engine away from transom.
[10]
Insert forward steering cable ram into new aluminum steering tube. Do not install steering cable nut at this time.
Step 5. Installation of Steering Connector Rod to Steering Cables
Do not use Steel Cable Seal Nut P/N 322376 on the new aluminum steering tube as galvanic corrosion may occur.
[11]
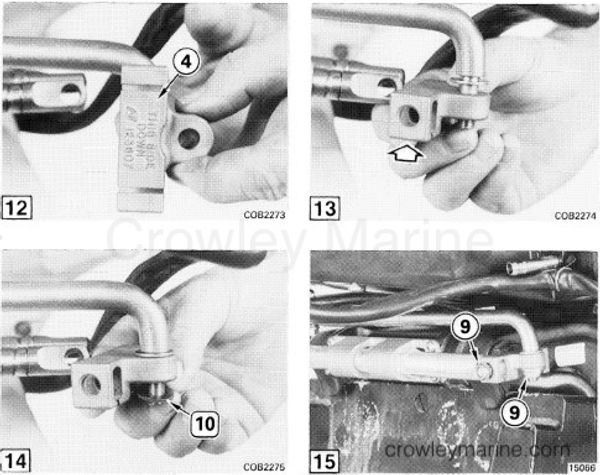
Install flat washer (10) onto steering connector rod.
[12] [13]
The steering cable connector (4) is labeled "this side down." Install connector onto steering connector rod with part number facing toward the steering cables.
[14]
Install the second flat washer (10) and locknut onto the steering connector rod. Install the steering cables into the connector. secure with screw (3) and locknut (9) provided.
[15]
Torque the steering connector rod locknut (9) to 18-20 ft. lbs. (24-27 Nm) and then back off nut 1/8 of a turn.
[15]
Torque the connector screw and locknut to 18-20 ft. lbs. (24-27 Nm).
Step 6. Adjustment of Forward Cable

[16] [17]
Slightly loosen steering tube nuts. Pull forward steering cable away from steering tube. By adjusting the steering tube nuts to move the steering tube, remove any gap that remains between the steering tube and the cable jacket end. Tighten steering tube nuts to a torque of 15-20 ft. lbs. (20-27 Nm).
[18]
Press steering cable jacket fitting against tilt tube and thread steering cable anchor nut onto tilt tube. Tighten anchor nut to cable manufacturer's recommended torque.
After approximately 10 hours of use, repeat items covered in Step 6 to remove any additional play in the steering cables.
Lubricate grease fittings on swivel bracket using Triple-Guard grease.
Step 7. Post Installation Test
After installation and adjustments are completed, check for possible interference between steering system parts and any portion of motor, boat, or accessory. To do this turn motor from lock to lock in both the running and full tilt positions. Failure to check for and to remove possible interferences may result in steering system parts being broken or damaged should the motor strike an underwater object and tilt rapidly into the boat.
Step 8. Special Steering System Warnings and Tilt Tube Lubrication Chart
The installer was instructed to grease the steering cable rams during installation of this kit. Periodic regreasing with Triple-Guard grease is required per chart below.
See your dealer for the required service.
| Type of Use | Frequency |
|---|---|
| Fresh water | Annually |
| Salt water | Every 90 days |
| Storsge of 30 days or longer | Before placing in storage |
Failure to regrease as recommended could result in steering system corrosion. Corrosion may affect steering effort making operator control difficult.
If you raise or lower the motor on the boat transom after installation of this kit, rerun Step 7 Post Installation Test. A few minutes spent to make sure that the steering system is free of part interference is better than broken parts and sudden steering control loss later.
When replacement of parts is required use genuine BRP parts or parts with equivalent characteristics including type, strength, and material. Failure to do so many result in product malfunction and possible injury to the operator and or passengers.
To the Installer
Give these instructions to the future owner. The instructions contain safety warnings and other information vital to the continued safe use of this product.
To the New Owner
Save these installation instructions. Put them in your owner's/operator's manual. The information that was important to the original installer is just as important to you in the future.
0174798 - DUAL CBL STRG KIT
0322376 - Johnson/Evinrude, OMC Steering Wiper Nut
0396748 - Johnson/Evinrude, OMC LIFTING EYE&ADPTR.
0912031 - Johnson/Evinrude, OMC WRENCH, EXTENSION
0508298 - OMC TRIPLE GUARD 8 OZ