

PREFACE
This kit is used on 1995 (EO) and newer 9.9/15 four-stroke remote electric start models to provide start-in-gear-prevention feature when using a remote control without a neutral start switch.

[1]
Check Contents of Kit
| Ref. | Name of Part | Qty. |
|---|---|---|
| 1 | Shift Shaft Assembly | 1 |
| 2 | Switch Bracket | 1 |
| 3 | Safety Switch Assembly | 1 |
| 4 | Switch Mounting Screws | 2 |
| 5 | Switch Mounting Locknuts | 2 |
| 6 | Sleeve | 1 |
| 7 | Socket Terminal | 1 |
To avoid accidental starting of engine while servicing, twist and remove all spark plug leads, and disconnect the battery cables from the battery.
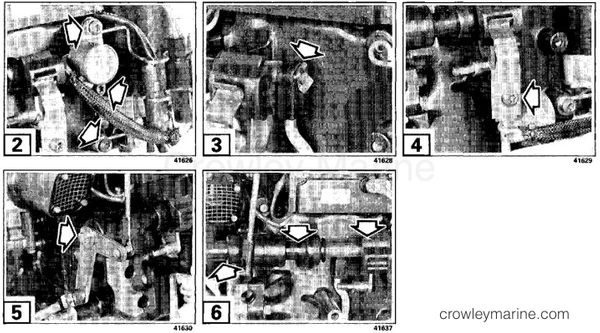
Remove lower motor cover.
[2]
Remove the two rectifier mounting screws, rectifier assembly, lower retainer screw, retainer, and spacer.
[3]
Remove the shift rod connector clip and connector.
[4]
Remove the detent spring adjustment screw and detent springs.
[5]
Remove the screw and washer retaining the shift shaft assembly and shift lever.
[6]
Remove the shift shaft assembly and the two shift shaft bushings. Discard the shift shaft assembly.
Inspect components and replace if necessary.

7
Install the two shift shaft bushings and the shift shaft assembly (1).
8
Apply Nut Lock to screw threads and install with washer and shift lever. Torque to 15-17 ft. lbs. (20-23 Nm).
[9]
Place the shift rod connector onto the shift shaft pin and secure with clip.
[10]
Install retainer, switch bracket (2), and rectifier upper mounting screw; hand tighten screw.
[11]
Install rectifier lower mounting screw. Torque both rectifier mounting screws to 60-84 in. lbs. (7-9 Nm).
[12]
Install screw, retainer, and spacer, as shown. Tighten screw securely.

[13]
Apply Nut Lock to threads of the detent spring adjustment screw. Verify gearcase is in NEUTRAL. Install screw through switch bracket and detent springs. Adjust detent springs to fully engage notch of the shift lever detent. Torque screw to 84-106 in. lbs. (10-12 Nm).
[14]
Install safety switch assembly (3) onto bracket with mounting screws (4) and locknuts (5). Adjust switch with plunger against cam and switch body 1/32 in. (0,8 mm) from cam surface. Tighten screws and locknuts securely.
[15]
Remove yellow/red stripe wire from starter solenoid.
[16]
Cut ring terminal off yellow/red stripe wire.
[17]
Strip back insulation 1/4 in. (6,3 mm) and install sleeve (6) onto wire.
[18]
Crimp socket terminal (7) onto wire. Coat both terminal with Electrical Grease.
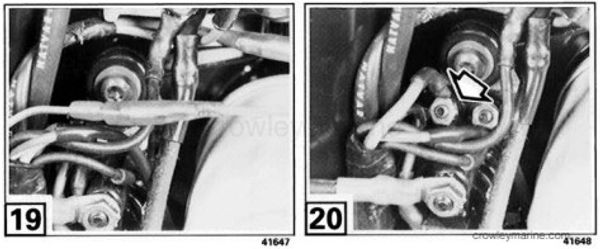
[19]
Connect bullet terminal on safety switch assembly to the socket terminal just installed. Pull sleeve over connection.
[20]
Attach ring terminal on safety switch assembly to starter solenoid. Reinstall washer and nut; tighten nut securely. Coat solenoid terminal with Black Neoprene Dip.
Reinstall lower motor cover.
Place wires in lower motor cover in a position that will not interfere with any moving part or other engine components.
Test Neutral Start Switch
Attempt to start motor in FORWARD, REVERSE, and NEUTRAL.
If motor will crank in FORWARD or REVERSE, reposition switch so plunger extends in both forward and reverse gear, and retest.
If motor will not crank in NEUTRAL, push switch closer to cam surface.
Reconnect spark plug wires.
0175951 - Neutral Start Kit
0176436 - Neutral Start Kit
0500422 - Johnson/Evinrude, OMC ULTRA LOCK 10 ML
0909570 - Johnson/Evinrude, OMC FL *NEOPRENE DIP
0503243 - Johnson/Evinrude, OMC LUBE TUBE ELEC