

Preface
This kit adapts the 1991 (EI) and newer, 2-cylinder, 2-cycle, 5 thru 8, Evinrude® and Johnson® outboards for use with a remote control, yet provides easy removability of cables for tiller control.

[1]
Contents of Kit
| Ref. | Name of Part | Qty. |
|---|---|---|
| 1 | Shift Lever Screw | 1 |
| 2 | Shift Lever | 1 |
| 3 | Clevis Pin | 2 |
| 4 | Cotter Pin | 2 |
| 5 | Shift Link Retainer | 2 |
| 6 | Shift Link | 1 |
| 7 | Retainer Spring | 1 |
| 8 | Retainer Pin | 1 |
| 9 | Trunnion Retainer | 1 |
| 10 | Grommet | 1 |
| 11 | Trunnion Bracket | 1 |
| 12 | Bracket Screw | 1 |
Installer: Give these instructions to the owner. Owner: Read "Cable Installation" and notes at the end of this document before connecting or disconnecting the control cables.
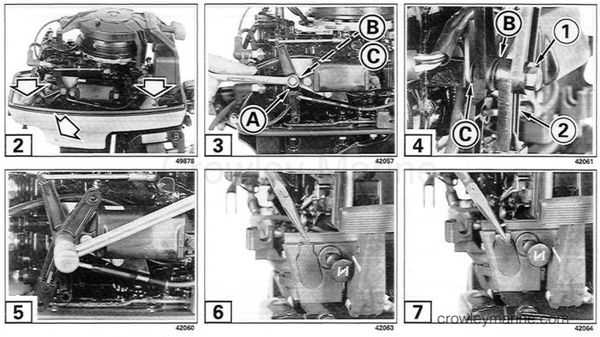
[2]
Remove lower motor cover.
[3]
Remove throttle mounting screw (A) and washers (B) and (C). Retain washers and discard screw.
[4]
Apply a light coating of Triple-Guard® 0508298 grease to shank of shift lever screw (1). Install screw through shift lever (2), washer (B), throttle lever, washer (C), and into throttle lever mounting hole.
[5]
Torque shift lever mounting screw to 60-84 in. lbs. (7-9 Nm).
[6]
Carefully remove plastic rib from lower motor cover.
[7]
Remove and discard lower motor cover grommet.

[8]
If trunnion bracket (11), is already on your engine, discard items (11) and (12). If trunnion bracket is not installed, secure trunnion bracket with screw (12). Tighten screw to a torque of 60-84 in. lbs. (7-9 Nm).
[9]
Remove screw and J-clamp that retains the tiller handle throttle cable and discard J-clamp. Reinstall screw and torque to 60-84 in. lbs. (7-9 Nm).
Cable Installation
Lubricate shift and throttle cable ends with Triple-Guard® grease.
When installing control cables, hold the steering handle throttle cable UP and route the remote control cables below it. This will eliminate throttle cable binding.
Identify the throttle cable from the shift cable at the motor end of cables by shifting control handle into FORWARD. The shift cable will move first. Return control to NEUTRAL.
[10]
Position throttle cable inside (to the port side) of the throttle lever, with holes aligned. Insert clevis pin (3) through cable and throttle lever. Insert cotter pin (4) and spread ends to secure.
Check that the motor shift lever is in NEUTRAL, the remote control handle is in NEUTRAL, and the fast idle lever is in RUN (down and latched) position.

Adjust the idle speed knob on the steering handle to the extreme slow speed position.
[11]
Turn the throttle trunnion nut so it will fit into trunnion pocket.
[12]
Position shift cable end into the shift lever and insert clevis pin (3) through holes. Insert cotter pin (4) and spread ends to secure.
[13]
Install a shift link retainer (5) on the end of the shift lever. Insert the shift link (6) through the lever with the link behind and above the throttle cable (A). Push the link down until it engages the retainer.
[14]
Install shift link retainer (5) into shift lever, then install shift link into lever. Make sure link is held securely in place with retainer.
[15]
Adjust length of the shift cable by turning the trunnion nut until cable trunnion fits into the trunnion pocket.
[16]
Install retainer spring (7) onto retainer pin (8). Insert pin into trunnion retainer (9).
[17]
Hook end of trunnion retainer assembly into trunnion bracket and over cable trunnions. Push pin down and twist to secure cables in place.
[18]
Install grommet (10) onto cables, then install grommet into lower motor cover.
Install lower motor cover.
Check Synchronization and Linkage adjustments. See the Service Manual Section 1, for procedures.
To the Owner
When operating with a remote control, the control cable trunnions must be adjusted properly or you may not be able to control motor speed or direction of thrust.
If motor is not running, do not shift from NEUTRAL into gear without rotating the propeller. Damage to motor shift linkage could result. Save this cable installation instruction with your Operator's Manual for future reference.