

Oil Component Servicing
To prevent accidental starting while servicing, disconnect the battery cables at the battery.
Oil Distribution Hoses
ENVIRONMENTAL NOTE
Dispose of used oil or oil contaminated towels in an environmentally responsible manner, or according to local regulations.
IMPORTANT: If replacing oil distribution hoses, note hose routings before proceeding with disassembly.
The oil distribution hoses from each manifold MUST be the same length. DO NOT alter the length of any hoses.
| Oil Distribution Hose Length |
|---|
| Crankcase oil manifold to crankcase fittings | 20 in.(508 mm) |
|---|---|
| Cylinder oil manifold to cylinder block fitting | 21.75 in.(552.45 mm) |
Removal
Release the hose by depressing the outer ring of the hose retaining mechanism.
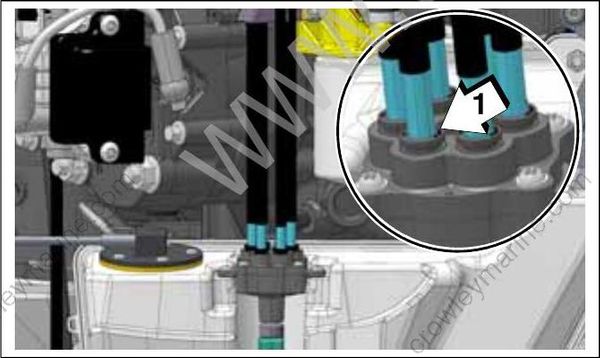
- Retainer mechanism
After the hose is removed from the manifold, make sure hose support is in the end of the hose.
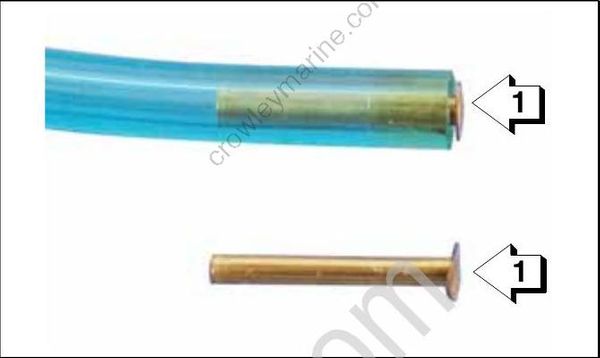
- Hose support
Cut tie straps and remove oil distribution hoses from the oil delivery fittings.
Installation
Cut Replacement Oil Hose, P/N 778708, to the correct length. Insert hose support in manifold end of hose.
IMPORTANT: DO NOT insert distribution hoses into manifold without a hose support.
Be sure the hose is fully inserted into manifold. Insertion depth is 5/8 in. (16 mm). Visually inspect for hose supports.
Route oil distribution hoses from the oil manifold to the oil delivery fittings as they were before removal. Refer to Oil Supply Diagrams on p. 190.
- Connect oil hoses to crankcase oil fittings and fasten with tie straps.
- Connect oil hoses to cylinder oil fittings on the cylinder head and fasten with tie straps.
Prime the oil system. Refer to Oil Supply Priming on p. 196.
Check oil flow through oil distribution hoses. Run the outboard and check for leaks.
Repair any oil leaks.
Install the starboard frame. Then install the engine top cover, rear cover and starboard side panel. Refer to Engine Cover and Frame Service on p. 55.
Oil Tank Servicing
ENVIRONMENTAL NOTE
Dispose of used oil or oil contaminated towels in an environmentally responsible manner, or according to local regulations.
Oil Tank Removal
Disconnect the battery cables at the battery.
Remove the engine top cover, rear cover and star board side panel. Remove the starboard frame. Refer to Engine Cover and Frame Service on p. 55.
Remove oil from the oil tank. Use shop towels to clean up any spilled oil.
Disconnect the electrical connectors from the:
- Oil pump
- Low oil switch
- Oil level sender
Remove the Oetiker clamps from:
- Oil fill tube
- Remote oil fill hose
- Oil vent hose
Remove the hoses from their fittings.
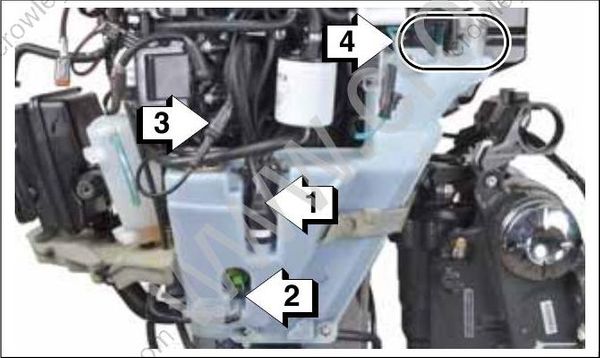
- Oil pump
- Low oil switch
- Oil level sender
- Oetiker clamps and hoses
Remove the oil distribution hoses from the oil manifold. Refer to Oil Distribution Hoses on p. 204.
Remove the nuts retaining the oil tank. Then remove the oil tank from its mounting studs.
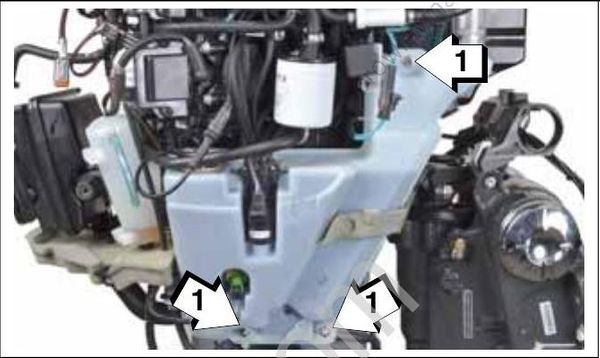
- Retaining nuts
Oil Tank Installation
Place the oil tank on its mounting studs. Install the three retaining nuts and tighten to a torque of 15 to 17 ft. lbs. (20 to 23 N•m).
Install the oil fill tube, the remote oil fill hose and the oil vent hose on their fittings. Secure the hoses with new Oetiker clamps.
Install the oil distribution hoses into the oil manifold. Refer to Oil Distribution Hoses on p. 204.
Connect the electrical connectors to the:
- Oil pump
- Low oil switch
- Oil level sender
Fill the oil tank with the recommended oil. Prime the oil system. Refer to Oil Supply Priming on p. 196.
Check oil flow through oil distribution hoses. Check oil system operation and routing of oil hoses. Run the outboard and check for leaks.
Repair any oil leaks and any kinked or misrouted hoses.
Install the starboard frame. Then install the engine top cover, rear cover and starboard side panel. Refer to Engine Cover and Frame Service on p. 55.
Crankcase Oil Pump
ENVIRONMENTAL NOTE
Dispose of used oil or oil contaminated towels in an environmentally responsible manner, or according to local regulations.
Removal
Disconnect the battery cables at the battery.
Remove the engine top cover, rear cover and star board side panel. Remove the starboard frame. Refer to Engine Cover and Frame Service on p. 55.
Remove oil from the oil tank. Use shop towels to clean up any spilled oil.
Disconnect the electrical connector from the oil pump.
Remove the oil distribution hoses from the oil manifold.
IMPORTANT: If replacing oil distribution hoses, note hose routings before proceeding with disassembly. Refer to Oil Distribution Hoses on p. 204.
Remove retaining screws from oil pump assembly. Twist and pull up on oil pump to remove from tank. DO NOT pull up on oil manifold.
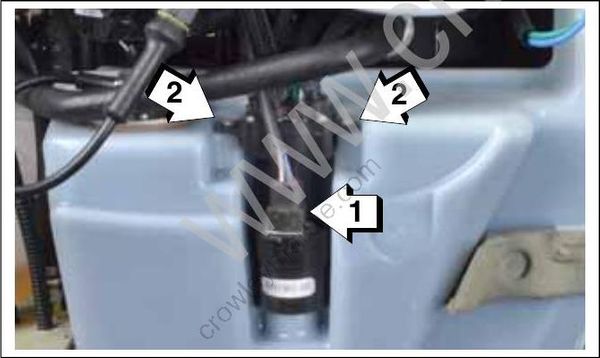
- Electrical connector
- Retaining screws
Remove the oil pump assembly.
IMPORTANT: The oil pump and manifold is an assembly and cannot be serviced as individual components.
Installation
Apply a drop of outboard lubricant to a new oil pump o-ring. Install o-ring on oil pump flange.
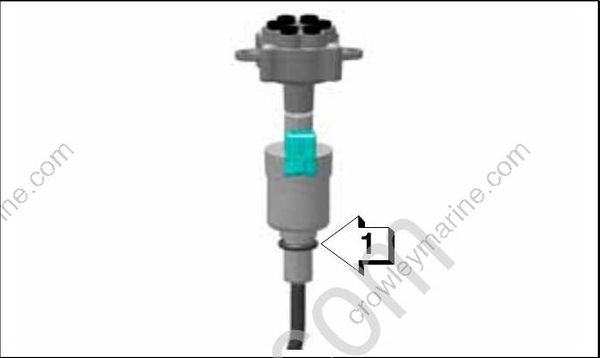
- O-ring
Install oil pump retainer screws. Tighten securely. IMPORTANT: Turn self-tapping screws counter clock-wise to start the threads and clockwise to tighten. Failure to follow this procedure can dam age the threads of the oil tank.
Reconnect the electrical connector.
Install the oil distribution hoses into the oil manifold. Refer to Oil Distribution Hoses on p. 204.
Fill the oil tank with the recommended oil. Prime the oil system. Refer to Oil Supply Priming on p. 196.
Check oil flow through oil distribution hoses. Check oil system operation and routing of oil hoses. Run the outboard and check for leaks.
Repair any oil leaks and any kinked or misrouted hoses.
Install the starboard frame. Then install the engine top cover, rear cover and starboard side panel. Refer to Engine Cover and Frame Service on p. 55.
Cylinder Oil Pump
Removal
Disconnect the battery cables at the battery.
Remove the engine top cover, rear cover and star board side panel. Remove the starboard frame. Refer to Engine Cover and Frame Service on p. 55.
Disconnect the electrical connector from the cylinder oil pump.
Remove the Oetiker clamp and oil supply hose from the inlet fitting of the oil pump. Remove oil distribution hoses from the cylinder oil pump. Use shop towels to clean up any spilled oil.
IMPORTANT: If replacing oil distribution hoses, note hose routings before proceeding with disassembly. Refer to Oil Distribution Hoses on p. 204.
Remove the screw retaining the oil pump.
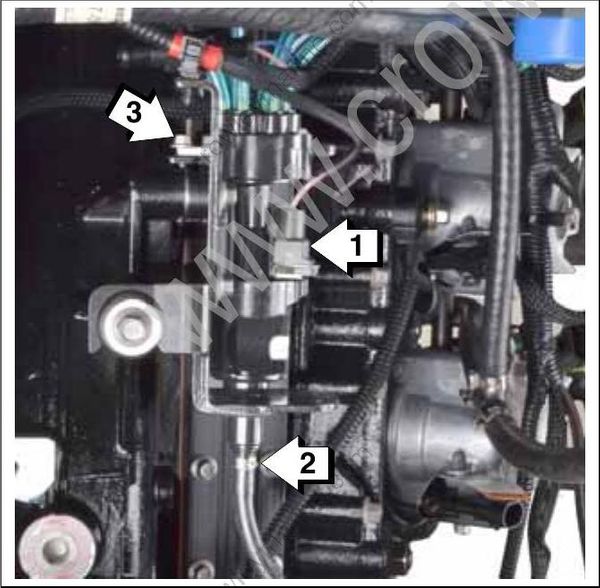
- Electrical connector
- Oetiker clamp and oil supply hose
- Screw
Remove the oil pump assembly.
IMPORTANT: The cylinder oil pump and manifold is an assembly and cannot be serviced as individual components.
Installation
Install the oil pump into the bracket. Install the screw and tighten to a torque of 35 to 60 in. lbs. (4 to 6 N•m).
Connect the electrical connector.
Connect the oil supply hose to the inlet fitting of the oil pump. Fasten with a new Oetiker clamp.
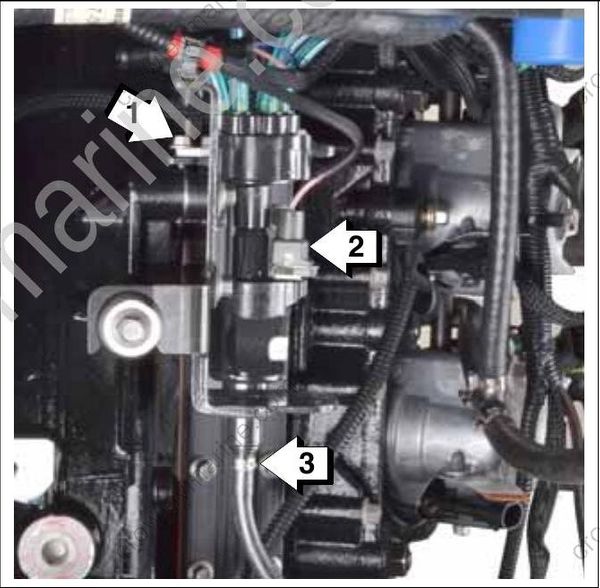
- Screw
- Electrical connector
- Oil supply hose and Oetiker clamp
Connect the battery cables at the battery.
Prime the oil system. Refer to Oil Supply Priming on p. 196.
Check oil flow through oil distribution hoses. Run the outboard and check for leaks.
Repair any oil leaks.
Install the starboard frame. Then install the engine top cover, rear cover and starboard side panel. Refer to Engine Cover and Frame Service on p. 55.
