

ASSEMBLY & INSTALLATION
Assembly & installation are reverse order of removal & disassembly with the special attention to the follow ing steps.

(1)Shift rod guide housing
(2)Bolt
(3)O-ring
(4)Dust seal
(5)Washer
(6)O-ring
(7)O-ring
(8)Washer
(9)Circlip
(10)Pin
(11)Spring
(12)Shift rod spring collar
(13)Shift rod
(14)Magneto
(15)Magneto holder
(16)Pin
(17)Pin
(18)Clutch cam
(19)Detent ball
(20)Spring
(21)Plate
(22)Shift rod guide
(23)Grommet
(24)Water pump case
(25)Pin
(26)Bolt
(27)Key
(28)Water pump impeller
(29)Pump case under panel
(30)Gasket
(31)Exhaust seal
(32)Exhaust seal plate
(33)Union
(34)Hose
(35)Nipple
(36)Gearcase
(37)Bolt
(38)Bolt
(39)Pin
(40)Anode
(41)Washer
(42)Bolt
(43)Trim tab
(44)Bolt
(45)Screw
(46)Water filter PORT
(47)Water filter STBD
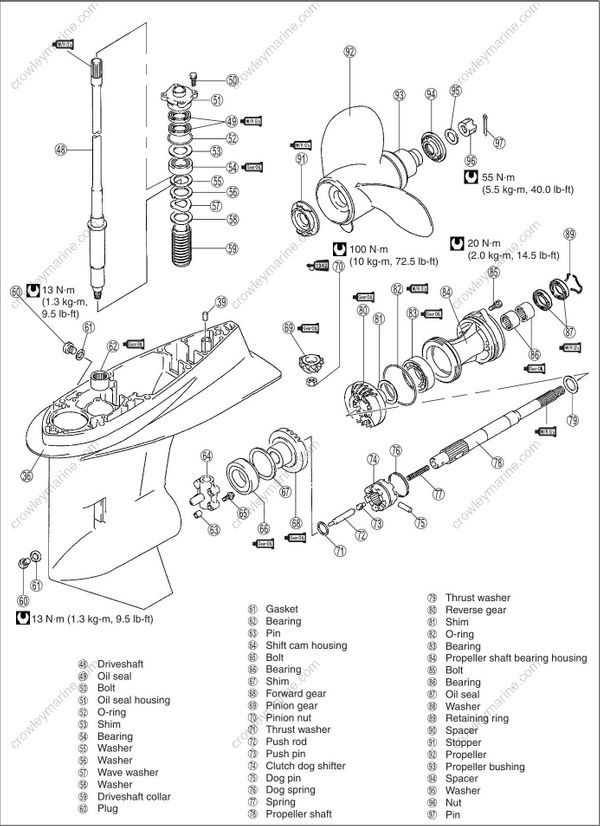
(48)Driveshaft
(49)Oil seal
(50)Bolt
(51)Oil seal housing
(52)O-ring
(53)Shim
(54)Bearing
(55)Washer
(56)Washer
(57)Wave washer
(58)Washer
(59)Driveshaft collar
(60)Plug
(61)Gasket
(62)Bearing
(63)Pin
(64)Shift cam housing
(65)Bolt
(66)Bearing
(67)Shim
(68)Forward gear
(69)Pinion gear
(70)Pinion nut
(71)Thrust washer
(72)Push rod
(73)Push pin
(74)Clutch dog shifter
(75)Dog pin
(76)Dog spring
(77)Spring
(78)Propeller shaft
(79)Thrust washer
(80)Reverse gear
(81)Shim
(82)O-ring
(83)Bearing
(84)Propeller shaft bearing housing
(85)Bolt
(86)Bearing
(87)Oil seal
(88)Washer
(89)Retaining ring
(90)Spacer
(91)Stopper
(92)Propeller
(93)Propeller bushing
(94)Spacer
(95)Washer
(96)Nut
(97)Pin
• Make sure that all parts used in assembly are clean
and lubricated.
• After assembly, check parts for tightness and smoothness of operation.
• Before final assembly, be absolutely certain that all gear contact, shim adjustments
and tolerances are correct.
Failure to correctly adjust these areas will result in lower unit damage.
(See the “GEARS SHIMMING AND ADJUSTMENT”section on the page 9-23.)
SHIFT CAM HOUSING
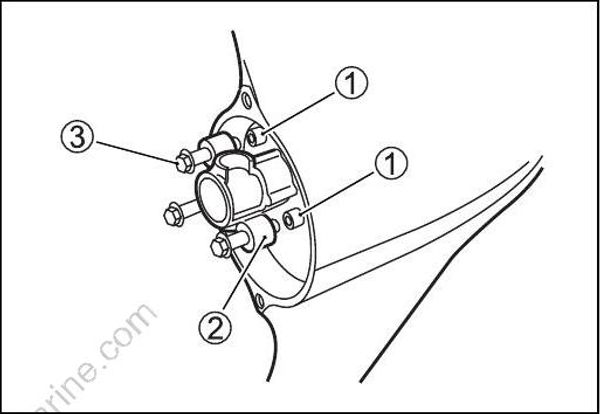
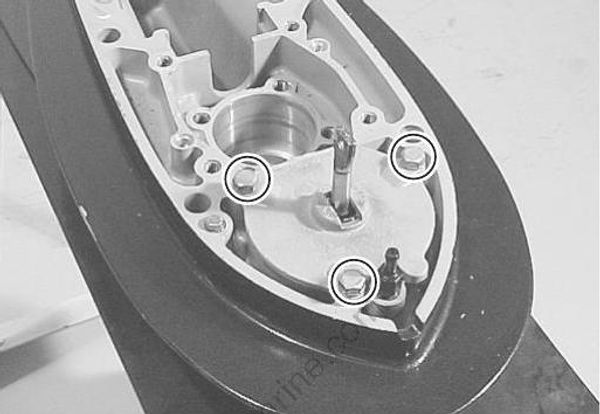
Install the dowel pins (1) and the shift cam housing (2), then tighten the three bolts (3) securely.
SHIFT ROD GUIDE HOUSING ASSEMBLY

- Apply the Water Resistant Grease to the inside of the dust seal (4), the O-ring (2), (3) and (9).
99000-25161: SUZUKI WATER RESISTANT GREASE
Align the pin holes of the shift rod (5) and the shift cam (6).
Insert the pin (7) through the pin holes first, then insert the pin (8) into the pin (7).Install the plate (10), the spring (11) and the detent ball (12) in the gearcase.
Install the shift rod/cam with the face (A) of the cam facing toward the propeller side.
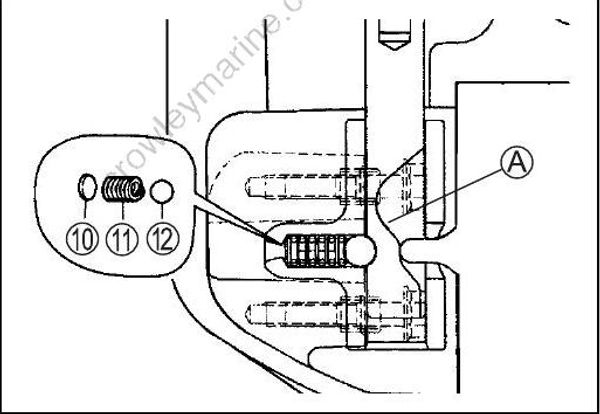
Install the shift rod guide housing to the gearcase and tighten the three bolts securely.
Make sure that the shift rod guide housing assembly shifts smoothly.
FORWARD GEAR
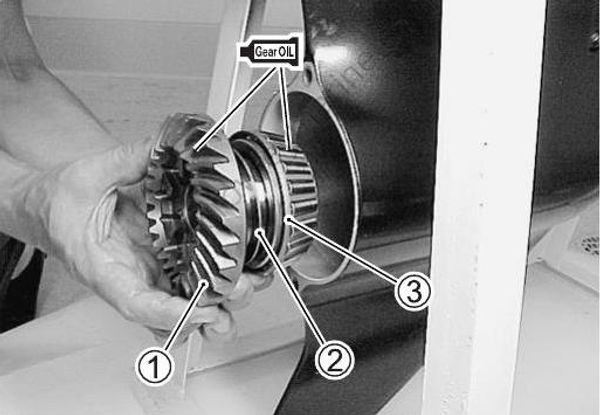
Place the forward gear bearing (3) and the back-up shim (2) in position, then install the forward gear (1).
09900-22540: SUZUKI OUTBOARD MOTOR GEAR OIL
PINION GEAR
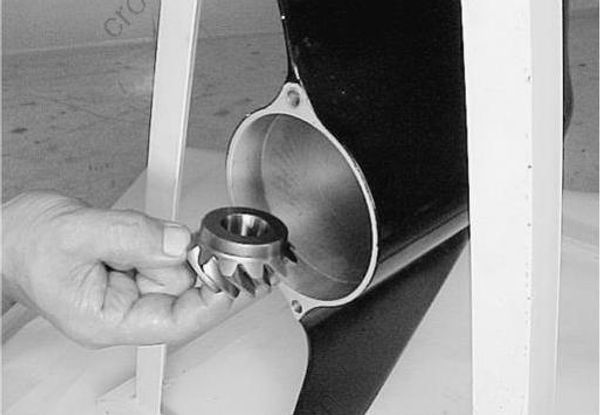
Place the pinion gear in the gearcase.
DRIVESHAFT
Assemble the washer (1), the washer (with the tab) (2), the wave washer (3), the washer (4) and the driveshaft collar (5) to the driveshaft.
After installing the driveshaft collar, fit the convex part of the collar in the concave part of the driveshaft by turning the collar.

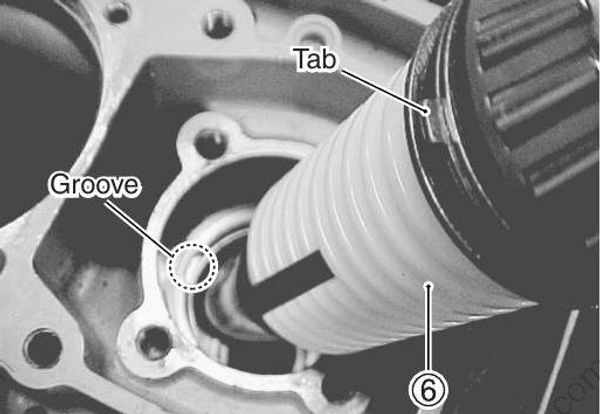
Lower the driveshaft assembly (6) down into the gearcase until the bottom of the shaft protrudes through the center of the pinion.
The washer tab should be located into the groove on the gearcase.
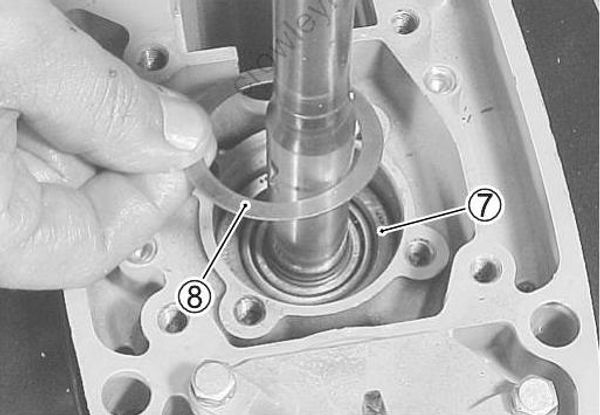
- Install the bearing outer race 7 and the pinion shim 8 to the driveshaft.
DRIVESHAFT OIL SEAL HOUSING

- Apply the Water Resistant Grease to the driveshaft oil seal.
99000-25161: SUZUKI WATER RESISTANT GREASE
- Apply the Water Resistant Grease to the O-ring, then install the O-ring into the groove on the driveshaft oil seal housing.
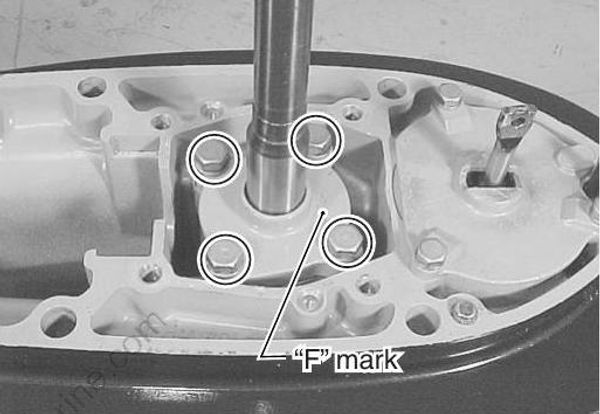
- Install the driveshaft oil seal housing on the gearcase, then tighten the four bolts securely.
PINION NUT
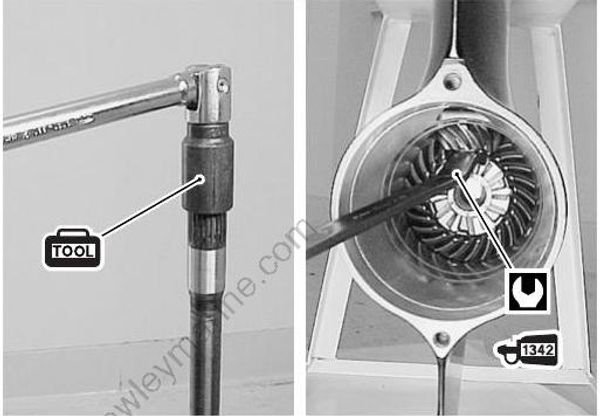
Apply the Thread Lock to the threads of the pinion nut, then tighten the nut to the specified torque.
Pinion nut: 100 N·m (10.0 kg-m, 72.5 lb-ft)
99000-32050: THREAD LOCK “1342”
09921-28710: Drive shaft holder
CHECKING DRIVESHAFT THRUST PLAY
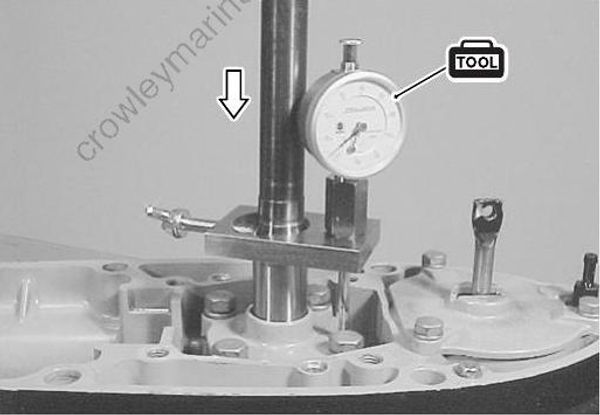
Before installing the reverse gear, the driveshaft thrust play should be checked.
(See the “Checking driveshaft thrust play” section on the page 9-24.)
09951-09530: Gear adjusting gauge
PROPELLER SHAFT

- Slide the clutch dog shifter (5) onto the propeller shaft (10.
For correct installation, the side of the clutch dog shifter which should face toward the reverse gear is marked with the letter “R”.
Insert the spring (2), the push pin (3) and the push rod (4) into the propeller shaft.
Align the holes in the clutch dog shifter (5) and the push pin (3), then slide the dog pin (6) through them.
Install the dog spring (7), ensuring that it fits snugly into the groove on the clutch dog shifter.

PROPELLER SHAFT/BEARING HOUSING

- Install the O-ring (5) to the propeller shaft bearing housing (4).
- Assemble the propeller shaft in the following sequence: Forward thrust washer (7) Reverse thrust washer (1) Reverse gear (2) Reverse gear
back-up shim (3) Propeller shaft housing (4)
99000-25161: SUZUKI WATER RESISTANT GREASE
99000-22540: SUZUKI OUTBOARD MOTOR GEAR OIL
- Using the special tools, install the propeller shaft and the housing assembly in the gear case.
09922-59410: Propeller shaft housing installer
09922-59420: Housing Installer Handle
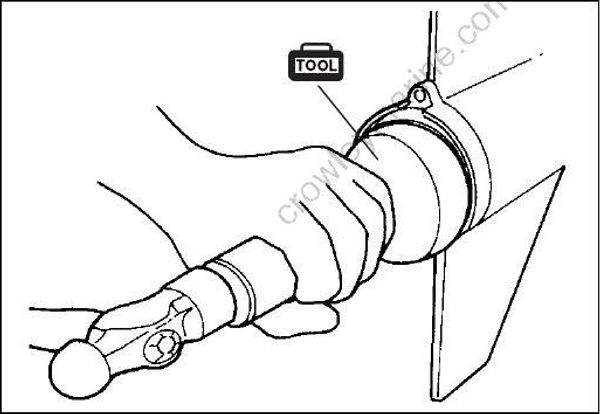
- When the housing is fully seated, tighten the two bolts to the specified torque.
Bearing housing bolt: 20 N•m (2.0 kg•m, 14.5 lb•ft)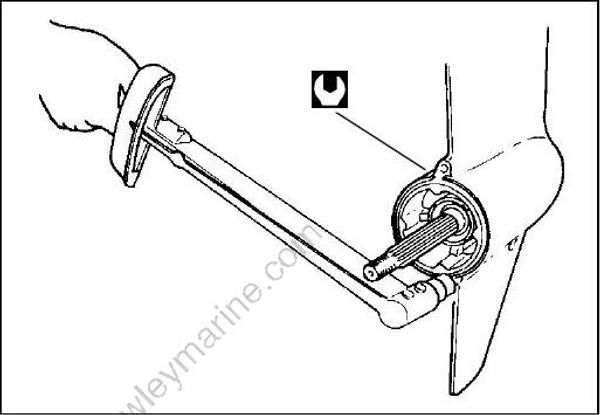
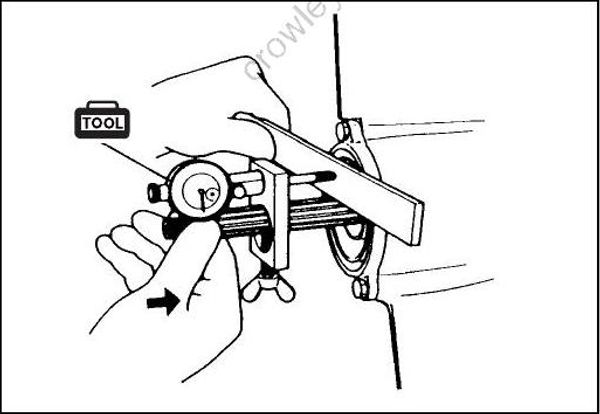
RECHECKING DRIVESHAFT THRUST PLAY
RECHECKING DRIVESHAFT THRUST PLAY

Recheck the driveshaft thrust play.
This should not be less than previously checked on the page 9-17. (See the “RECHECKING DRIVESHAFT THRUST PLAY” section on the page 9-26.)
09951-09530: Gear adjusting gauge
CHECKING PROPELLER SHAFT THRUST PLAY
See the page 9-27.
LEAKAGE CHECK
Check for leakage of the oil seal and the O-ring when applying air pressure inside of the gearcase.
09950-69512: Oil leakage tester
09952-99310: Hand air pump

Procedure
- Install the oil leakage tester into the oil level hole.
- Connect a hand air pump to the oil leakage tester.
- While rotate the driveshaft and the propeller shaft clockwise several times, apply specified pressure for leakage test.
Apply low initial pressure of 20 – 40 kPa, (0.2 – 0.4 kg/cm2
, 2.8 –5.7 psi) first, then apply the specified pressure.
Leakage test pressure: 100 kPa (1.0 kg/cm2
Do not exceed pressure of 110 kPa (1.1 kg/cm2
, 15.6 psi) or damage to oil seals will result.
- Once stabilized, the pressure should remain steady for at least 5 min.
If the pressure does not fall, sealing performance is correct..
WATER PUMP

Place the dowel pins (1), the under panel gasket (2) and the under panel (3) into position.
Insert the key (4) in the driveshaft and slide the impeller (5) onto the driveshaft, ensuring that the key and the keyway are aligned.
Install the pump case (1) while rotating the driveshaft clock wise to flex the impeller vanes in correct direction.
Tighten the four pump case bolts (2) to the specified torque.
Pump case bolt: 20 N•m (2.0 kg•m, 14.5 lb•ft)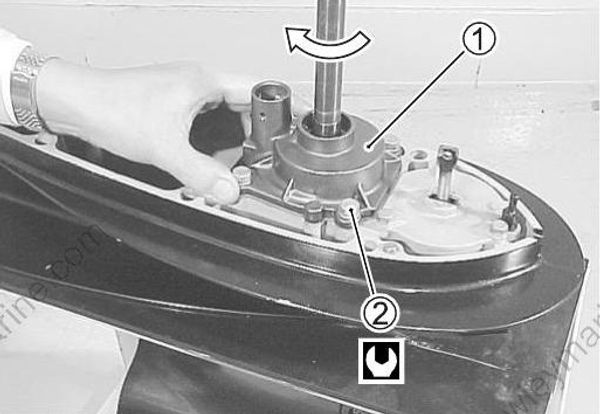
PROPELLER INSTALLATION
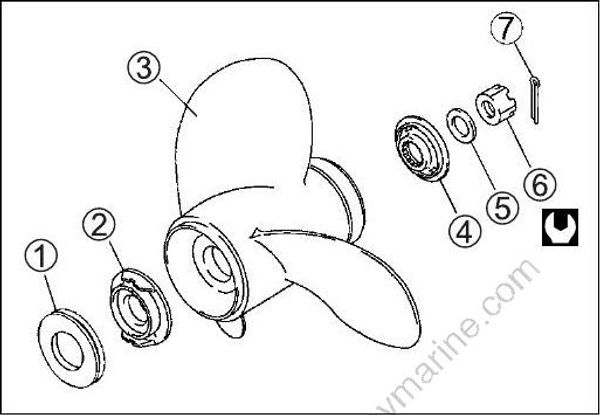
Install the spacer (1) and the propeller stopper (2) onto the propeller shaft, then slide on the propeller (3).
Fit the spacer (4), the washer (5) and the nut (6), then tighten the nut to the specified torque.
Propeller nut: 55 N•m (5.5 kg•m, 40.0 lb•ft)
- Push the cotter pin (7) through the nut and the shaft, then bend to secure.
LOWER UNIT INSTALLATION
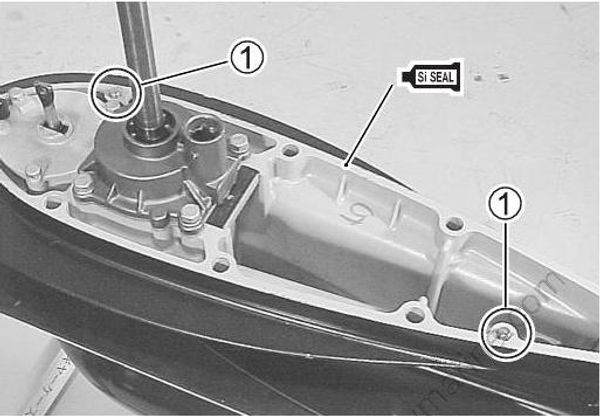
Install the dowel pins (1).
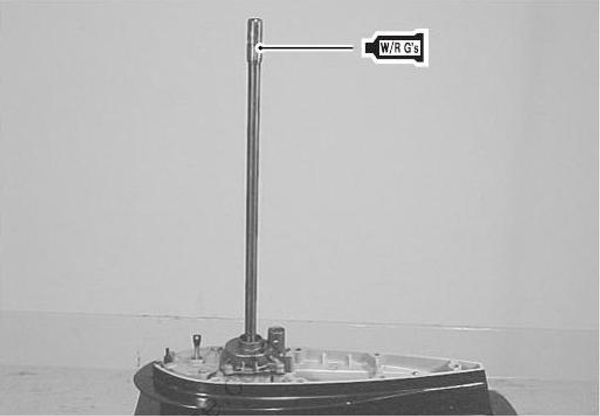
Apply the Water Resistant Grease to the driveshaft splines.
Apply the Silicone Seal lightly to the mating surfaces of the gearcase and the driveshaft housing.
Slide the gearcase into place, making sure that the top of the driveshaft engages properly with the crankshaft and the water tube locates in the water pump case outlet.
99000-25161: SUZUKI WATER RESISTANT GREASE
99000-31120: SUZUKI SILICONE SEAL
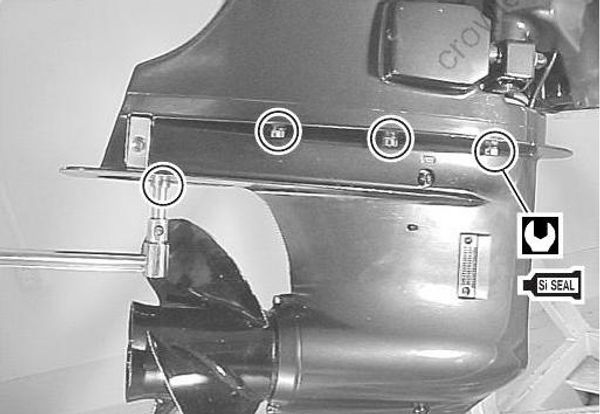
- Apply the Silicone Seal to the seven gearcase bolts and tighten them to the specified torque.
99000-31120: SUZUKI SILICONE SEAL
Gearcase bolt: 55 N•m (5.5 kg•m, 40.0 lb•ft)
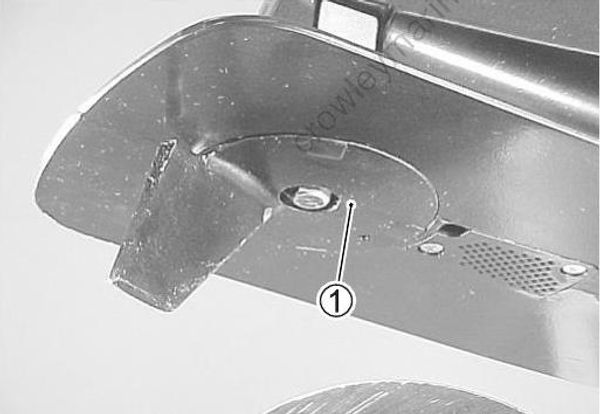
Install the trim tab (1).
Connect the shift rod to the clutch rod with the connector pin (1) and the cotter pin (2).

GEAR OIL
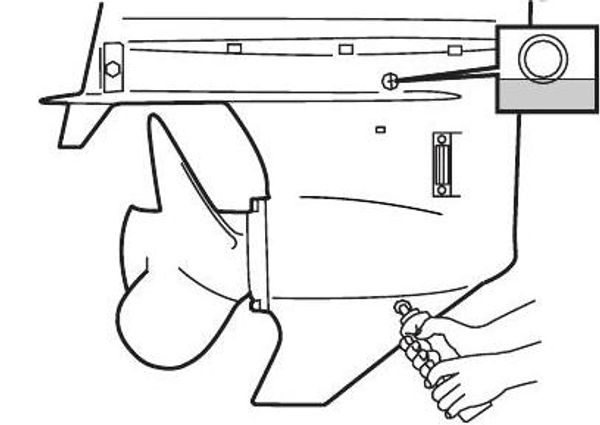
Fill the gearcase with the specified gear oil.
See the “PERIODIC MAINTENANCE/GEAR OIL” section on the page 2-5.
Necessary amount of gear oil:
1 050 ml (35.5/37.0 US/Imp.oz)
99000-22540: SUZUKI OUTBOARD MOTOR GEAR OIL
TRIM TAB ADJUSTMENT
TRIM TAB ADJUSTMENT
The trim tab counteracts or minimizes propeller torque “pull” felt through the steering system.
If steering is pulled to starboard or port side, adjust the trim tab with the following procedure:
Adjusting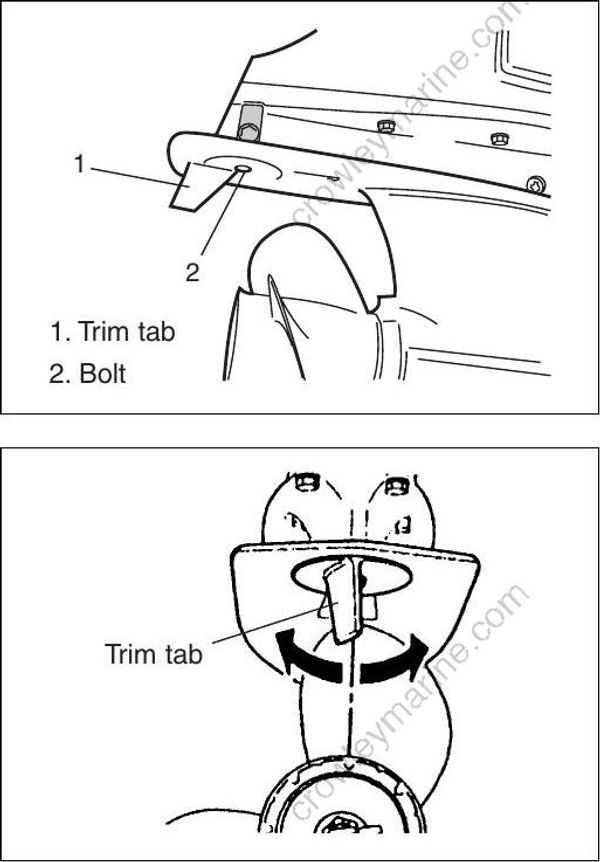
- Loosen the bolt of the trim tab.
- Change the direction of the trim tab.
●To compensate for a veer to starboard, set the trailing edge of the tab to the right (as viewed from behind).
●To compensate for a veer to port, set the trailing edge of the tab to the left.
Tighten the bolt of the trim tab.
Test ride boat and repeat the procedure 1 – 3 to set the trim tab in the best position.
With a properly adjusted trim tab, steering should be neutral and there should be no tendency for steering to be pulled to either port or starboard.
