GEARCASE TYPES, 75 – 90 HP
| Outboard Model | Gearcase Type | General Comparison | Service Procedure Comparison |
|---|---|---|---|
| (L) Models with 20 in. shaft | “S” | Unique housing, shafts, gears, and bearings | Similar |
| (X) Models with 25 in. shaft | “O” | Unique housing, shafts, gears, and bearings | Similar |
PROPELLER SERVICE
Inspection
Carefully examine propeller and outboard for the following:
• Damaged blades and signs of propeller cavitation (burned paint, etc.)
• Spun or overheated inner hub
• Worn or twisted splines and inadequate lubricant
• Damaged or missing converging ring (if applicable)
• Damage to outer hub area
• Worn, missing, or incorrect thrust washer and spacer
• Correct size and style
• Check for bent or damaged propeller shaft and twisted splines.
Refer to Propeller Hardware Installation on p. 290.
When servicing the propeller, always shift the outboard to NEUTRAL, turn the key switch OFF, and disconnect the battery positive (+) cable so the outboard cannot be started accidentally.
Propeller Selection
Selection of the wrong propeller could reduce engine service life, affect boat performance, or cause serious damage to the powerhead.
Water testing with various propeller designs and sizes is the best method of propeller selection.
The correct propeller, under normal load conditions, will allow the engine to run near the midpoint of the RPM operating range at full throttle. Refer to SERVICE SPECIFICATIONS AB MODELS on p. 12.
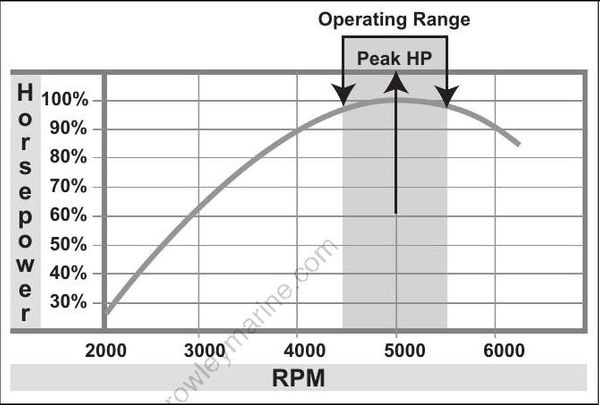
If the propeller blades have too much pitch, the engine will operate below its normal range at full throttle. Power will be lost, and powerhead damage could occur. If the propeller blades have too little pitch, the engine will operate above its normal range and damage from overspeeding could occur.
When selecting a propeller, consider the following:
• Use an accurate tachometer to determine the engine’s full-throttle RPM.
• The outboard should be trimmed for top speed.
• Select a propeller that suits the customer’s application and allows the engine to run near the midpoint of the full-throttle operating range when the boat has a normal load.
• Occasionally, one propeller will not cover a wide range of boat applications — water skiing to high speed performance boating. In such cases, it might be necessary to have a propeller for each situation.
• Refer to the Evinrude/Johnson Genuine Parts and Accessories Catalog for propeller styles and sizes.
• Right-hand propellers are considered standard rotation propellers. When propelling a boat forward, the propeller rotates in a right-hand (clockwise) direction as viewed from the rear.
• Left-hand propellers are considered counterrotation propellers. When propelling a boat forward, the propeller rotates in a left-hand (counterclockwise) direction as viewed from the rear.
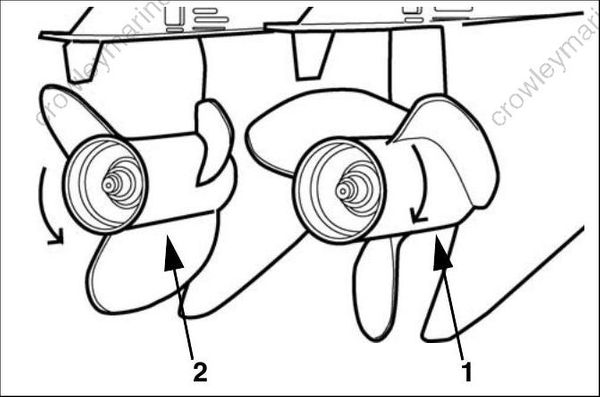
- Right-hand rotation (clockwise)
- Left-hand rotation (counterclockwise)
For dual-outboard installations, always check to be sure propellers are installed on the correct engines before aggressively operating the boat.
Propeller Hardware Installation
To prevent accidental starting while servicing, twist and remove all spark plug leads.
IMPORTANT: Depending on propeller style, different thrust bushings, spacers, and cotter pin keepers are used. See the Evinrude/Johnson Genuine Parts and Accessories Catalog for correct propeller hardware.
Apply Triple Guard grease to the entire propeller shaft before installing the propeller.
Install thrust bushing onto propeller shaft with taper of bushing matching taper of shaft.
If installing a propeller with an interchangeable hub, assemble the propeller following instructions provided with the propeller.
Align splines of propeller and shaft. Push propeller until seated on the thrust bushing.
Install the spacer over the propeller shaft splines.
Wedge a block of wood between propeller blade and the anti-ventilation plate.
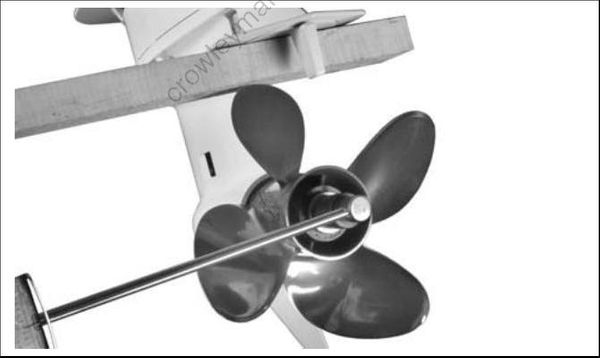
Install the propeller nut and tighten to a torque of:
• With Keeper – 70 to 80 ft. lbs. (95 to 109 N·m)
• Without Keeper – 120 to 144 in. lbs. (13.6 to 16.3 N·m)