

STORAGE
IMPORTANT: DO NOT start outboard without a water supply to the outboard’s cooling system. Cooling system and/or power head damage could occur.
Fuel System Treatment
Stabilize the boat’ s fuel sup ply with Evinrude/ Johnson 2+4 Fuel Conditioner following the instructions on the container
Internal Engine Treatment
Remove the propeller , attach garden hose to flushing port and turn on water. Evinrude E-TEC models are designed to be self winterizing using either of the following methods:
IMPORTANT: Engine MUST be in NEUTRAL throughout these procedures.
Throttle Control Method
- Advance throttle control to 1 /2 throttle (5 0%) position and t hen st art the outboard. All four System Check lights will turn on an d the out board will run at idle speed.
- After approximately 15 seconds, the System- Check_ light s will go of f. Move throttle to IDLE position. System Check_ lights will light again.
- Wait another 15 seconds. System Check_ light s will go of f. At this point, advance throttle to FULL (in neutral). System Check_ lights will flash, indicating that outboard is in winterize mode.
- Outboard will automatically go to fast idle and fog it self. Allow outboard to run until it shut s itself off (about one minute).
IMPORTANT: If System Check lights do not flash, or outboard run s above fast idle
immediately turn of f outboard and st art the procedure again.
Software Control Method
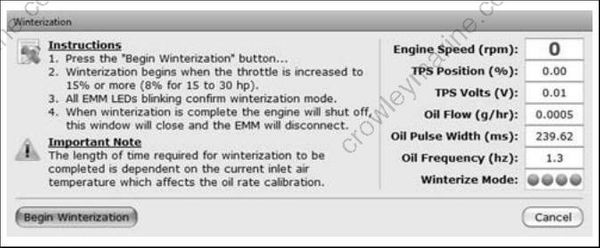
Winter ization can also be run using Evinrude Diagnostics software. With the outboard running,
start the process at the Settings/Adjustments screen and follow the instructions.
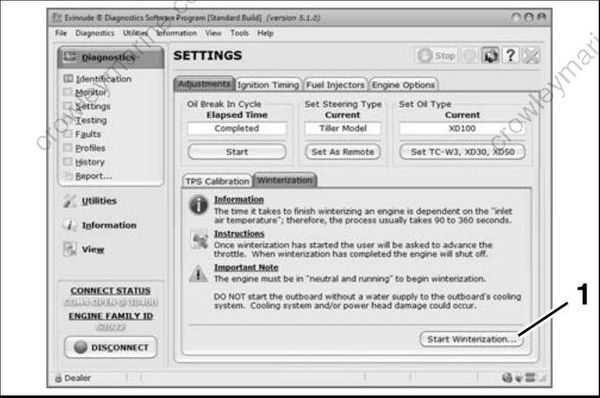
- Winterization start button
008564
008565
After the outboard shuts itself off, turn key switch OFF, then detach garden hose.
IMPORTANT: When finished, l eave t he out board in vertical position long enough to completely drain the power head.
Additional Recommendations
- Fill oil reservoir.
- Inspect the fuel filter. If there is debris in the fuel filter, it must be replaced.
- Replace gear case lubricant.
- Remove and inspect propeller.
- Clean and grease propeller shaft.
- Blow water from gear case speedometer pickup system (gear case speedometer models only).
- Lubricate all grease fittings and linkages.
- Inspect outboard, steering system, an d controls. Replace all damaged and worn components. Refer to manufacturer’s and lubrication recommendations.
- Touch up painted surfaces as needed. Coat outer painted surfaces with automotive wax.
- Remove battery(s) from boat. S tore in a coo l, dry location. Periodically charge battery(s) while stored. Re fer to manufacturer’s maintenance recommendations when servicing batteries.
- Store outboard in upright (vertical) position.
- Check for fuel leakage.
Failure to check for fuel leakage could allow a leak to go undetected, resulting in fire or explosion.
PRE-SEASON SERVICE
If t he out board was remove d from the boat for storage, make sure it is reinstalled with factory specified hardware. Refer to the Pre delivery and Installation Guide.
Outboard Mounting Bolts
- Check and re-tighten outboard mounting bolts to a torque of 40 ft. lbs. (54 N·m).
Gear case Lubricant
- Check the lubricant level.
- Inspect gear case for leaks. I f leak is apparent, pressure and vacuum test gear case.
- Repair gear case as needed.
Battery(s)
- Replace batteries that cannot be charged.
Power Trim and Tilt
- Remove filler cap and check fluid level.
- Inspect the power trim and tilt unit for leaks. Repair as needed.
Operational Checks
• Refer to OPERATIONAL CHECKS on p. 33
- Steering system
- Remote controls
- All other accessories and instrumentation
Check Oil Injection Tank
- Inspect the oil tank for leaks.
Check Fuel System
- Inspect entire fuel system for leaks before starting outboard.
- Repair all leaks.
Water Pump
- Make sure a steady stream of water flows from overboard indicator.
Failure to check for fuel leakage could allow a leak to go undetected, resulting in fire or explosion.
