

Key Switch, START Position
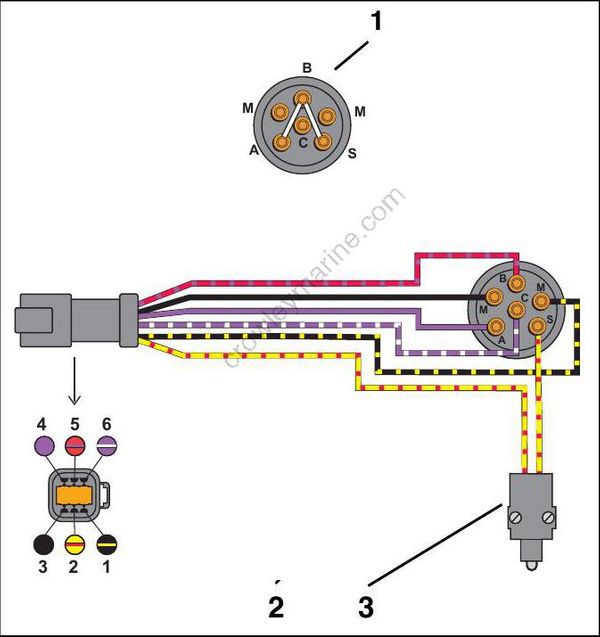
Key switch START:
- Switches 12 V to terminal “S” of key switch and to the neutral safety switch (in remote control).
- A closed neutral safety switch provides 12 V to the engine wire harness yellow/red wire an d solenoid (terminal “A”).
000691R
- Ignition switch, START position – Continuity between terminals “B” and “A”; “B” and “S”
- Terminal “S”, 12 V
- Neutral safety switch
ELECTRIC START TESTS
Starter Solenoid Test
Disconnect the B+ (POS) battery cable at the battery.
IMPORTANT: Disconnect all wiring from solenoid terminals before proceeding with this test. Use a digital multimeter to measure resistance.
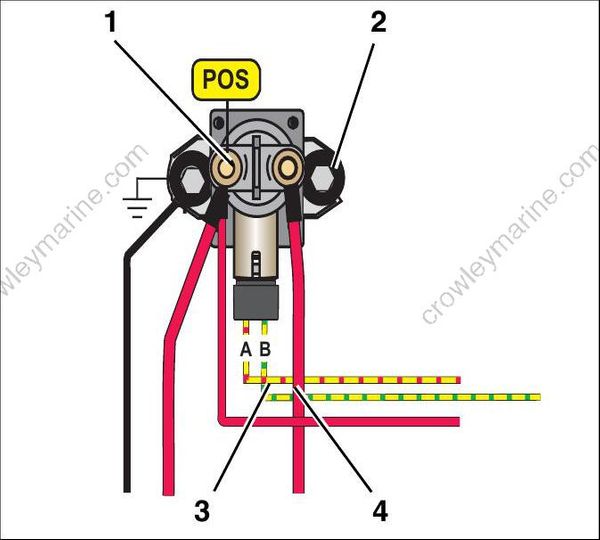
Put on e meter lead on the starter positive (+) cable terminal an d the other lead on the battery positive (+) cable terminal:
- Meter must not show continuity (high reading).
- If meter shows continuity (low reading), replace the solenoid.
002073
- Battery positive cable (B+) terminal
- Starter positive (+) cable terminal
- “A” terminal (yellow/red)
- “B” terminal (yellow/green)
Apply B+ to terminal “A” of solenoid and ground (NEG) to terminal “B” of solenoid. Measure resistance between the starter positive (+) cable terminal and the positive battery (+) cable terminal.
- The solenoid must close with an audible click.
- Meter must show continuity (low reading).
- If meter shows no continuity (high reading), replace the solenoid.
After re-installing the solenoid, coat all wires a nd terminals with Black Neoprene Dip.
Starter Voltage Drop Test
To prevent accidental starting of outboard, disconnect crankshaft position sensor (CPS).
Use a digit al voltmeter to measure the volt age drop on each section of the start circuit.
If an y voltage reading is greater than 0.5 VDC check that connections are clean, tight and free of corrosion. Clean or replace any corroded or dam aged cables or connections.
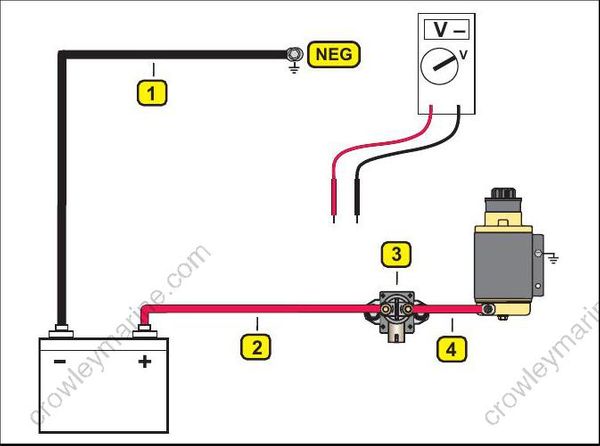
STEP 1: Connect voltmeter positive (+) lead to the terminal for the negative (–) batter y cable at powerhead. Connect voltmeter negative (–) le ad to negative (–) battery post.
- Activate starter motor and observe volt age reading.
008464
- Negative battery cable
- Positive battery cable
- Solenoid
- Starter cable
STEP 2: Connect positive (+) lead to battery positive (+) terminal. Connect negative (–) lead to starter solenoid terminal.
- Activate starter motor and observe volt age reading.
STEP 3: First, activate starter motor . Connect positive (+) lead to starter solenoid terminal. Connect negative (–) lead to opposite starter solenoid terminal.
- Observe voltage reading.
STEP 4: Connect positive (+) lead to starter cable of solenoid terminal. Connect negative (–) lead to starter motor terminal.
- Activate starter motor a nd observe volt age reading.
No Load Current Draw Test
Securely fasten starter in a vise or suitable fixture before proceeding with this check.
Use a battery rated at 500 CCA (60 amp-hr) or higher that is in good condition and fully charged. Use an inductive ammeter or connect a 0 to 10 0 amp ammeter in series with a heavy jumper between the battery positive (+) terminal and the starter positive (+) terminal.
Fluke model 33 4 or 336, Snap-On model MT110 or EETA501, and various other ammeters should be available through local tool suppliers.
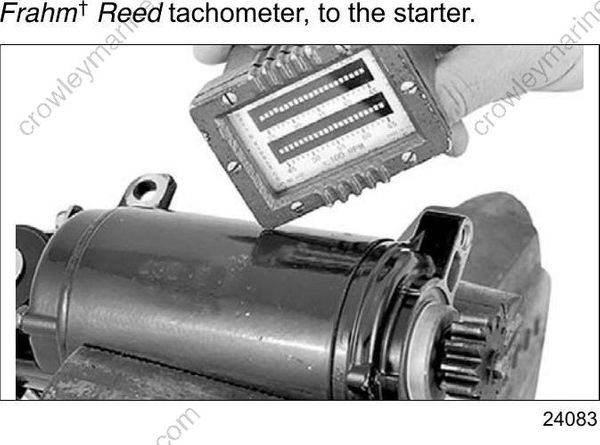
Attach or hold a vibration tachometer, such as a Frahm† Reed tachometer, to the starter.
24083
Complete the circuit with a heavy jumper between the battery negative (–) terminal a nd t he starter frame.
Monitor the starter RPM and current draw.
- At 10 ,500 RPM the ammeter should show a maximum of 30 A.
