

Propeller Selection
Selection of the wrong propeller could reduce engine service life, affect boat performance, or cause serious damage to the powerhead.
Water testing with various propeller designs and sizes is the best method of propeller selection.
The correct propeller, under normal load conditions, will allow the engine to run near the midpoint of the RPM operating range at full throttle. Refer to SERVICE SPECIFICATIONS on p. 10.
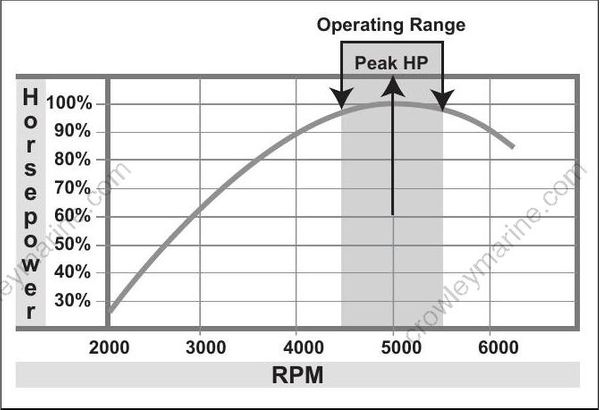
If the propeller blades have too much pitch, the engine will operate below its normal range at full throttle. Power will be lost, and powerhead damage could occur. If the propeller blades have too little pitch, the engine will operate above its normal range and damage from overspeeding could occur.
When selecting a propeller, consider the following:
- Use an accurate tachometer to determine the engine’s full-throttle RPM.
- The outboard should be trimmed for top speed.
- Select a propeller that suits the application and allows the engine to run near the midpoint of the full-throttle operating range when the boat has a normal load.
- Occasionally, one propeller will not cover a wide range of boat applications — heavy loads to high speed performance boating. In such cases, it might be necessary to have a propeller for each situation.
- Refer to the Evinrude/Johnson Genuine Parts and Accessories Catalog for propeller styles and sizes.
Propeller Hardware Installation
To prevent accidental starting while servicing, twist and remove all spark plug leads.
Refer to IMPELLER SERVICE, MJRL MODELS on p. 236 for jet pump models.
Apply Triple Guard grease to the entire propeller shaft before installing the propeller.
Install thrust bushing onto propeller shaft with taper of bushing matching taper of shaft.
If installing a propeller with an interchangeable hub, assemble the propeller following instructions provided with the propeller.
Align splines of propeller and shaft. Push propeller until seated on the thrust bushing.
Install the spacer over the propeller shaft splines.
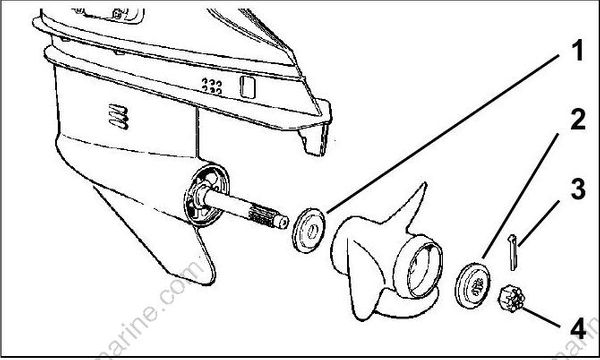
- Thrust bushing
- Spacer
- Cotter pin
- Propeller Nut
Wedge a block of wood between propeller blade and the anti-ventilation plate.
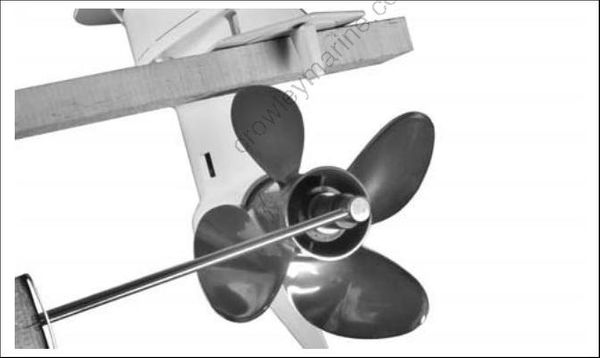
Install the propeller nut and tighten to a torque of:
- 120 to 144 in. lbs. (13.5 to 16.5 N·m)
If cotter pin holes in the nut and shaft do not align, tighten further. Do not loosen.
Install new cotter pin.
IMPORTANT: After installation, make sure outboard is in NEUTRAL and carefully spin propeller. Propeller must turn freely and should not spin off center. If propeller appears to wobble, check for possible bent propeller shaft.
WATER TEST AND FINAL ADJUSTMENTS
An in the water test is required to make sure the outboard(s) and boat are rigged correctly, propeller selection is correct, and that all accessories function properly.
Pay special attention to the following, especially if the boat is repowered with new outboard(s):
- Engine mounting height
- Correct propeller selection and WOT RPM
Make all needed adjustments or repairs and retest before delivery.
Engine Mounting Height Adjustment
Goals include:
- Engine RPM within the full throttle operating range
- Best acceleration and top speed
- No excessive ventilation while boat is coming onto plane.
Start with the engine lower on the transom. Make a test run, taking note of engine RPM, water pressure, trim level and boat speed.
Raise the engine and repeat the process until the best acceleration and boat speed are achieved.
Fuel System Vacuum
Test boat fuel system vacuum. Refer to Lift Pump Vacuum Test on p. 142. The maximum inlet fuel vacuum should not exceed 4 in. Hg. (13.5 kPa) at the inlet to the fuel lift pump under any operating conditions (IDLE to WOT).
A higher vacuum indicates an excessive restriction in the fuel supply. Repair as needed.
