

Hull Preparation
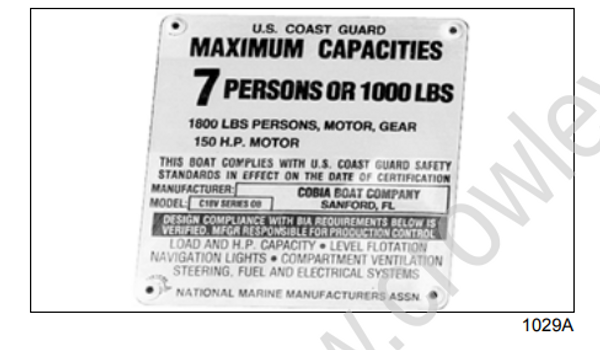
Maximum Capacity
Do not overpower the boat by installing an outboard that exceeds the horsepower indicated on the boat’s capacity plate. Overpowering could result in loss of control.
Before installing outboard:
Refer to the boat manufacturer's certification label for maximum horsepower rating.
Refer to ABYC Standards to determine the maximum horsepower capacity for boats without certification labeling.
Mounting Surface
Inspect transom surface prior to drilling mounting holes.
The transom should meet ABYC Standards.
The transom must be flat and cannot have any protrusions.
The transom angle should be approximately 14 degrees.
Check transom strength and height.
DO NOT install an outboard on a curved or irregular surface. Doing so can wear, bind, and damage components, causing loss of control.
Top Edge of Transom or Bracket
Transom thickness or off-sets must also be considered. The top edge of the transom or bracket must provide a proper surface for stern brackets.
The stern brackets must contact the flat surface of the transom or bracket. Modify moldings or components that prevent the stern brackets from resting against the transom surface. Do not modify transom brackets.
Transom Clearances
Make sure the transom and splash well area provide adequate clearances.
The top edge of the transom should be wide enough to allow full steering travel. The ABYC standard for most single outboard installations is 33 in. (84 cm).
Check cable and hose routing clearances.
Make sure there is clearance for mounting bolts and washers. Check the inside area of the transom for obstructions prior to drilling holes.
Water Flow
Inspect the hull area directly in front of the mounting location.
Boat-mounted equipment should not create turbulence in the water flow directly in front of the outboard's gearcase. Turbulence or disruptions in the water flow directly in front of the gearcase will affect engine cooling and propeller performance.
Avoid locating outboard centerlines within 3 in. (76 mm) of bottom strakes on dual-outboard installations.
Transom Brackets and Jack Plates
When mounting an outboard on boats equipped with transom brackets or jack plates, refer to the manufacturer's recommendations.
Confirm maximum weight and horsepower capacities.
Jack plate assemblies must provide a one-piece mounting surface to support the outboard, hydraulic unit, and steering system.
Mounting Hardware
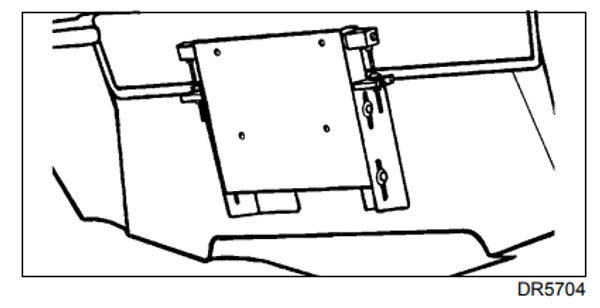
Use all mounting hardware supplied with the outboard to help ensure a secure installation. Substituting inferior hardware
can result in loss of control.
The required outboard mounting bolts, aluminum backing plates, washers, and nuts are used to attach the outboard to the frame of the shipping
palette.
Refer to the outboard's parts catalog for alternate length mounting bolts or replacement components.
Use only Evinrude/Johnson Genuine Parts or parts of equivalent type, strength, and material.
Use the mounting hardware provided with outboard whenever possible.
Transom Measuring and Drilling
Hull Centerline
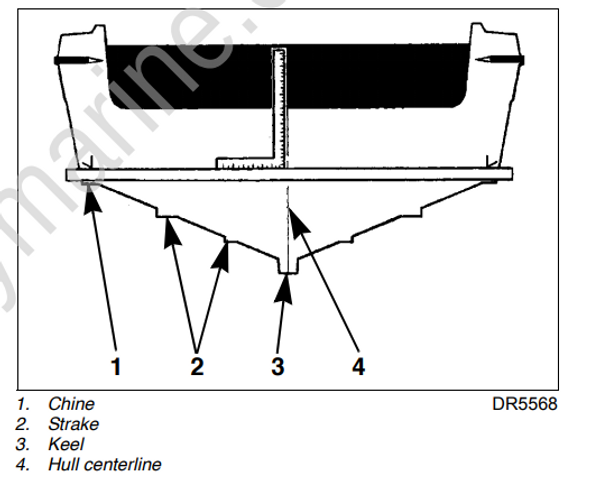
Locate the centerline of the boat transom as it relates to the hull (bottom) of the boat.
Use a straightedge to draw a line connecting the port and starboard chines. The chines should be used as reference points for determining the centerline of the hull.
Use a framing square to accurately place a line on the transom. The centerline of the hull should be in line with the keel of the hull and perpendicular to the midpoint of the line connecting the port and starboard chines.
Dual-Outboard Centerlines
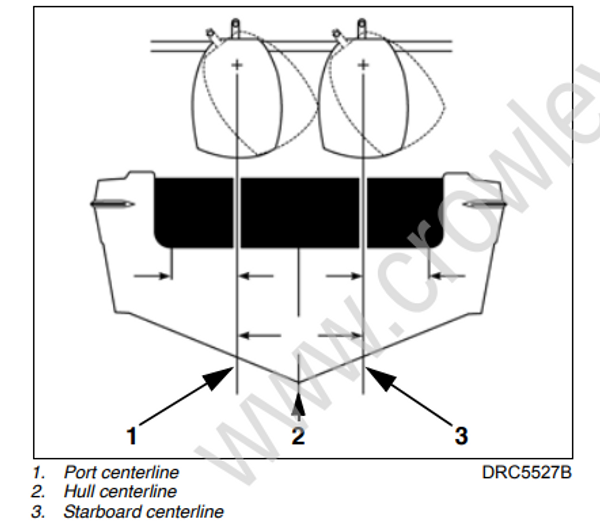
The following table lists standard ABYC centerline spacing between outboards in dual installations:
| 2 and 3 cylinder | 22 in. (559 mm) |
Some applications may require changes in this dimension to avoid strakes, to adjust for transom height, or for performance reasons. Best performance can be determined only through testing. Refer to boat manufacturer for recommendations.
If the standard spacing does not allow full steering travel in a particular installation, it may be necessary to increase the spacing.
IMPORTANT: Some steering systems may require additional spacing. Refer to steering system manufacturer for recommendations.
The width of the top edge of the transom should be more than twice the dual-outboard centerline spacing dimension. Bracket installations may not
require this consideration.
Measure the transom for dual-outboard spacing after the centerline of the hull is established.
Divide the spacing dimension by two. Use the resulting number to space the outboard centerlines from the hull centerline.
EXAMPLE: A 26 in. (660 mm) dual-outboard spacing would result in two outboard centerlines, each 13 in. (330 mm) from the hull centerline.
Transom Heights
Make sure the transom height is consistent with the height of the outboard to be installed.
A 19 to 21 in. (48.3 to 53.3 cm) transom height uses a 20 in. (50.8 cm) shaft outboard.
The shaft length of the outboard being installed should come close to matching the transom height of the boat.
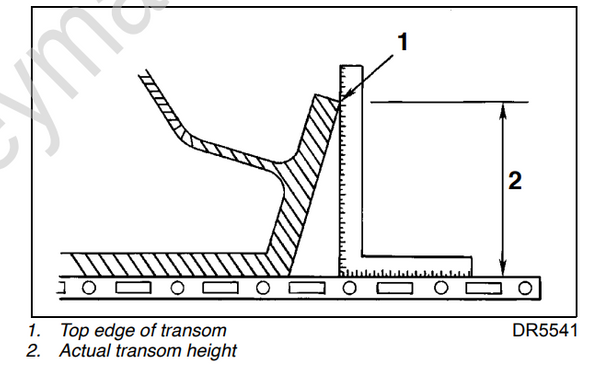
Determine transom height by measuring from the top edge of the transom, along the centerline.
For dual-outboard installations, transom height should be measured at the outboard centerlines.
Use a straightedge as a reference to extend the bottom of the boat.
Position the straightedge along centerline. The distance from the top edge of the straightedge to the top edge of the transom is the actual transom
height.
Transom Drilling Locations
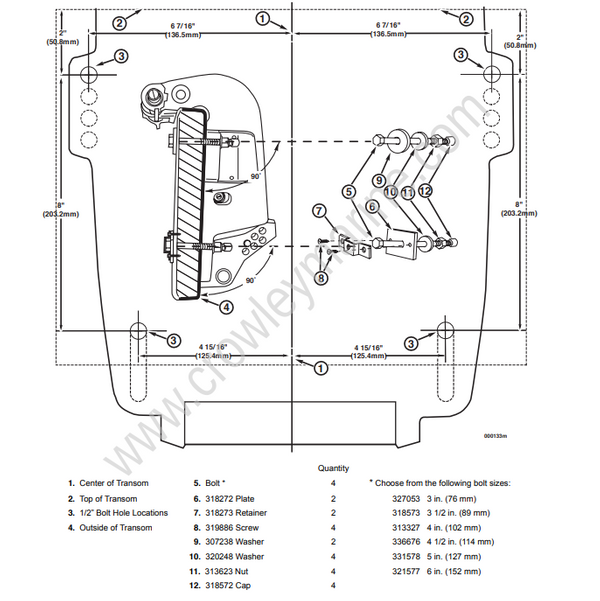
All models use the standard ABYC 4-Bolt mounting pattern.
Transom drill fixture, P/N 434367 or P/N 385368, may be used as a guide for correct hole placement. If drill fixture is unavailable, refer to Drilling and Hardware Diagram on p. 50 for measurements.
Position drill fixture on top of transom or bracket and align indicator points with centerline.
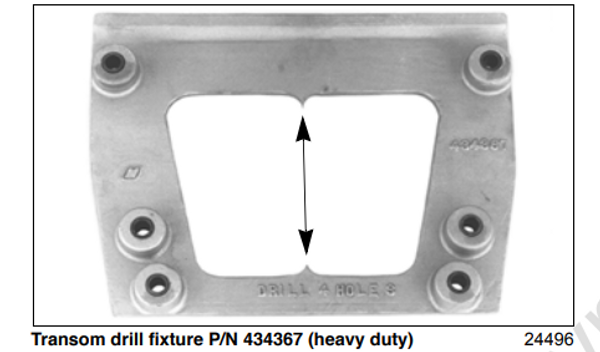
The indicators are affected by the squareness of the top edge of the transom. If either side of the fixture must be raised more than ¼ in. (6 mm)
above the transom's top surface to make both indicators align, the transom must be modified.
IMPORTANT: DO NOT assume that the top edge of the transom is straight. Position the drill fixture based on measurements aligning it to the
bottom of the hull.
IMPORTANT: Maintain at least 1.75 in. (45 mm) of transom surface above the top mounting bolts.
Make sure that the proposed mounting hole locations will provide adequate clearance for mounting bolts and washers.
Check the inside area of the transom for obstructions prior to drilling mounting holes.
Check transom height(s) at centerlines prior to drilling any mounting holes.
Drill four ½ in. (13 mm) mounting holes in the appropriate locations.
IMPORTANT: Be sure to drill the required holes perpendicular to transom surface.
Drilling and Hardware Diagram
IMPORTANT: This is not a template.
Lifting the Outboard
Lifting Fixtures
To avoid personal injury, make sure the lifting capacity of the hoist is at least twice the weight of the outboard. DO NOT allow the lift hook or chain from the hoist to come in contact with any part of the engine during lifting.
Remove shipping carton.
Remove any banding material used to secure outboard to shipping palette. The mounting hardware used to attach the outboard to the shipping frame
is reused to fasten outboard to boat transom.
Use correct Lifting Fixture to lift outboard:
| Model | Lifting Fixture |
|---|---|
| 2 and 3-Cylinder Evinrude E-TEC |
P/N 396748 |
Position lifting tool on flywheel and seat the three screws completely.
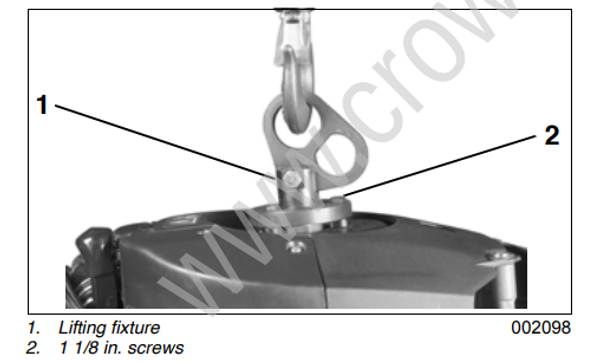
IMPORTANT: Use only the 1 1/8 in. (short) screws, P/N 398067, included with the tool to avoid damage to electronic components under the
flywheel.
Fasten appropriate chain hook to eye of tool. Carefully hoist outboard with chain and unbolt outboard mounting brackets from frame.
If chain hooks or snap hooks are too large, the integrated lifting eye could break. The outboard could drop suddenly and cause
serious damage.
Before Mounting Outboard to Transom
Some rigging components that attach directly to the outboard should be assembled before the outboard is mounted to the boat's transom. Steering
system components and gearcase speedometer pickup hoses are the most common. Determine what equipment will be installed prior to mounting
the outboard to the transom or bracket.
Steering Systems
Mechanical Cables
All Evinrude/Johnson outboards equipped with tilt tubes are designed to be compatible with mechanical steering systems that meet ABYC Standard P-17. Single-cable mechanical steering systems can be used on single or dual-outboard installations if an ABYC-approved steering link is used.
Dual-cable mechanical steering helps provide firm steering control at high speeds.
Extend the output end of the steering cable and lubricate the inner core of cable prior to installation.
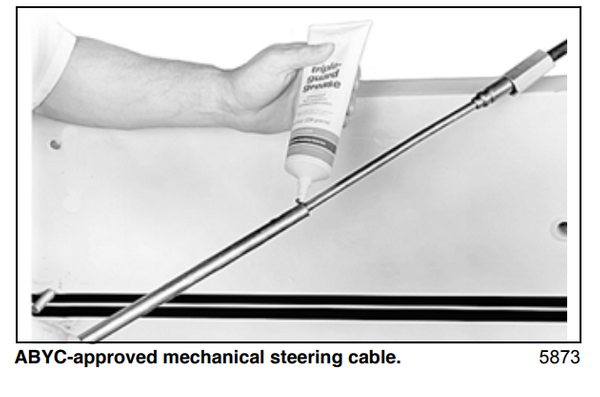
IMPORTANT: Install steering cable through tilt tube before mounting outboard on transom. Tighten nut securely.
DO NOT use cable over pulley steering on 40 HP and larger outboards.
Manual Hydraulic Steering
Manual hydraulic steering systems use hydraulic fluid to transfer motion and load from the helm to the outboard. Hydraulic steering systems offer
certain design advantages that can be beneficial in some applications.
Use only a hydraulic steering system designed for the specific application. Refer to the steering system manufacturer’s specifications for recommended applications.
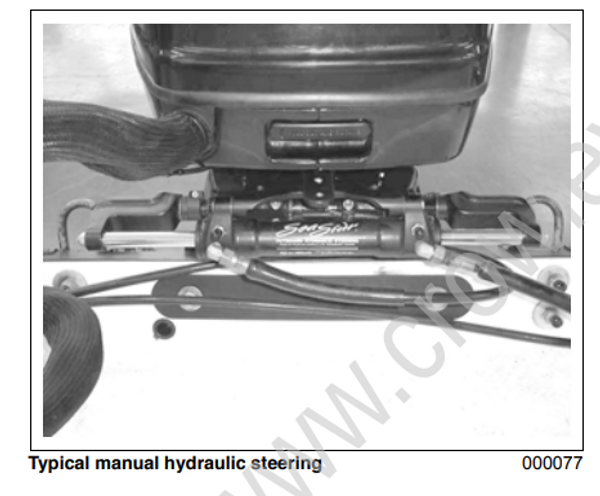
IMPORTANT: Some hydraulic steering systems require additional centerline spacing in dual-outboard installations. Refer to steering system manufacturer’s recommendations and to DualOutboard Centerlines on p. 47.
Drag Links
Install cable wiper nut on tilt tube and connect drag link to the correct location on the steering arm. For single motor, single cable applications,
the drag link should be installed in the rear hole.
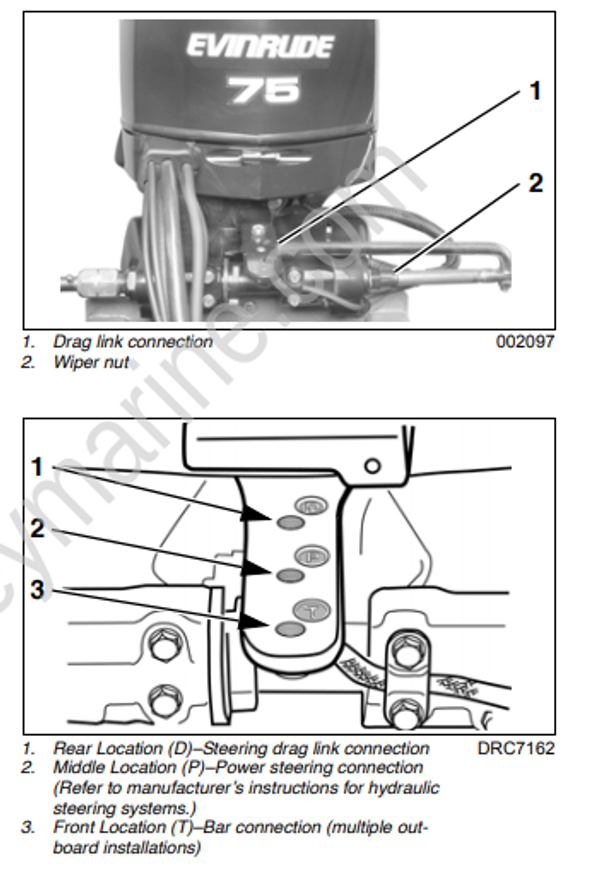
Use the correct drag link to allow full steering travel:
| Model | Drag Link |
|---|---|
| 75 – 90 Evinrude E-TEC | P/N 175125 |
Outboard Mounting
Mounting Height
Boat performance depends on outboard mounting height.
Generally, the anti-ventilation plate of the gearcase should be in alignment with the bottom of the hull. Conventional V-hulls often perform well with
the anti-ventilation plate approximately 1 in. (25 mm) above the bottom of the hull.
Boats that exceed 50 MPH may benefit from higher outboard heights. Consult the boat manufacturer for specific outboard mounting height
information for a particular hull.
Test outboard and boat performance at different heights until the best performance is achieved.
IMPORTANT: Be sure that outboard water pressure is not adversely affected by the mounting height of the outboard.
IMPORTANT: Use a marine sealant rated for above or below waterline use. RTV silicone is not approved for below waterline use. Polyurethane
sealants are not easily removed and may damage outboard or boat mounting surfaces when removed.
Apply marine sealer under hex heads of bolts, on the mounting plates, and to the bolt shanks.
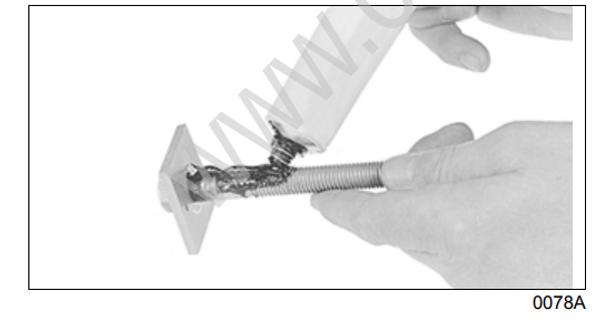
Assemble transom mounting plates on mounting bolts.
Apply sealant around the mounting bolt holes on the outer surface of the transom.
Install the mounting bolts through the transom from the inside of the boat.
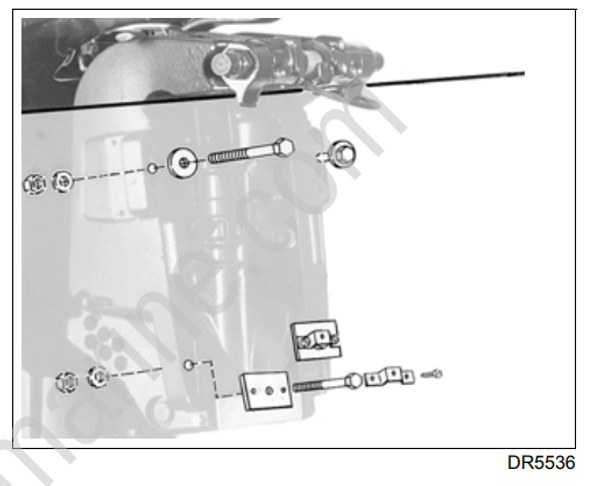
Position the square aluminum transom mounting plates (when applicable) so the retainer holes are horizontal.
Position hex head of bolt with flats toward holes in the mounting plates. Install retainer over hex head of the bolt and secure it with screws provided.
Install all washers and nuts. Torque nuts and bolts to 40 ft. lbs. (54 N·m).
If either side of the transom deforms or cracks when the bolts are tightened to their recommended torque, the transom construction may not be adequate or may be deteriorated. Structural failure of the transom could result in loss of boat control and injury to the occupants.
