Control System Selection
Outboard remote control systems provide the operator with tools for:
• Starting and stopping the engine
• Shifting into Forward, Neutral, or Reverse
• Changing engine speed
• Changing the tilt/trim angle of the outboard.
The remote control system must include the following features:
• Shift stroke must be 1.125 to 1.330 in. (28.6 to
33.8 mm) between Neutral and Forward
• Throttle stroke must PUSH for open
• Start-in-gear prevention
• Emergency stop switch with lanyard—multiple outboard installations require separate start switches and a single emergency stop switch
• Connections for engine monitor warning system
Refer to Engine Monitor System on p. 26.
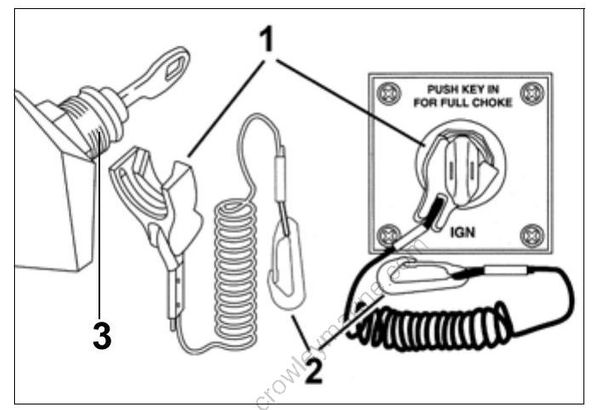
- Emergency stop clip
- Safety lanyard
- Key switch with emergency stop feature
The remote control used must have starting-gear prevention. This feature can prevent injuries resulting from unexpected boat movement when the outboard starts.
Always install and recommend use of an emergency stop/key switch. Doing so will
reduce the risk of personal injury or death should the operator fall away from the controls or out of the boat.
Several remote control options are available in the Evinrude/Johnson Genuine Parts and Accessories catalog.
Mechanical control systems use push/pull cables to physically move the shift and throttle components on the outboard.
These systems use a Modular Wiring System (MWS) harness to carry start, stop, and trim signals (analog) to the outboard. Specific harness selection depends on the type of Information Display system being used. Refer to Information Display Systems on p. 26.
Control Installation
Plan the installation of remote controls carefully, following all instructions provided with the control. Select an appropriate location based on the boat
configuration.
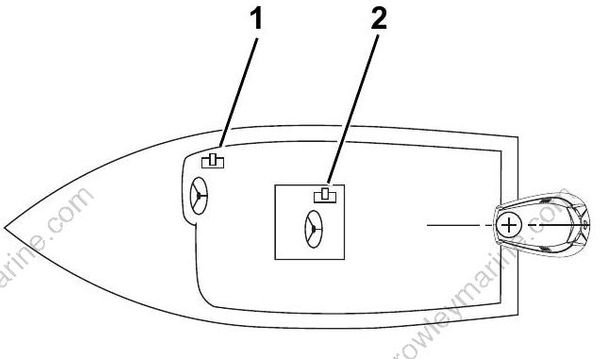
- Side console
- Center console
IMPORTANT: The mounting location must be a flat surface and must be strong enough to provide rigid support. Strengthen mounting surface as
necessary.
Place remote control at proposed location and check clearance around remote control lever at full throttle in FORWARD and then at full throttle in
REVERSE. There must be at least 2.5 in. (64 mm) of clearance between the handle and any part of the boat throughout the control lever travel.
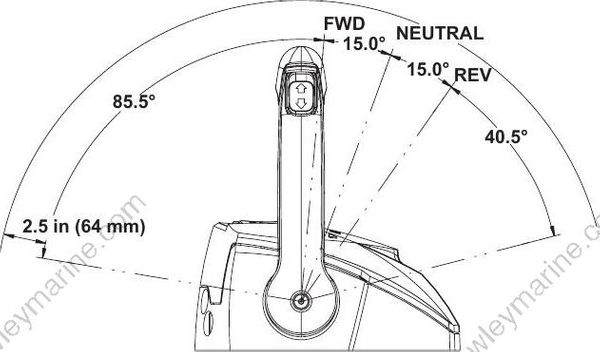
Typical control clearances
Use an appropriate drill template to cut mounting holes. Templates are included with the control instructions.
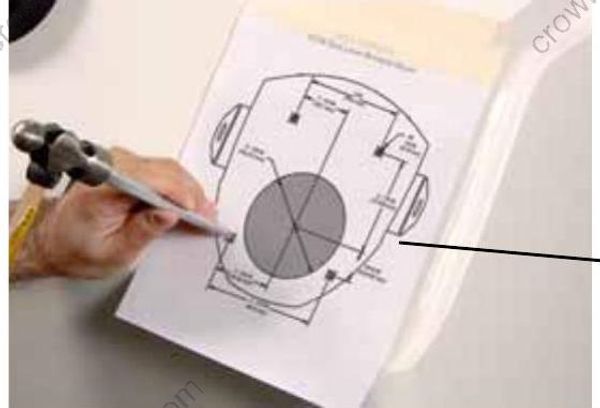
- Template
Install control with hardware provided.
IMPORTANT: Make sure remote control assembly is secure and does not move during operation
Control Cable Routing
Control cables and harnesses should be routed along a protected path to the rear of the boat and secured to prevent movement or damage.
Harness connections should be mounted in a dry location, away from bilge and motor well areas.
Control cables should be long enough to allow a 12 in. (30 cm) cable loop at the front of the outboard when the cables are routed from the side of the splash well.
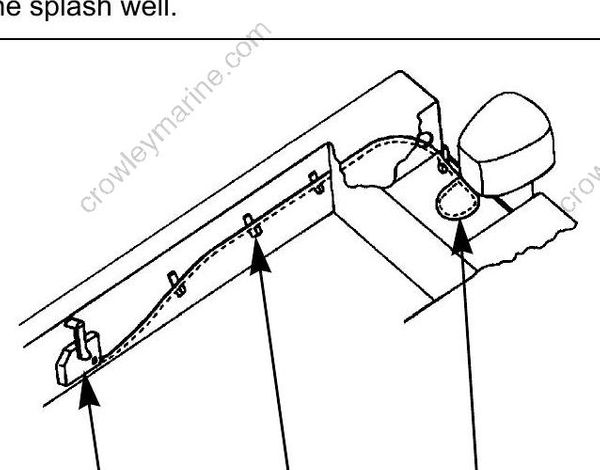
- Surface side-mount remote control
- Cable support
- 12 in. (30 cm) cable loop at front of outboard
Engine Monitor System
All remote controlled outboards must be equipped with an engine monitoring system to warn the operator of conditions that could damage the outboard.
The engine monitor system includes sensors on the outboard and oil tank, a warning horn, a dash mounted display, and related wiring.
The outboard’s EMM sends information about monitored functions to:
• System Check gauges
IMPORTANT: Operating the outboard without an engine monitor will void the warranty for failures related to monitored functions.
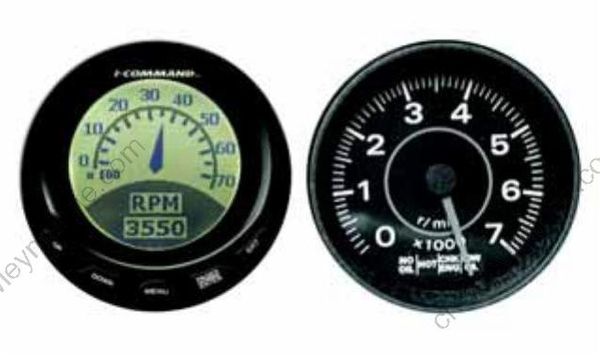
Typical I-Command and System Check gauges
System Check Gauges
System Check gauges are used with mechanical remote control systems only.
System Check gauges receive monitored information from the outboard through a Modular Wiring System (MWS) harness.
Refer to System Check (MWS) Harness Connections on p. 27.
System Check (MWS) Harness Connections
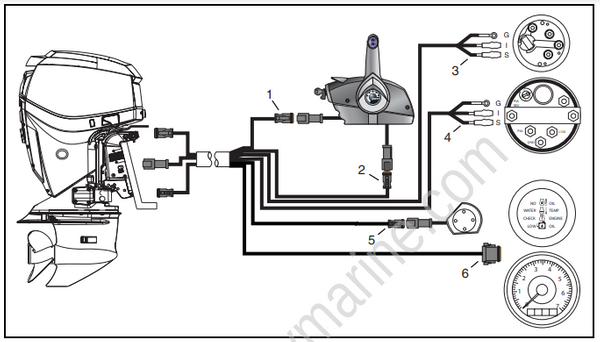
Typcial MWS wiring with a side-mount mechanical remote control 007989
- 6-Pin Connector – Connect to a pre-wired remote control or to a dash-mounted key switch.
- 3-Pin Connector – Connect to remote control trim switch or to a dash-mounted trim switch.
- Black, purple, white/tan wires – Connect to the trim gauge.
- Black, purple, gray wires – Connect to a conventional tachometer when a System Check tachometer is not used.
- 2-Pin Connector – Must connect to the warning horn in all installations.
- 8-Pin Connector – Connect to a System Check gauge or tachometer.
Battery Installation
Each outboard requires its own starting battery.
Select a battery that meets or exceeds the minimum requirements.
Battery Recommendations
| Outboard Model | Battery Rating |
|---|---|
| 15–30 HP | 640 CCA (800 MCA), or 800 CCA (1000 MCA) below 32° F (0° C) 107 amp-hr in extreme applications |
Battery Location
Proper installation will prevent battery movement while underway.
• Secure all batteries in protected locations
• Place battery as close to the outboard as possible
• Battery location must provide access for periodic maintenance
• Use battery mounting trays or battery boxes on all battery installations
• Connections and terminals must be covered with an insulator
• Battery connections must be clean and free from corrosion
• Read and understand the safety information supplied with the battery before installation.
Battery Connections
Keep the battery connections clean, tight, and insulated to prevent their shorting or arcing and causing an explosion. If the battery mounting system does not cover the connections, install protective covers.
Check often to see that connections stay clean and tight.
IMPORTANT: Connect the battery positive (+)
cable to the battery positive (+) post FIRST. Connect the battery negative (–) cable to the battery negative (–) post LAST.
Install a starwasher on the threaded battery post. Stack cables from the outboard, then cables from accessories. Finish this connection with a hex nut.
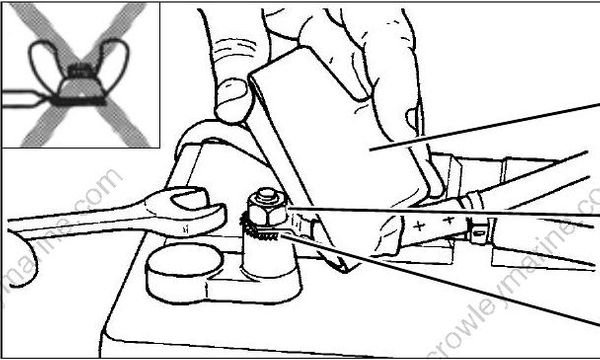
Marine Style Battery Post
- Starwasher
- Hex nut
- Terminal Insulator
Do not use wing nuts to fasten ANY battery cables. Wing nuts can loosen and cause electrical system damage not covered under warranty.
Tighten all connections securely. Apply Triple Guard grease to prevent corrosion.
Battery Cable Requirements
Evinrude outboards are shipped with stranded copper battery cables for typical installations in which the starting battery is close to the transom.
Specialized outboard installations with extended length battery cables require an increased wire size. Refer to the following table.
| 15–30 HP | 40–300 HP | |
|---|---|---|
| 1 to 10 Ft. (.3 to 3 m) | 6 Gauge | 4 Gauge |
| 11 to 15 Ft. (3.4 to 4.6 m) | 4 Gauge | 2 Gauge |
| 16 to 20 Ft. (4.9 to 6.1 m) | 2 Gauge | 1 Gauge |
IMPORTANT: Inadequate battery cables can affect the performance of an outboard’s high amperage start circuit and the cranking speed of
the outboard. DO NOT use aluminum wire cables. Use ONLY AWG stranded copper wire cables.
Battery Switches and Multiple Batteries
A multiple battery setup, including marine battery selector switches, can provide flexibility in single and dual outboard installations.
Refer to Battery and Switch Wiring Diagrams on p. 31 for battery connection options.
The battery selection function can be used for emergency starting if a primary battery becomes discharged.
The OFF position of the battery selector switch can be used to minimize battery discharge during periods of non-use.
Typical battery functions Primary
• Used as starting battery under normal operating conditions.
• Red (+) cable connected to battery switch.
• Primary battery is charged by connection to main red (+) outboard battery cable.
Dual outboard installations can utilize the opposing outboard's primary battery as a secondary battery for emergency starting only.
Secondary
• Used as back-up starting battery under abnormal operating conditions.
• Red (+) cable connected to battery switch.
• Secondary battery is charged independently from primary battery.
Accessory
• Not used as starting battery.
• Isolated from outboard start function.
• No red (+) cable connected to battery switch.
Secondary and accessory batteries are often charged by an isolated battery charging circuit. Refer to Auxiliary Battery Charging on p. 30.
Battery Switch Requirements
Battery switches must meet the following requirements.
• The switch must be approved for marine use.
• The switch should be a “make before break”
design.
• Switch amperage rating should be adequate for the outboard it will be used on.
• Use one battery switch for each outboard installed.
• Use appropriately sized wire and terminals.
• Use AWG stranded copper wire.
Battery Switch Location
• Locate battery switch as close to the batteries as possible.
• Locate switch so that it cannot be accidently bumped or switched.
• Refer to the battery switch manufacturer’s installation instructions.
• Fasten all battery switches to solid surfaces.
• Route wiring as directly as possible.
• Support the battery switch as needed to prevent abrasion.
• Use appropriate wiring and connectors.
• Seal all connections and terminals with liquid neoprene to prevent corrosion.
Insulate all battery positive (+) terminals to prevent shorting.
Battery Switch Operation
• Select the primary battery for normal operation.
• Secondary batteries should only be selected for emergency starting.
• ALL or BOTH switch position is for emergency starting only.
Provide operator with the documentation supplied by the battery switch manufacturer. Make sure that the operator is informed of proper battery switch operation.
The negative (–) terminals of a multiple 12-volt battery installation must be connected together.
Auxiliary Battery Charging
Evinrude E-TEC 15 – 30 HP outboards do not have a built in isolator feature. Proper methods must be used to connect a second battery.
Battery charging output on 15 – 30 HP models is 15 Amps. Be sure to follow published standards for wire gauge selection. Refer to Battery Cable
Requirements on p. 28.
If a battery isolator is desired, a battery switch, such as P/N 506161, and a voltage sensitive relay, such as BEP model 710-125A, can be used to create a battery isolator/combiner.
The voltage sensitive relay (VSR) regulates charging of a second battery based on predetermined voltage levels of the primary battery.
Never connect an external battery isolator to the stator of an Evinrude E-TEC.
Battery and Switch Wiring Diagrams
Single outboard
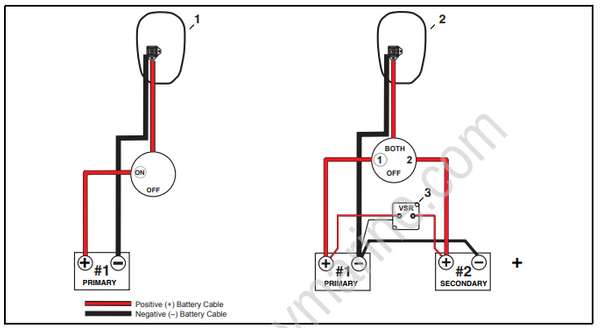
- Single starting battery with ON/OFF switch
- Two starting batteries with isolator/combiner (15 – 90 HP models)
Two outboards: Two starting batteries each
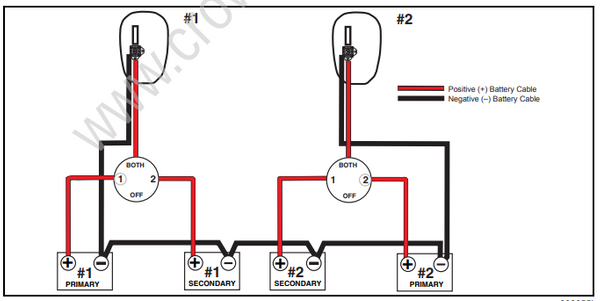
Fuel System Requirements
Regulations and Guidelines
Vessel manufacturer, and/or installer of an EPA certified outboard, must meet minimum specifications for boat fuel systems established by:
• U.S. Environmental Protection Agency (EPA)
– 40 CFR 1045.112
– 40 CFR 1060
• U.S. Coast Guard (USCG)
– 33 CFR 183
• American Boat & Yacht Council (ABYC)
– Standard H-24
– Standard H-25.
Permanent Fuel Tanks
Permanent fuel tanks must be properly vented outside of the hull.
Remote fuel tank gas fills must be grounded.
Fuel tank pickups should include an anti-siphon valve to prevent fuel flow if a leak occurs in the fuel distribution system.
Portable Fuel Tanks
3. Voltage sensitive relay
If engine is equipped with a quick-disconnect fuel hose, you MUST disconnect the fuel hose from the engine and the fuel tank to prevent fuel leaks:
• Whenever the engine is NOT being used
• Whenever the engine is being trailered
• Whenever the engine is in storage.
A small amount of fuel may be released when the fuel connector is disconnected.
Store portable fuel tanks in well-ventilated areas, away from heat sources and open flames. Close the vent screw of the fuel tank cap, if equipped, to prevent escape of fuel or fuel vapors which could accidentally ignite. Do not allow disconnected fuel hoses to leak fuel.
Fuel Hose
All fuel hoses used for rigging outboards manufactured after January 1, 2009 must meet EPA permeation requirements for evaporative emissions.
• Use SAE J30R9, or USCG Type B1-15, fuel hose in motor well areas.
• Use USCG Type A1-15 fuel hose between permanent fuel tanks and motor well fittings in inaccessible routings.
• Compliant hoses are labeled with the applicable specification.
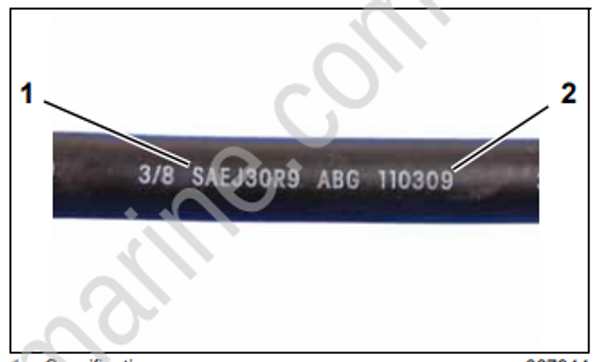
- Specification
- Date code
Permanently installed fuel hoses should be as short and horizontal as possible.
Use corrosion-resistant metal clamps on permanently installed fuel hoses.
Multi-outboard applications require separate fuel tank pickups and hoses. (A fuel selector switch may be used for “kicker” motors as long as it has enough flow capacity for the larger outboard.)
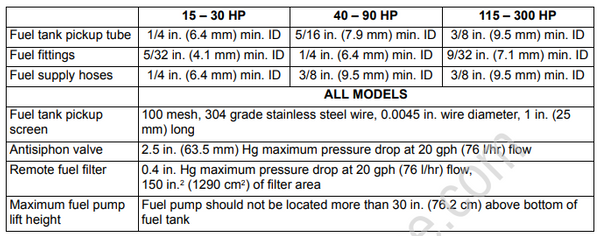
Use only fuel lines (or copper tubing) that meet the Fuel Flow Requirements for the outboard.
Fuel System Primer
Outboards require a priming system to refill the fuel system after periods of non-use. The most common priming system is a primer bulb in the fuel supply hose.
Install the primer bulb as follows:
• The primer bulb must meet the same Fuel Flow Requirements as the fuel hose.
• The primer bulb should be easily accessible.
• The arrow on the primer bulb must point in the direction of fuel flow.
• The fuel supply hose must allow the primer bulb to be held with the arrow pointing up during priming.
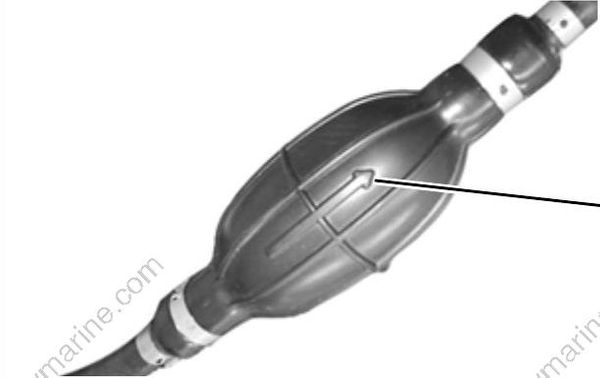
- Arrow indicates direction of fuel flow
An alternative to a primer bulb is a U.S. Coast Guard approved marine primer pump. Electric primer pumps offer the convenience of outboard priming from a dash-mounted momentary switch.
Fuel Filters
Boat-mounted fuel filters and water-separating fuel filter assemblies must meet the required fuel flow and filter specification. Refer to Fuel Flow Requirements.
The filter must be mounted to a rigid surface above the full level of the fuel tank and accessible for servicing.
Fuel Filter Assembly, P/N 174176, meets all requirements for a water-separating fuel filter.
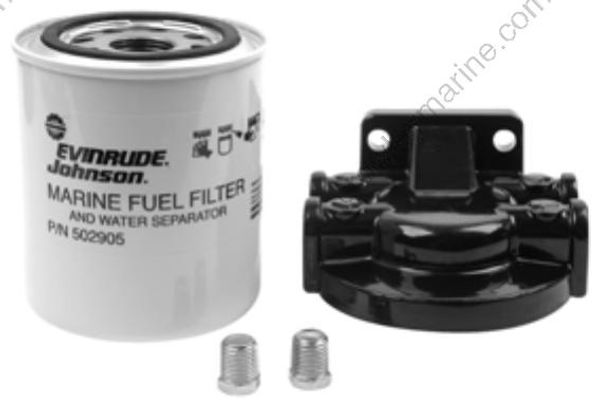
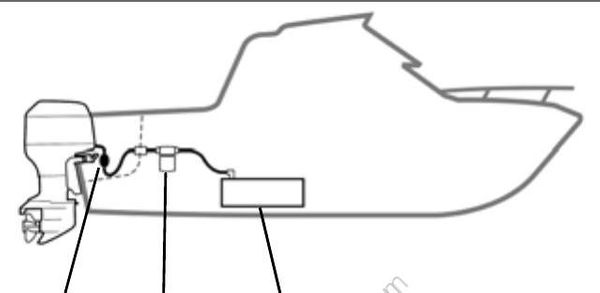
Typical Fuel Supply Configuration
- Primer bulb
- Water separating fuel filter
- Anti-siphon valve, in fuel pick-up of tank
Avoid using in-line fuel filters external to the outboard. The filter area and flow characteristics may not be adequate for high horsepower outboards.
Portable Fuel Tanks
Do not use portable fuel tanks for outboards larger than 115 HP. Inadequate fuel flow to high horsepower outboards can result in serious power head damage.
Fuel Flow Requirements
Cable and Hose Installation
Before installation, identify all required wiring,
cables, and hoses:
• Throttle and shift cables
• Instrument harnesses
• Battery cables and switches
• Fuel supply hose
• Primer bulb or primer pump
Determine whether any additional wiring or hoses will be needed for accessory gauges or batteries:
• Speedometer pick-up hose
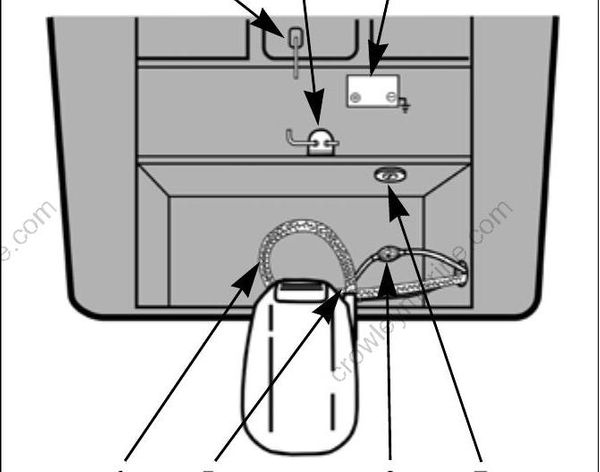
Typical outboard installation
- Anti-siphon valve
- Water separating fuel filter
- Starting battery
- Flexweave protective sleeve
- Access cover
- Primer bulb
- Battery switch
Boat Cable and Harness Routing
Improper installation and routing of outboard controls could wear, bind, and damage components, causing loss of control.
Remote control cables, wiring, and hoses must follow a similar path into the lower motor covers.
Select the best routing for the specific application.
All cables, wiring, and hoses must be long enough to provide adequate slack. Check clearances at all possible combinations of trim angles and steering positions.
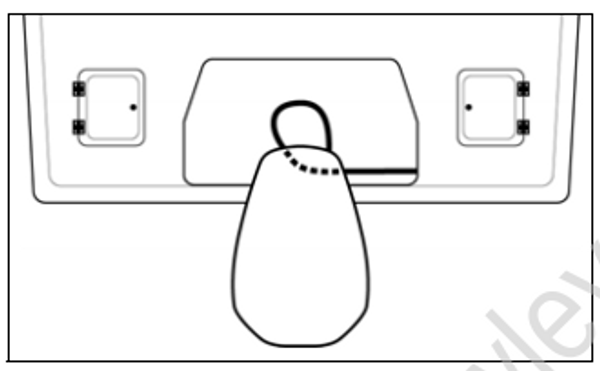
Typical Small Splash Well
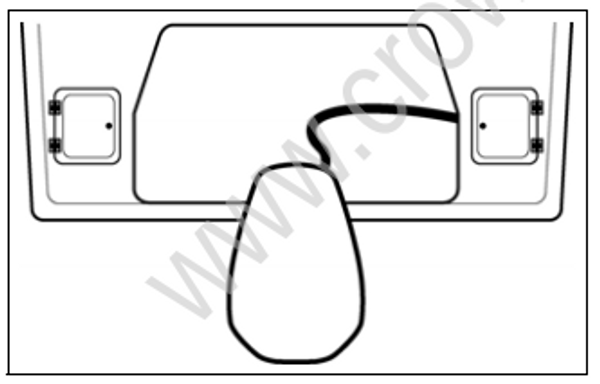
Typical Large Splash Well
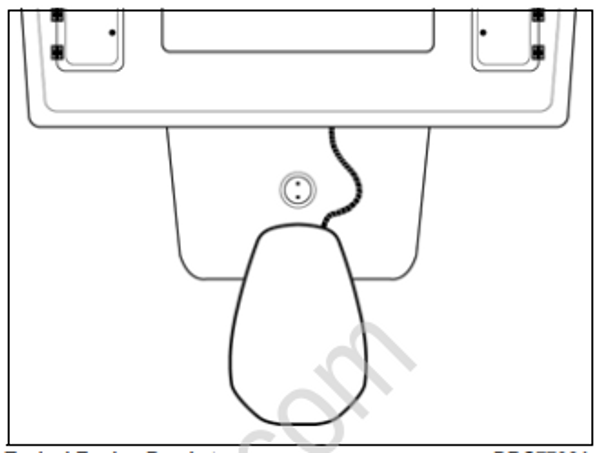
Typical Engine Bracket
Protective Sleeve/Conduit
Make sure all cables, wiring, and hoses have been identified and fitted to the appropriate lengths. Refer to OUTBOARD RIGGING on p. 52.
Next, bundle the components that route to the outboard with appropriate shielding, such as an expandable “flexweave” sleeve or a flexible conduit.
Battery Cables
When routing battery cables, be sure to:
• Route cables through the protective sleeve.
• Use the most direct path to route the battery cables to the battery or battery switch.
Fuel Hose
The fuel hose may be routed outside of the protective sleeve or conduit. Electric primers or manual primers may not require this consideration.
Route fuel hoses with enough slack to allow the primer bulb arrow to point “up” during use.
Install the primer bulb with the arrow pointing in the direction of fuel flow to the outboard.
Connect the fuel supply hose from the fuel tank to the fuel supply line at the outboard.
Oetiker Clamp Servicing
Clamp Identification
Use Oetiker clamps for making hose connections.
These clamps provide corrosion resistance, minimize the potential for abrasion of rigging components, and provide solid, permanent connections.
The selection and installation of an Oetiker clamp is essential in the proper sealing of hose connections. The clamp identification numbers appear on
the side of the clamp, near the top of the ear.
Refer to Clamp Selection chart for dimensions.
DO NOT re-use Oetiker clamps. Fuel leakage could contribute to a fire or explosion.
Clamp Selection
To select the correct size Oetiker clamp, measure the outside diameter of the hose when installed on the fitting.
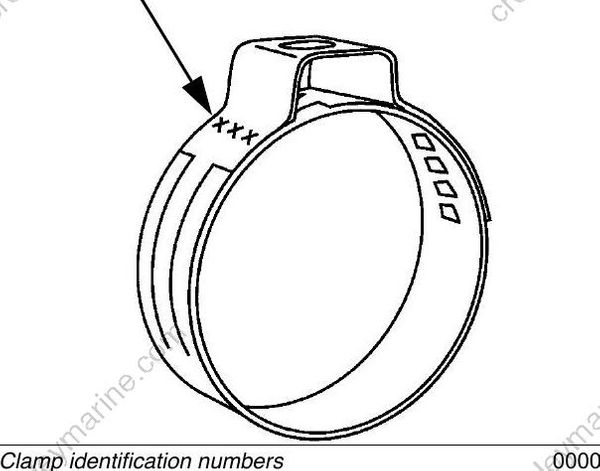
- Clamp identification numbers
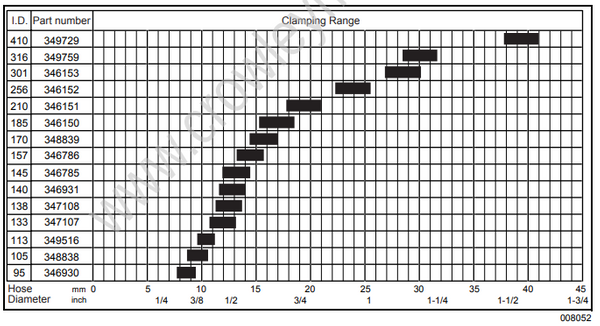
Chose a clamp so that the outside diameter of the hose is approximately in the middle of the clamping range of the clamp.
Clamp Installation
A constant stress should be applied to close the ear clamps. This method ensures a positive stress on the hose and does not result in excessive compression or expansion of the band material.
IMPORTANT: Use only Oetiker recommended tools to close Oetiker stepless clamps.
Oetiker pincers are available in the Evinrude/Johnson Genuine Parts and Accessories Catalog.
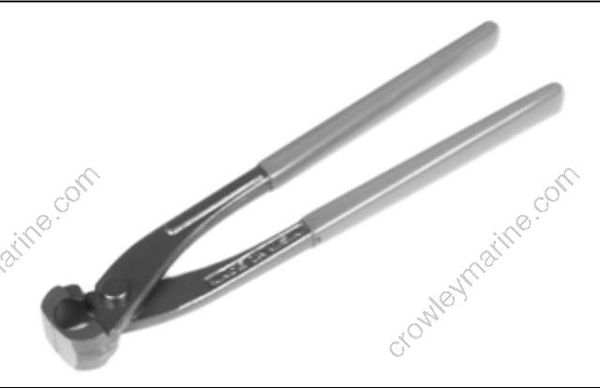
• Position correct size clamp over hose.
• Install hose on fitting.
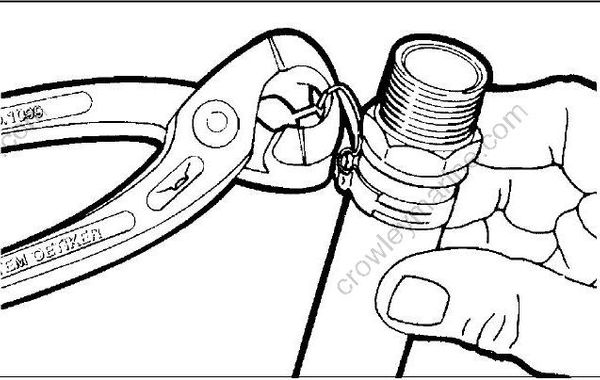
• Close clamp ear fully with Oetiker pincers (pliers).
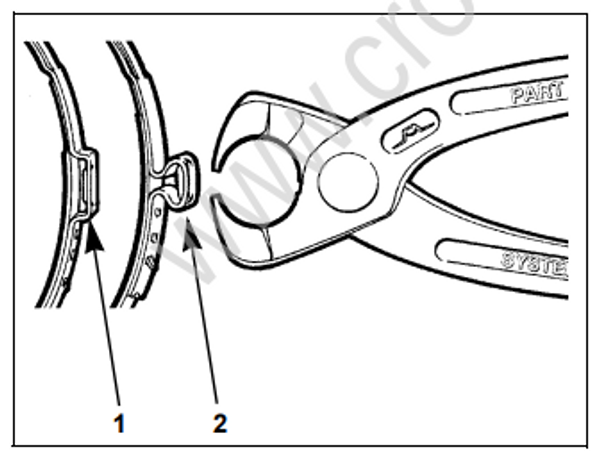
- Open clamp
- Closed clamp
Clamp Removal
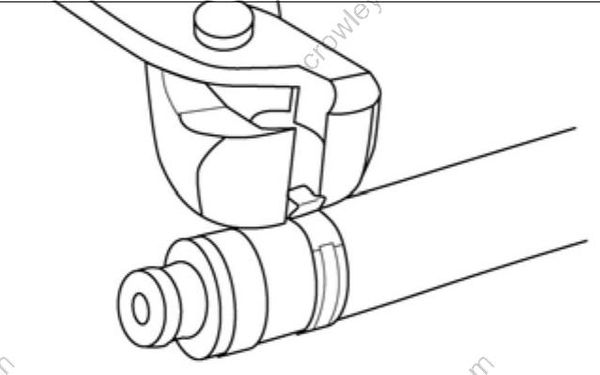
Method 1: Position Oetiker pincers across clamp ear and cut clamp.
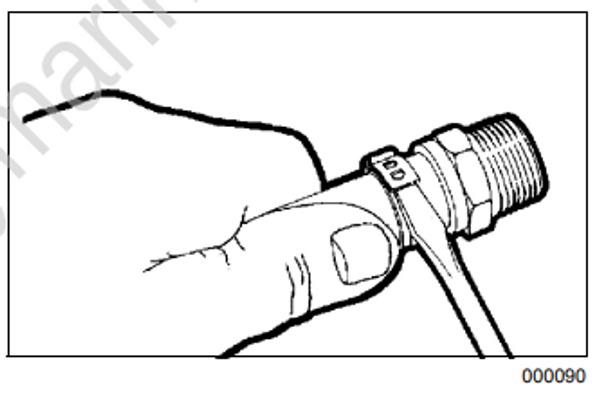
Method 2: Lift end of stepless clamp with screwdriver.
Method 3: Use Oetiker pincers (pliers) to grip clamp. Pull clamp off of connection and discard.