

EXPLODED DIAGRAM
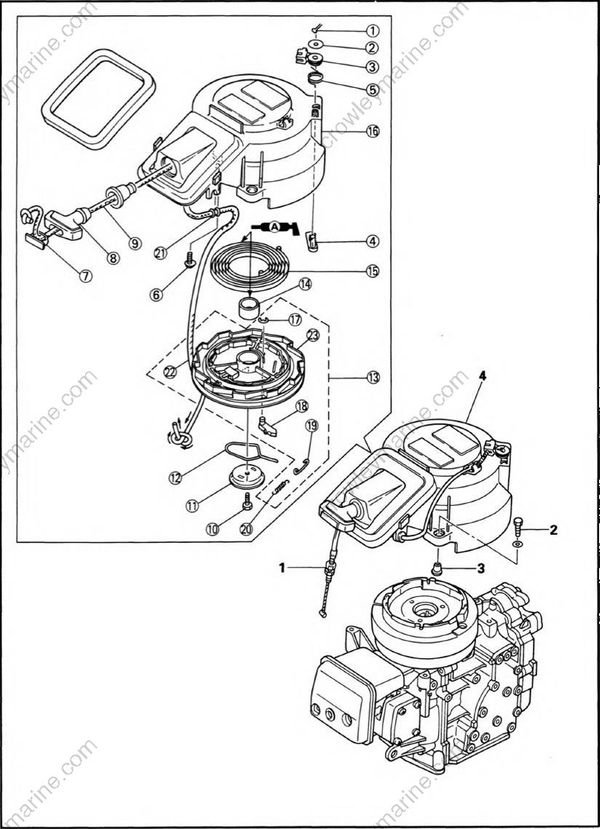
REMOVAL AND INSTALLATION CHART
| Step | Procedure/Part name | Q'ty | Service points |
|---|---|---|---|
| RECOIL STARTER REMOVAL | Follow the left "Step" for removal. | ||
| 1 | Start-in-gear protection wire | 1 | - for start-in-gear protection model |
| 2 | Bolt (with washer) | 3 | 6 x 20 mm |
| 3 | Collar | 3 | |
| 4 | Recoil starter assembly | 1 |
| Step | Procedure/Part name | Q'ty | Service points |
|---|---|---|---|
| RECOIL STARTER DISASSEMBLY | |||
| 1 | Cotter pin | 1 | for start-in-gear protection model |
| 2 | Plane washer | 1 | |
| 3 | Reel stopper | 1 | |
| 4 | Stopper arm | 1 | |
| 5 | Spring | 1 | |
| 6 | Screw | 1 | |
| 7 | Cover | 1 | |
| 8 | Starter handle | 1 | |
| 9 | Starter rope | 1 | |
| 10 | Bolt (with washer) | 1 | |
| 11 | Drive plate | 1 | |
| 12 | Drive pawl spring | 1 | |
| 13 | Sheave drum assembly | 1 | NOTE: |
| Position the inner end of the spiral spring on the retainer post of the sheave drum. | |||
| Wind up the spring 2-1/2 turns counter clockwise with the starter rope. | |||
| 14 | Bushing | 1 | |
| 15 | Spiral spring | 1 | |
| 16 | Starter case | 1 |
| Step | Procedure/Part name | Q'ty | Service points |
|---|---|---|---|
| SHEAVE DRUM DISASSEMBLY | |||
| 17 | Circlip | 1 | |
| 18 | Drive pawl | 1 | |
| 19 | Spring | 1 | |
| 20 | Return spring | 1 | |
| 21 | Rope guide | 1 | |
| 22 | Starter rope | 1 | NOTE: |
| Wind the rope 2 turns around the sheave. drum. | |||
| 23 | Sheave drum | 1 | |
| Reverse the removal steps for installation. |
SERVICE POINTS
Sheave drum removal
1.Turn:
- Sheave drum (1)
Turn the sheave drum clockwise until the spiral spring is free.
NOTE:
- Turn the sheave drum so that the cutaway on the outer surface of the sheave drum faces toward the starter handle.
- Pass the starter rope through the cut.
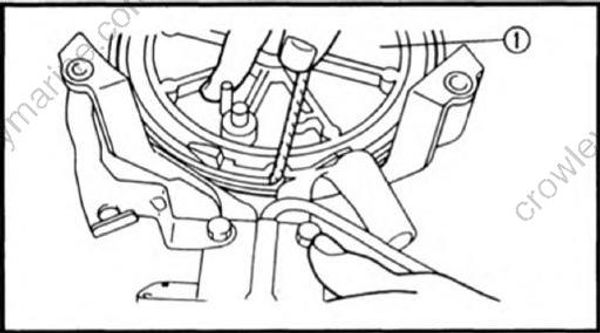
- Remove:
- Sheave drum
WARNING:
When removing the sheave drum, be sure to turn the sheave drum upside down to prevent the spiral spring from popping up at you.
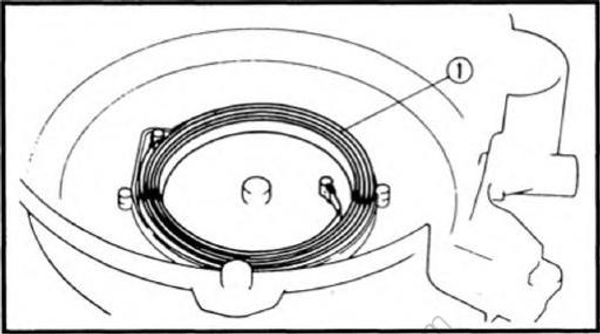
Spiral spring removal
- Remove:
- Spiral spring (1)
WARNING:
Be careful so that the spiral spring does not pop out when removing it. Remove it by allowing it out one turn of the winding each time.
Starter stopping plunger inspection
- Inspect:
- Starter stopping plunger
Crack/Wear/Damage -> Replace
Drive pawl and spring inspection
- Inspect:
- Drive pawl
Crack/Wear/Damage -> Replace. - Drive pawl spring
Broken/Bent/Damage -> Replace.
Bushing inspection
- Inspect:
- Bushing
Crack/Damage -> Replace.
Sheave drum inspection
- Inspect:
- Sheave drum
Crack/Damage -> Replace.
Spiral spring inspection
- Inspect:
- Spiral spring
Broken/Bent/Damage ->Replace.
Starter rope inspection
- Inspect:
- Starter rope
Fray/Wear/Damage -»Replace.
NOTE:
When replacing the rope, cut it to the specified length and burn the rope end so that it will not travel.
Starter rope length: 1,800 mm (70.9 in)
Recoil starter checking
- Check:
- Starter operation
Rough operation —> Repair.
