

Maximum Capacity
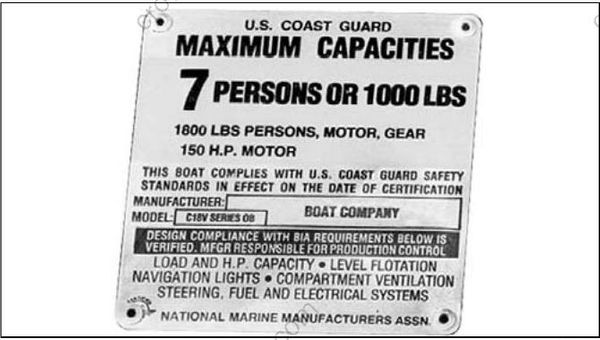
Do not overpower the boat by installing an outboard that exceeds the horsepower indicated on the boat’s capacity plate. Overpowering could result in loss of control.
Before installing outboard:
• Refer to the boat manufacturer's certification label for maximum horsepower rating.
• Refer to ABYC Standards to determine the maximum horsepower capacity for boats without certification labeling.
Mounting Surface
Inspect transom surface prior to drilling mounting holes.
• The transom should meet ABYC Standards.
• The transom must be flat.
• The transom angle should be approximately 14 degrees.
• Check transom strength and height.
The stern brackets must contact the flat surface of the transom. Modify trim that prevents the stern brackets from resting against the transom surface.
Do not modify stern brackets.
DO NOT install an outboard on a curved or irregular surface. Doing so can wear, bind, and damage components, causing loss of control.
Transom Clearances
Make sure the transom and splash well area provide adequate clearances:
• The top edge of the transom should be wide enough to allow full steering travel. The ABYC standard for most single outboard installations is 33 in. (84 cm).
• Check cable and hose routing clearances.
• Make sure there is clearance for mounting bolts and washers. Check the inside area of the transom for obstructions before drilling holes.
Water Flow
Inspect the hull area directly in front of the mounting location.
• Boat-mounted equipment should not create turbulence in the water flow directly in front of the outboard's gearcase. Turbulence or disruptions in the water flow directly in front of the gearcase will affect engine cooling and propeller performance.
• Avoid locating outboard centerlines within 3 in. (76 mm) of bottom strakes on dual-outboard installations.
Transom Brackets
When mounting an outboard on a transom bracket:
• Refer to the manufacturer's recommendations for maximum weight and horsepower.
• The transom bracket must provide a rigid, one piece mounting assembly—either a solid surface, or surfaces adequately connected to prevent flexing or twisting.
IMPORTANT: Damage caused by use of an inadequate transom bracket or unstable mounting surface will not be covered by warranty.
Whenever possible, use mounting hardware supplied with the outboard to install transom bracket on the transom. Tighten all fasteners to specified torque values.
To prevent damage to outboard, check installation frequently for:
• Loose mounting bolts and nuts
• Loose tilt tube or steering cable nuts
• Elongated mounting holes
• Bent or deformed washers
Replace any hardware that fails to maintain torque specifications.
Mounting Hardware
Use all mounting hardware supplied with the outboard to help ensure a secure installation. Substituting inferior hardware can result in loss of control.
Outboard mounting hardware must meet minimum specifications for material and strength:
• Material: Stainless steel; Group 1,2,3 per ASTM F593 OR Grade A2 per ISO 3506-1.
• Strength: Minimum proof load.
Outboard mounting bolts, backing plates, washers, and nuts are supplied with the outboard. If alternate bolt lengths or replacement parts are required, use only Evinrude/Johnson Genuine Parts.
IMPORTANT: Standard screws offered by local merchants may not provide the high strength required for outboard installations.
